1963 Case 530CK Backhoe/Loader

   / 1963 Case 530CK Backhoe/Loader
  • Thread Starter
#131  
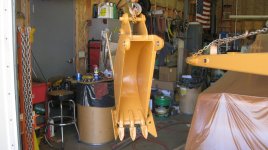
If you have trouble with cleaning out your narrow bucket while dumping I've seen buckets where the owner has welded a heavy chain inside the bucket. One end gets welded on just behind the teeth and the other end close to the top where the pins are. The idea is that the chain is long enough to lay flat against the back of the bucket while digging and then as you dump it's something that helps the dirt to fall out. It's also something to rattle around inside the bucket to encourage the mud to fall out.

Hi pmsmechanic, That's pretty interesting and a novel solution to sticking clay. You know, I have never had too much trouble with material sticking to the inside of that 12" bucket but that's an interesting suggestion. Most of the dirt and clay here where I live is what's known as Caliche. It's so darned hard that it's hard to break through it and it doesn't stick to anything, it's like rock! I came from northern Idaho and the clay there was real bad for sticking in buckets. I remember when I was contracting how much the wet clay mud stuck to everything including my Carhartt pants. Thanks very much for the suggestion, I would be willing to try that!
 
   / 1963 Case 530CK Backhoe/Loader
  • Thread Starter
#132  
I find it helps to not "curl" so much to totally load your bucket. Try to dig flatter (like following the bottom of the trench) as looser material will fill the bucket.

This may seem inefficient as opposed to taking one big scoop while curling but then shaking the bucket to unload is also.

Another thing that works sometimes is stop dipper travel when the bucket is half full. Reverse direction a few inches then continue filling the bucket. This may help alleviate some of the suction in clay.

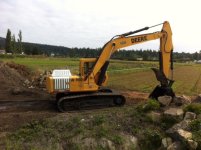
Here's my JD resto. Not as nice as your Case. :)

View attachment 490816

Terry

Hey Big Barn, thanks for the picture of your excavator. And I'll tell you what; it looks every bit as good as my resto! You also had a much bigger job as well.

And your suggestion to not "curl" so much I have tried when digging. You know there are so many little tricks that you learn along the years that a guy adopts and really don't realize you are doing it as you are doing it. I worked around this one operator back in the 70's & 80's and he was just like watching a ballet dancer at work the hoe was just an extension of his hands and arms. I could never hope to work at his level but he taught me a lot over the years...... just watching him as he moved dirt!
 
   / 1963 Case 530CK Backhoe/Loader #133  
Beautiful job! Thanks for taking the time to post your progress through the restoration. I've enjoyed watching it come along and enjoyed your skills as you made the needed parts.
 
   / 1963 Case 530CK Backhoe/Loader
  • Thread Starter
#134  
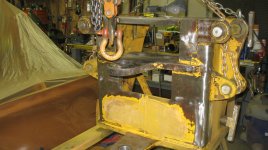
Here are some pictures of the backhoe main frame housing; cleaning, prepping and painting.... My overhead crane was really indispensable for this part of the restore. The metal is so thick and massive that you just can't maneuver it for all the operations that I needed to do, without an ability to lift, swing, tip the part.
IMG_2389_rs.jpg
This is a shot of the housing upside down and I was stripping paint, chasing threads and prepping for later welding.
IMG_2390_rs.jpg
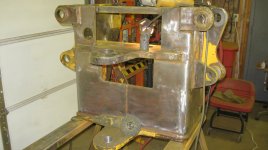
Most of the paint off the sides, then lacquer thinner was applied by rag, to clean any remaining grease and paint dust off. I used these really neat paint removing disks on my 4 1/2" angle grinder. For me, it was less messy than liquid paint remover and faster to remove paint and rust.
IMG_2396_rs.jpg
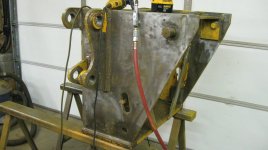
Just a shot of the right side and still upside down.
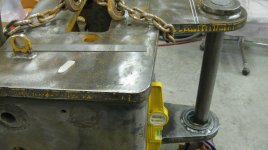
IMG_2417_rs.jpg
Ok, I now have the housing cleaned up and back over behind the tractor, and checking the alignment of the two bores that connect with the tower. Somehow, the upper flat had been bent up and by using a solid straight piece of round 2"bar I was able to see the problem. The lines on the flat shows where I had to heat it, then bend it down for the final alignment. Man that thick iron soaked up the heat. I turned up my largest rose bud tip and it took a long time to get it to a bendable temperature.
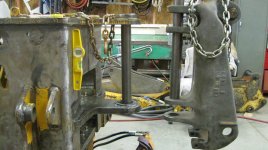
IMG_2421_rs.jpg
This one shows how much it was off. The bottom (self-aligning) bushing was in it's housing and 2'' round bar was about 1/2" off of the bore. I have no idea how you bend an over 1" thick flat stock. It's just that after installing all the new bushings nothing would line up, which means that there was an awful lot of play in all of my connection and now I know why everything was so loose!
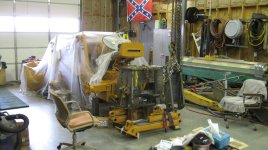
IMG_2422_rs.jpg
This one is just for perspective, show how I was using the crane to align parts.
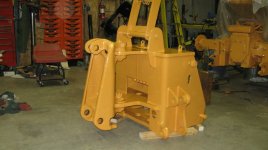
IMG_2552_rs.jpg
After machining the pins, bushings and such I now have the right tension set on the bottom pin-bolt and it really rotates nice!
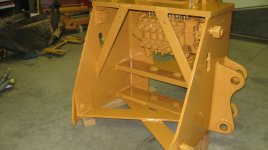
IMG_2555_rs.jpg
Got the valve body cleaned, painted and bolted up, ready for the levers.
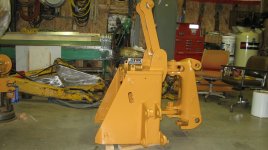
IMG_2559_rs.jpg
This is a good angle of the boom holder that I designed and fabricated. It really came in handy as a crane connection for moving this part around. It made it so that I didn't have to scratch paint with my lifting chains as I was positioning the heavy thing.
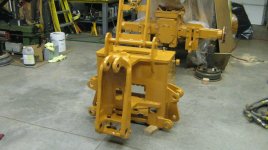
IMG_2575_rs.jpg
This picture is just showing it's time to hook it up with the docking bars on the tractor.

I've got several more posts that I'm working on to show you guys before I make may final presentation and maybe I'll still get another one out later today, thank you all again.....
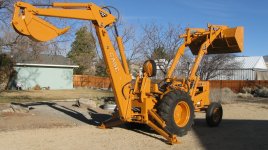
 
   / 1963 Case 530CK Backhoe/Loader #135  
Thanks! I've really enjoyed following this thread.
 
Last edited:
   / 1963 Case 530CK Backhoe/Loader
  • Thread Starter
#136  
Thanks! I've really enjoyed following this thread.

Thanks Terry, I'm glad that you find it entertaining and hopefully helpful.......

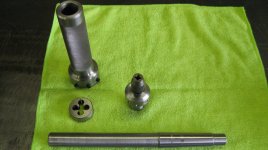
I thought maybe I would include a post on one of the tools that I machined to help me with my threading. As I got into this project I found that I needed more than one threaded rod, so out of necessity I made this. I was looking all around the internet and found several designs for threading rod stock. Kind of copied the principal from a site that was selling them complete, but since I have several different diameters of dies I decided to make my own to accommodate my needs . I had a bunch of round bar of different diameters laying around from extra stock that I was using for pins and so I made the various parts:

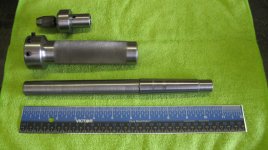
IMG_2599_rs.jpg
This will give you a idea of the size of the rod threader. The main shaft, just North of the ruler, has a taper machined on it to insert into my tailstock on the lathe, which is a #3 Morse taper. The handle and fitting just above the main shaft is what holds either the die or tap. And the last piece above the handle is the adapter for holding the different taps.

IMG_2602_rs.jpg
The handle is now mated over the main shaft and will slide back and forth for about 5" and still be contained and not fall off the shaft.

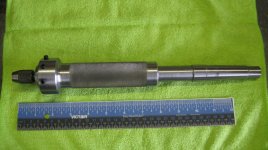
IMG_2603_rs.jpg
Now all of the parts are together so you can see how it is set up when in operation. A guy can then slide the handle with the insert and die into a pre- bored hole mounted in the lathe as it is spinning. You then grasp the handle and hold it while the lathe turns and go as deep as you want until either the depth that you are threading has been reached or until it gets too hard to hold. Just release the handle and it will continue to spin on the main shaft but because it is spinning without resistance now nothing is damaged. You then reverse the lathe, hold onto the handle and back it off until you are completely out of the bore. When you thread a piece of rod, that same principal applies. All you have to remember is to release the handle and you won't get wound up in it. The knurling on the handle helps a lot with oily hands.

IMG_2606_rs.jpg
Just a final shot to show the inserts (die, tap) that can be used. I can thread anything between 6-32 (all metals) to about 1/2x13 threads both course and fine. I made a hex insert that will hold my metric 6 sided set as well. By the way, I thought you should be aware that hand driven threading only works for 5/16" rod stock and smaller, anything above that I mount a lever into the handle and let the handle ride on my lathe carriage to protect my hands.

I've got a cylinder insert that I designed and fabricated to press dents out from the inside of a cylinder that I'll do a write up and pictures. Thanks.
 
   / 1963 Case 530CK Backhoe/Loader #137  
That is a tremendous amount of work with great pictures.:thumbsup:
 
   / 1963 Case 530CK Backhoe/Loader #139  
Hi Stans1

Awesome write-up. I will be replacing the upper and lower bushings in my 1961 Case Backhoe, model 42, and in my service manual the self-centering bushing you refer to is called a "Pivotal Ball Type Bushing". These terms are new to me. I quoted the paragraph where you state you were fortunate to find a replacement bushing. Would you have a part number for it and location where you bought it? I rebuilt my case-o-matic and learned a lot about that if you are in need of any details about that.

"Here are the finished products and you can see how they compare with the old worn out pins. Also you can see how broken the self-centering bushing housing was that I removed from the frame. The new one is to the left of it for comparison. I felt real fortunate to find a new replacement bushing, because I don't think they use that type of bushing any more in the newer hoes and that's something that I could never have manufactured!"
 
   / 1963 Case 530CK Backhoe/Loader
  • Thread Starter
#140  
Hi Stans1

I will be replacing the upper and lower bushings in my 1961 Case Backhoe, model 42, and in my service manual the self-centering bushing you refer to is called a "Pivotal Ball Type Bushing". These terms are new to me. I quoted the paragraph where you state you were fortunate to find a replacement bushing. Would you have a part number for it and location where you bought it?

Hi Cariboo4x4,
Thank you for the kind words, here is the part referenced in my post:

D2361 New Case Dozer 115B 115C 115D 115E 115G Self Aligning Bushing | eBay

I'll give you more information tomorrow, stans1
 

Tractor & Equipment Auctions

KUBOTA RTV X1100C UTV (A51406)
KUBOTA RTV X1100C...
2013 CAT 950K WHEEL LOADER (A50854)
2013 CAT 950K...
2012 MACK GU713 DUMP TRUCK (A51406)
2012 MACK GU713...
2017 Rogator RG1300B Dry Fertilizer Applicator (A51039)
2017 Rogator...
2006 International 4400 LP Crew Cab Heavy Haul Truck Tractor (A49461)
2006 International...
2006 International 4400 LP Ambulance (A50323)
2006 International...
 
Top