Surface prep... sandblast vs. grind?

   / Surface prep... sandblast vs. grind? #21  
I wish there was a similar sand blasting facility around here. I have been all over the S East and dont think I have ever seen such a facility that would rent the baster and a place to work. Seen plenty of large blasting businesses, but no diy places.

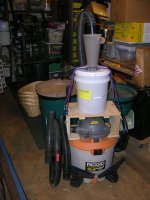
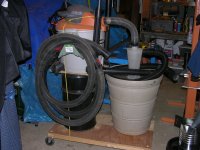
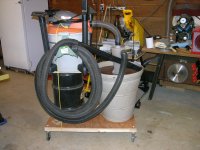
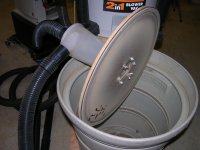
I have one of those small blasting cabinets to glass bead small parts, I dont have the cfms to to do any big blasting projects.

We have one of those DIY blast shops that opened up two or three years ago. They had good reviews and customers seemed to like the atmosphere and experienced support.

I decided to drop in and check it out for a project I had in mind. It was located in a semi industrial part of town with the 3 or 4 dedicated parking spots in front of their shop occupied. On street parking was minimal in a neighbourhood known for hookers and drug dealers.

Since I couldn't even find a spot to park I couldn't really see a future for me there. I ordered my own blast cabinet that week.

Terry
 
   / Surface prep... sandblast vs. grind? #22  
Here is a pic of my setup. Lots of mods to the HF cabinet thanks to Tacoma Company. But overall idea is portable and transferrable dust collection. The dust deputy mounted on a sealed bin above my shop vac. Welded up a light weight support frame and all on casters. Basically a pre filter before my vac. Probably worth a separate thread if folks interested but I can move this between tools. Blast cabinet, miter saw, router table, etc. I also have a dust collector (in the background) that is soft plumbed to my table saw and jointer, and with a bit of finesse, my wood planer.

If you have your answer on weld prep, why not treat us to a more detailed description of your blasting and dust collector set up. I'm intrigued. Can you recycle the media using this set up?
 
   / Surface prep... sandblast vs. grind? #23  
Powder coat to me is the worst coating as it flakes and rust forms under 'til the finish comes away is small sheets just like the old style automotive undercoatings did.

Powder coating is 90% prep. Get the prep and curing right and you will not have these sort of issue. Short change the prep or the curing cycle and it will come off.
 
   / Surface prep... sandblast vs. grind? #24  
I have a 350 lbs. pressure pot with a 200 cfm compressor, so we do most of our own blasting.

There is a local commercial blaster that runs dual 7500 cfm compressors with 5 pots that probably 3 tons each. It's not a DYI operation and there standard is $100 an hour, which it's bad when you consider how much they can blast in an hour.

The only problem is they blast at high pressure, so you have to be careful what you take them.
 
   / Surface prep... sandblast vs. grind?
  • Thread Starter
#25  
Powder coating is 90% prep. Get the prep and curing right and you will not have these sort of issue. Short change the prep or the curing cycle and it will come off.
I agree with you here... prep is key. Cure ramp and dwell temp/time matters too.
 
   / Surface prep... sandblast vs. grind?
  • Thread Starter
#26  
I have a 350 lbs. pressure pot with a 200 cfm compressor, so we do most of our own blasting.

There is a local commercial blaster that runs dual 7500 cfm compressors with 5 pots that probably 3 tons each. It's not a DYI operation and there standard is $100 an hour, which it's bad when you consider how much they can blast in an hour.

The only problem is they blast at high pressure, so you have to be careful what you take them.
Yikes... that is serious blast pressure and flow. :shocked: I imagine you can do some damage easily if you aren't careful.
 
   / Surface prep... sandblast vs. grind?
  • Thread Starter
#27  
If you have your answer on weld prep, why not treat us to a more detailed description of your blasting and dust collector set up. I'm intrigued. Can you recycle the media using this set up?
IT, sorry for the delay... on a biz trip this week. Here is an overview of the blast cabinet mod and dust collector build.
First I bought an upgrade kit from The Tacoma Company. Mike and company are a small private company and were great to deal with. Mike spent time on the phone with me explaining sand blasting and what/why his upgrade kit significantly improves the HF cabinet. He has several options and the website doesn't do a bit of good for you but if you call, be prepared for a nice discussion to figure out what is best for you. Mike knows his stuff. You have to call. I will say also that there are lots of youtube videos on modding the HF blast cabinet. I thought about making a video and might still someday but I don't get paid for that like most of those that put out regular videos so unless I got something unique I leave it for others.

IMG_9478.jpg IMG_9479.jpg IMG_9489.jpg

First thing I did is cut down the rack inside the cabinet to increase the workspace volume. Again lots of youtube vids on that. Second, I built a stand for a Rigid shop vac and purchased the 'Dust Deputy' and a sealable container to mount it on. Space is a premium in my shop so I built a rack on casters that carries the dust collection system. This plugs into the cabinet such that when I turn on/off the light in the cabinet the vac turns on... and off after a 5 second delay (to clear the line).
 
   / Surface prep... sandblast vs. grind?
  • Thread Starter
#28  
The little Dust Deputy was a bit disappointing when I pulled it out of the box. It is tiny and expensive for the plastic molded funnel. But once in operation, it surprised me.

IMG_9481.jpg IMG_9488.jpg

One thing that is changed plumbing wise is the air intake and exhaust are switched to create more logical flow in the cabinet. The back is now the exhaust and the side is now the draw.

IMG_9491.jpg IMG_9487.jpg

The beauty of the system is the foot pedal control and the recycling method of the media. Instead of having to use 'tons' of media, the grit flows through the bottom and outside the cabinet as more of a gravity feed instead of the stock pick up tube. Much more efficient.

The foot pedal is more more ergonomical than the trigger squeeze on the OEM gun. The other gigantic improvement is the lighting. The OEM little fluorescent light is worthless. That has to go. The two halogen floods are super bright and provide heat and drying keeping the media from wanting to clump and clog.
 
   / Surface prep... sandblast vs. grind?
  • Thread Starter
#29  
The other key features are the gun and the pressure regulator mounted on the unit.

IMG_9485.jpg IMG_9486.jpg

The gun is designed more like a pen than a pistol this improves the flow as the media and air are more inline and along with the gravity feed vs. a pick up tube that tends to clog, means you can run the system at much lower psi. This is huge! About 40-45psi instead of 90+psi. So much easier on your compressor and duty cycle.

As I said before, this probably deserves its own thread but since this is a welding thread in a tractor forum I will end it here but definitely let me know if you have questions or comments. I made a few other mods but I will leave those alone for now. I absolutely love my set up now. Keep in mind I put three times as much money into the mod than I did the original purchase. :ashamed: but it was worth it.
 
   / Surface prep... sandblast vs. grind?
  • Thread Starter
#30  
I just realized I didn't answer the question I think IT had on recycling the media... The media is recycled in the cabinet and the dust collection sucks the very fine dust but does not vacuum the 'good' media from the cabinet. The intake vent is adjustable and there are baffles on the intake and outtake to regulate the 'negative' pressure in the cabinet. The dust deputy 'cyclone' action causes 99.9% (and I am not exaggerating) of the dust to drop out in the upper canister before it reaches the pleated paper filter. After running this for several hours of blasting, I barely have any dust in the shop vac and the filter still looks clean.

One of the big problems with shop vacs is the filter and how fast it clogs. The Dust Deputy pre filtering system solves that problem. There are youtube videos on this as well showing the effectiveness. I was skeptical but now I am a believer.
 
   / Surface prep... sandblast vs. grind? #31  
Nice job on the mods.
 
   / Surface prep... sandblast vs. grind? #32  
Yikes... that is serious blast pressure and flow. :shocked: I imagine you can do some damage easily if you aren't careful.

Yeah, we had them to blast aout 300 mild steal parts for us one time (thought we were getting ahead), but after getting the first batch out of the oven we had dirt in the powder. We couldn't figure out where it was coming from.

We checked everything and finally figured out what was going on. Some of the sand was actually inbedded in the parts. You could not see or feel it, but once the parts got hot it would work it's way out and get under the power. That was a mess.........
 
   / Surface prep... sandblast vs. grind?
  • Thread Starter
#33  
Yeah, we had them to blast aout 300 mild steal parts for us one time (thought we were getting ahead), but after getting the first batch out of the oven we had dirt in the powder. We couldn't figure out where it was coming from.

We checked everything and finally figured out what was going on. Some of the sand was actually inbedded in the parts. You could not see or feel it, but once the parts got hot it would work it's way out and get under the power. That was a mess.........
I can totally relate to your situation.

My company makes specialty fasteners out of metals and composites generally for aerospace. They are often adhesively bonded and contamination in processing is always a concern. Seems easy to avoid but when things go wrong it can be surprisingly hard to troubleshoot and find what is causing the problem. Manufacturing in clean environments is not easy but for critical applications it is a must.
 
   / Surface prep... sandblast vs. grind? #34  
Thanks Dragoneggs. Lots to review and ponder. I had never realized how extensive the possible modifications were for the simple HF blast cabinet.
 
   / Surface prep... sandblast vs. grind?
  • Thread Starter
#35  
Thanks Dragoneggs. Lots to review and ponder. I had never realized how extensive the possible modifications were for the simple HF blast cabinet.
Yeah there's a few more I didn't show... the cut down the mesh rack inside and adding a couple support braces for heavy items such as old bench vises. A variable intake vent. Bending down the sill below the door to eliminate a resting spot for the media. Using Click Bond nutplates and Tee screws for quick and easy viewing glass replacement... and... still to go, leg extensions w/castors (I'm 6'2" and want it raised about six inches so I'm not as hunched over.

I'm a mod kinda guy so most of my stuff gets tweaked soon out of the box. Another case it point was adding a air/hydraulic jack to my HF 20ton press!
 
   / Surface prep... sandblast vs. grind? #36  
"I'm a mod kinda guy so most of my stuff gets tweaked soon out of the box. Another case it point was adding a air/hydraulic jack to my HF 20ton press! "

Mark, I knew there was a reason we seemed to get along - my friends kid me about not owning anything I haven't modded, but when they get stuck figuring things out guess whose phone rings :laughing:

Another cyclone convert here, I have 2 of the plastic ones in service and a small steel one in (delayed) process for "grind shack" duty, plus I modded my Jet dust collector with their larger "super dust deputy" - I haven't changed a filter (or even LOOKED into either shop vac) in a few YEARS. I figure I'll KNOW when that's necessary when I DON'T have suction...

I did, however, learn one important caveat on the FIRST cyclone/shop vac - do NOT try to suck up styrofoam packing peanuts or you WILL be opening the vacuum itself :confused: - anything that has more surface area than mass is NOT your friend here...

I've looked at the HF cabinet for a blaster, but depending on circumstance I might just use a free diesel tank I got (about 200 gallons or more) - it's an oval tank so I'd probably cut it about in half leaving upper and lower "U-shaped" halves, grating in center, top hinged with gas shocks so I could load it with a fork lift without damaging the cabinet - (I may actually LIVE long enough to get to THAT project :rolleyes: )

Anyway, here's a few pics of the cyclones I'm using ATM; sorry for the "semi-hi-jack"... Steve
 

Attachments

  • DSCN0823.JPG
    DSCN0823.JPG
    1.2 MB · Views: 131
  • DSCN1872.JPG
    DSCN1872.JPG
    598 KB · Views: 111
  • DSCN0781.JPG
    DSCN0781.JPG
    1.2 MB · Views: 114
  • DSCN0806.JPG
    DSCN0806.JPG
    1.2 MB · Views: 117
  • DSCN0811.JPG
    DSCN0811.JPG
    618.7 KB · Views: 97
  • DSCN0779.JPG
    DSCN0779.JPG
    1,008.9 KB · Views: 114
   / Surface prep... sandblast vs. grind?
  • Thread Starter
#37  
Wow Steve.... you have a cyclone arsenal! They do perform incredibly! Thanks for the tip on the styrofoam I can see how they wouldn't work so well in the 'storm'. :D

Back to the blasting for welding... just one more observation. I can really tell the difference with blasting AR400 vs. mild steel! Last night I was using 60grit garnet media and it takes at least twice the time and I was still getting a blotchy finish rather than a consistent dull battleship gray. I'm assuming the hardness is the culprit. Anyone else notice this??? Wonder if coarser grit is the answer on harder materials. I suppose I could turn up the psi some as well.
 
   / Surface prep... sandblast vs. grind? #38  
Not surprised on the AR plate - 'bout 12-13 years ago when I bought my 580, it had been "rode hard and put away wet" - sent it out for some of the repairs, and while it was gone I worked on the 2' bucket - PO had lost teeth and kept digging, so NONE of the 4 weld-on shanks would hold a tooth, they'd just "roll off" - I noticed the newer 2' buckets had FIVE teeth, figgered I'd upgrade/repair, so bought 5 new weld-on shanks and teeth, - my old (always hated) Crapsman 7' grinder decided to die when I put a 9" pipe wheel on it to clean out as much of the welds as possible (no plasma at that time) - Crapsman started slowing down, I got even MORE pissed so LEANED on it, working on a holiday weekend, getting dark, finally it got REAL dark as the Crapsman gasped its last -

No REAL tool stores open on a holiday, but HD had a 9" Hitachi (still got it, it's now a coin toss as to which of us is more "manly") :D

Finished up the tooth replace, noticed the wear strips on the bucket were semi-imaginary so called up my steel supplier and ordered 4 strips of 1/4x3"x32" AR400 - they cut from a "master plate", at that time it was plasma cut, and I didn't like the slightly rough edges on those strips 'cause I KNEW I'd find 'em with a bare arm when walking behind the hoe in a T shirt, so decided I'd just "break" the edges before I welded 'em on with 7018...

2 edges per strip, 15 amp grinder with 7" NEW disk, each EDGE of each strip took me about 30 minutes just to put a SLIGHT bevel on it.

Fast forward about 12 years and those strips have a "patina", but otherwise look like I just put 'em on...

I'm actually kinda surprised you EVER got anywhere with the blaster... Steve
 
   / Surface prep... sandblast vs. grind?
  • Thread Starter
#39  
I'm actually kinda surprised you EVER got anywhere with the blaster... Steve
Well actually I probably understated the time and effort... to save embarrassment I suppose. :ashamed: :laughing: My crappy plasma cut edge (due to power reasons already discussed) on the AR400 said absolutely NO to my grinders. Sure wish I would have made a cleaner cut to begin with... :smiley_aafz:
 
   / Surface prep... sandblast vs. grind? #40  
Back here
http://www.tractorbynet.com/forums/build-yourself/376766-cutting-down-back-blade-good-4.html
texasranger556 suggested using one of the HF magnetic tool holders as a guide - at the time I thought "he didn't read the part about the CURVED surface - but I "filed it away for later" - today I was making a 2.5x as thick "deck skirt" for my Cub RZT 50 (thread likely in next few days) so I thought I'd try his idea (he also has a PM45) - for straight cuts on FLAT material (up to about 14" per tool holder) I was AMAZED -

Those SPECIFIC ones have a curved channel with magnets glued inside, and they're enameled - as it works out, if you hold the nozzle of the PM45 torch up against that curve, it puts the tip less than 1/16" off the surface AND gives you that smooth enameled surface to drag on. Smoothest NON-wheelie cuts I've made in a LONG time...

When I post my deck repair thread it'll be clearer what I meant by "non-wheelie"... Steve
 

Tractor & Equipment Auctions

2022 Dodge Ram 4500 Miller 8,000lbs Wrecker Tow Truck (A59230)
2022 Dodge Ram...
(INOP) 2016 CATERPILLAR 259D SKID STEER (A60429)
(INOP) 2016...
Informational Lot - Financing (A56438)
Informational Lot...
JOHN DEERE 330G SKID LOADER (A58214)
JOHN DEERE 330G...
(2) UNUSED 320/85R24 TRACTOR TIRES / WHEELS (A57192)
(2) UNUSED...
2003 Big Tex 10PI 16ft. T/A Pipe Top Utility Trailer (A55973)
2003 Big Tex 10PI...
 
Top