Forum for air cooled diesel engines and clones

   / Forum for air cooled diesel engines and clones
  • Thread Starter
#321  
Dumb question - how do you separate the generator from the engine? I got the big main bolt that runs through the rotor out, loosened the 4 long external bolts that seem to hold the stator to the front cover that bolts to the engine. But nothing seems to be coming loose? It's 7 degrees out in the barn right now, so I'm trying to be careful not to break anything, lol. Am I missing something other than a bigger hammer? Any parts diagrams anyone has would be helpful and much appreciated!

TIA...[/QUOTE

Not a dumb question!!

To seperate the generator from the engine first remove the outer (external) generator housing to expose the rotating Field unit.
Then remove the center screw that secures it to the engine crankshaft, the OD of the bore you removed the long bolt from should be threaded.
Now find a screw that has the same thread as the long screw up hat was previously removed and cut a threaded section to insert into the crankshaft to protect the internal threads and provide a surface to push on. Cut a slot on it to slow you to thread it into the crankshaft and turn it in until it is slightly above flush.
It the OD previously mentioned is not threaded you must tap it with a 1/2-20 tsp to allow use of a 1/2-20 screw to use as s pushed device.
With the insert threaded into the crankshaft cut a length of solid rod as a spacer that can be inserted in the hole so you can use the 1/2-20 screw can to push the unit off the crankshaft.
Use caution this process could take time and require some shock with s hammer and possibly some heat.
Seperating them can be very difficult and time consuming to avoid damage.
My personal unit was not tapped which required me to do and took considerable time and force to separatem from the crankshaft.

Be patient.
90cummins
 
   / Forum for air cooled diesel engines and clones #322  
Thanks for the help "90", but I think your detailed response indicates my question was indeed a dumb one, lol, as I'm stuck on your first sentence: "first remove the outer (external) generator housing to expose the rotating Field unit." I've got the long center bolt out, although it sounds like maybe I should reinstall that until I have the "outer cover" (what I called the "stator") off?

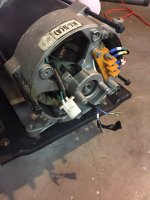
Are the four long bolts the only thing that holds the outer cover (what I called the "stator") on? (The picture below shows 3 backed out, but I've got all four loose.) I couldn't see anything else holding it on, but it didn't want to budge and I didn't want to use too much force until I knew I had all the required fasteners loose. From your description it would seem the silver colored cast end housing and the black metal outer cover should just slide off revealing the rotor/rotating part still fastened to the crankshaft? Once I have it to that stage the rest of your directions make sense!

Thanks,
- Jim

GeneratorDisassembly.jpg

Dumb question - how do you separate the generator from the engine? I got the big main bolt that runs through the rotor out, loosened the 4 long external bolts that seem to hold the stator to the front cover that bolts to the engine. But nothing seems to be coming loose? It's 7 degrees out in the barn right now, so I'm trying to be careful not to break anything, lol. Am I missing something other than a bigger hammer? Any parts diagrams anyone has would be helpful and much appreciated!

TIA...[/QUOTE

Not a dumb question!!

To seperate the generator from the engine first remove the outer (external) generator housing to expose the rotating Field unit.
Then remove the center screw that secures it to the engine crankshaft, the OD of the bore you removed the long bolt from should be threaded.
Now find a screw that has the same thread as the long screw up hat was previously removed and cut a threaded section to insert into the crankshaft to protect the internal threads and provide a surface to push on. Cut a slot on it to slow you to thread it into the crankshaft and turn it in until it is slightly above flush.
It the OD previously mentioned is not threaded you must tap it with a 1/2-20 tsp to allow use of a 1/2-20 screw to use as s pushed device.
With the insert threaded into the crankshaft cut a length of solid rod as a spacer that can be inserted in the hole so you can use the 1/2-20 screw can to push the unit off the crankshaft.
Use caution this process could take time and require some shock with s hammer and possibly some heat.
Seperating them can be very difficult and time consuming to avoid damage.
My personal unit was not tapped which required me to do and took considerable time and force to separatem from the crankshaft.

Be patient.
90cummins
 
   / Forum for air cooled diesel engines and clones
  • Thread Starter
#323  
The outer housing is attached to the engine with 4 screws. Remove those and the housing can be removed.
The long screw holds the rotating Field unit on the crankshaft.
90cummins
 
   / Forum for air cooled diesel engines and clones
  • Thread Starter
#324  
It is a snug fit so use a soft malet to free it.
90cummins
 
   / Forum for air cooled diesel engines and clones
  • Thread Starter
#325  
In your photo where the long screws thread into the aluminum housing there is a notch barely visible that you can use a screwdriver to pry the black housing off.
Work it side to side unti loose and carefully slide it off taking care not to damage the windings.
90cummins
 
   / Forum for air cooled diesel engines and clones #326  
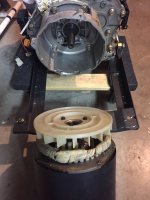
Your descriptions gave me the confidence to get a little more aggressive, and it finally popped apart. It didn't take *that* much force, and mine came apart somewhat differently than you described. The housing and rotor came off as a unit rather than separately. The rear rotor bearing didn't separate from the rear housing.

Thanks for the confidence boost. Now to find out what went "bang" in the engine. I had the head off and there was no sign of traumatic damage to the valves or (top of the) piston. When spinning the crank and watching the valves everything seemed mostly in time, although it's hard to tell exactly. I'm suspecting broken rings or ring lands at this point.

GenSet.jpg
 
   / Forum for air cooled diesel engines and clones
  • Thread Starter
#327  
I've repaired a lot of generators and never had one separate from the crankshaft as easy as yours!!
Now you can dig in and find your clunk.
90cummins
 
   / Forum for air cooled diesel engines and clones #328  
Great timing BeeferMan, I was just about to attempt the same thing on my genset.
Mine seems to be very similar to yours and I spent quite a bit of time looking at it as well to try and figure out how to separate it from the engine, but didn't get far.
I did twist off one of the long screws that holds the housing together, I will have to replace it.

Any chance you could upload a few more pics of how you got it all apart?

xp
 
   / Forum for air cooled diesel engines and clones #329  
Great timing BeeferMan, I was just about to attempt the same thing on my genset.
Mine seems to be very similar to yours and I spent quite a bit of time looking at it as well to try and figure out how to separate it from the engine, but didn't get far.
I did twist off one of the long screws that holds the housing together, I will have to replace it.

Any chance you could upload a few more pics of how you got it all apart?

xp

I can get some pictures later when I get back at the shop if needed, let me try some text first..

There are three main parts involved in this step: 1. The housing that bolts to the crankcase of the motor, which I'll call the front cover. 2. The outer housing of the generator itself, properly called the stator, I believe. This part also includes the rear cover. And 3. the rotating part of the generator, the rotor.

The rotor rotates on a bearing in the rear cover, but has no front bearing - it it bolted to the crankshaft via a long bolt all the way through the rotor shaft and uses the crank bearing in place of a front bearing. Remove that long bolt.

The stator and rear housing assembly are fastened to the front cover by four long bolts on the outside of the stator. You can see those in the picture I put in post #322. Remove those.

A little prying between the stator and the front housing should allow those two to separate slightly, but they may not come apart more than a fraction of an inch at first. Now it seems there are two ways this might come apart.

A. In 90Cummins experience (see his posts) it seems that the rear bearing of the rotor separates from the rear housing, and the rear housing and stator slide off over the rotor leaving the rotor stuck on the crankshaft. Remember there is no front bearing, so take care sliding the stator off the rotor. Then the job is removing the rotor from the crankshaft.

B. In mine, the rear rotor bearing didn't separate easily from the rear housing. With enough prying the rotor eventually separated from the crankshaft, and the stator/rear housing and rotor came away from the front housing as one unit.

A caution: the front and rear housing are cast (aluminum?) of unknown quality, so I'd be very carefully when you're prying or putting pressure on them. Best to pry in a few spots at the same time to reduce the risk of cracking one of the castings.

If this doesn't suffice, ask more questions and I'll get some pictures.

- Jim
 
Last edited:
   / Forum for air cooled diesel engines and clones #330  
Thanks a lot for the pointers, that helps a lot.
I will be trying this in a few days if weather allows.
I twisted one of those long bolts, so the housing has to come out to get the broken piece of the screw out so i can replace it.

xp
 

Tractor & Equipment Auctions

Car Lift (A50121)
Car Lift (A50121)
2019 Fecon BH74SS Hydraulic Mulcher High Flow Skid Steer Attachment (A50322)
2019 Fecon BH74SS...
Deutz 6806 (A50120)
Deutz 6806 (A50120)
Howse 10' 3pt Rotary Mower (A50774)
Howse 10' 3pt...
2-Row Peanut Inverter (Chain Drive, PTO, 3-Point Hitch) (A52748)
2-Row Peanut...
2016 Chevrolet 3500HD (A50120)
2016 Chevrolet...
 
Top