Transfer Screws--Making and Using-Pics

   / Transfer Screws--Making and Using-Pics #1  

npalen

Elite Member
Joined
Nov 17, 2009
Messages
3,601
Location
Beloit, KS
Tractor
Kubota B9200 HSTD and Mahindra 3015
Not sure how many folks have used transfer screws to measure or transfer a hole pattern but here's a little project:
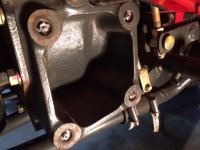
I'm looking at adding a front end loader to my Mahindra 3015 (30HP) and probably going to have to design and make mounting brackets to fit.

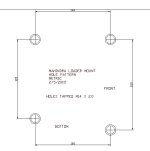
The 4-hole pattern shown in the pic is on the side of the tractor chassis and is one place that the mounting brackets will attach to.
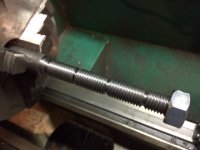
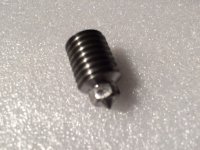
The purpose of making the transfer screws, which are M14 x 2.0 thread, was to measure accurately the hole locations which is not a square pattern.

You may notice the point on the end of the screws which normally creates a center punch mark pattern when a piece of material is held against the screws and hit with a hammer or such.
I simply installed them and then measured the distance between holes. Will probably drill the mating plates on my vertical mill using digital readout.

The long hex piece shown in the link below is actually a wrench for storing the screws inside and installing the screws using the female hex on the end.
I didn't find any transfer screws online to fit a M14 threaded hole so made these on the lathe by single pointing the thread and then milling the hex.

HHIP 361-25 7 Piece Transfer Screw Set 1/4-2: Amazon.com: Industrial & Scientific

Edit: Did a bit more refined search and did find these online. Would have been easier to buy but then I wouldn't of had the fun making them. :)
Apis Inc.
 

Attachments

  • TRANSFER-SCREW-1.JPG
    TRANSFER-SCREW-1.JPG
    78 KB · Views: 373
  • TRANSFER-SCREW-2.JPG
    TRANSFER-SCREW-2.JPG
    154.3 KB · Views: 426
  • TRANSFER-SCREW-3.jpg
    TRANSFER-SCREW-3.jpg
    387.2 KB · Views: 405
  • MAHINDRA-TRANSFER-PATTERN-1.JPG
    MAHINDRA-TRANSFER-PATTERN-1.JPG
    28.9 KB · Views: 334
   / Transfer Screws--Making and Using-Pics #2  
Yep. I have used those several times, and they are very handy. Another way to get the same results in your case, is to screw bolts in the holes and caliper over the outside of them, and subtract one bolt diameter to get the center distance. I have used that method more than the transfer point method in cases like that.
 
   / Transfer Screws--Making and Using-Pics #3  
Why not just hold the paper over the metal and rub the paper with your fingers to create creases where the holes are, along with the edges of the metal? Or fill put in a bolt and add a drop of caulking to the tops of the bolt heads, then put the paper on top of the bolts to transfer the caulking to the paper?
 
   / Transfer Screws--Making and Using-Pics #4  
Nicely done :)

I grew up using gasket material and tapping the edges with a hammer until the hole center fell out.
It's not as precise of course but does tend to work.

The side of a MtDew box works good too ;)
 
   / Transfer Screws--Making and Using-Pics
  • Thread Starter
#5  
You guys are simply too practical. I can tell that none of your are retired and have too much time on your hands. :)
 
   / Transfer Screws--Making and Using-Pics #6  
I use a dab of paint on the bolt to transfer the mark
 
   / Transfer Screws--Making and Using-Pics #7  
Based on your final measurements, I would have put a metric tape up there and read 100mm and 105mm!
You just need to figure out if it was designed metric or sae.
 
   / Transfer Screws--Making and Using-Pics #8  
Very interesting - never done that before! Thanks for sharing.
 
   / Transfer Screws--Making and Using-Pics #9  
Never heard of them before!
I usually measure as best I can, drill it, and if the 3rd or 4th hole need to be wobbled :laughing: I feel lucky if only the 4th hole need to get "wobbled"
I believe "wobble" is a technical term for those without transfer screws, wobbling the drill bit around in a hole to achieve the correct position :D
 
   / Transfer Screws--Making and Using-Pics #10  
Never heard of them before!
I usually measure as best I can, drill it, and if the 3rd or 4th hole need to be wobbled :laughing: I feel lucky if only the 4th hole need to get "wobbled"
I believe "wobble" is a technical term for those without transfer screws, wobbling the drill bit around in a hole to achieve the correct position :D

Thats funny but true
 
   / Transfer Screws--Making and Using-Pics #11  
I've used them, but 30+ year ago. I have a set of transfer punches, I have used those quite a bit.
 
   / Transfer Screws--Making and Using-Pics
  • Thread Starter
#12  
Based on your final measurements, I would have put a metric tape up there and read 100mm and 105mm!
You just need to figure out if it was designed metric or sae.

I probably would have done that also if the bolt pattern was square. Seeing the one bolt "out of position" made me a big leary. The pattern sure looks simple enough now, however.
 
   / Transfer Screws--Making and Using-Pics #13  
My suggestion is the one you began with. I have used the gasket material many times to make a gasket and you can get accurate location for holes using small ball peen hammer, using the ball head.
 
   / Transfer Screws--Making and Using-Pics
  • Thread Starter
#14  
I've used some of the transfer methods mentioned above and they work well and especially efficient for making gaskets.
I'm hoping to go near size on size for extra stability when bolting the loader mounts to the tractor chassis so need the hold locations to be reasonably precise. Press fit dowel pins would be good but doesn't look to be enough "meat" for the dowel holes.
 
   / Transfer Screws--Making and Using-Pics #15  
I've never heard of them before but it looks like they would definately work great for presice hole placement. Thanks for posting them
 
   / Transfer Screws--Making and Using-Pics #16  
I’ve used pretty much all the methods listed here except the screws and none are very accurate. The screws look fast and accurate.
 
   / Transfer Screws--Making and Using-Pics #17  
Those screws look like the best approach, but here's another. After the 1st hole is drilled use a laser pointer to the center of the second hole, then install the plate with the first bolt and mark where the laser point is, remove plate, drill and repeat. I've found this to be very successful, especially since it accommodates any accumulative errors.
 
   / Transfer Screws--Making and Using-Pics #18  
I just drill a small center hole on the head of the bolt in the lathe then measure to the center holes. Have a tram gauge and I used this system to align frame members on a 65 mustang.
 
   / Transfer Screws--Making and Using-Pics #19  
Trick showed to me by an old mechanic.

Place paper or cardboard over the item and use round balls from bearings and gently tap while positioned over the bolt hole.
Lacking steel balls you can even use the round side of a ball peen hammer.

LOL, I have 1/2 and 3/4 old ball bearing balls in my tool box just for that.
Makes for a great transfer method. I've cut many a gasket with that method.

Crude, but also works, is to smear grease on the surface to be copied and gently press a clean sheet of white paper onto the greasy surface.
 
   / Transfer Screws--Making and Using-Pics #20  
I have made them when I was in a pinch or for odd threads but decent hardened ones are pretty cheap.
 

Tractor & Equipment Auctions

2022 Chevrolet 1500 Silverado Crew Cab 4X4 Pick-Up Truck (A59230)
2022 Chevrolet...
Midwestern Industries MEV Screen Model MEV 5X10⁻² (A56438)
Midwestern...
2018 FREIGHTLINER CASCADIA TANDEM AXLE SLEEPER (A59905)
2018 FREIGHTLINER...
Unused 2025 CFG Industrial QH12R Mini Excavator (A59228)
Unused 2025 CFG...
NEW HOLLAND HAY CUTTER (A58214)
NEW HOLLAND HAY...
2015 JOHN DEERE 35G EXCAVATOR (A52707)
2015 JOHN DEERE...
 
Top