Container Weld Shop build -

   / Container Weld Shop build -
  • Thread Starter
#461  
"that looks like a good way to bring stuff in and out of the container, atleast from one end anyways."
Yup, and mine only open on one end so it'll work good for me...

"I'm still not getting the the need for two different size wooden box patterns"

You missed the part where the FAN is 16" square, and the INLET air louver is a 24" square opening

Best way I've found to weld 2 small round rods together like that - take a fairly heavy-walled piece of angle, 2" wide or more and at least 12" long - cut a "window" out of the center by removing the angle part itself, leaving a "corner window" that's about an inch along the length of the angle, and about an inch from the angle's corner - so all that should be left of the angle in that center area would be about half of each SIDE of the angle, but NO CORNER - then hard clamp the two pieces (prepped/beveled, of course)just touching each other in that middle "window", turn the mig down a bit and weld a little on each side, let it cool completely, then 2 more welds 90* from the first ones, let cool, go til it's all done then grind it down as necessary - that's worked pretty well for me... Steve
 
   / Container Weld Shop build -
  • Thread Starter
#462  
Ordered the steel (couple sizes I didn't have in stock) to do the "security bezels" for the vent and fan(s) for all 4 containers today, gets here manana probably mid-afternoon. Before I did that, FORTUNATELY I did a "triple-check" on my plan; found out I had the motorized louvers envisioned BACKWARDS, which would've meant the controller had to go OUTSIDE in the rain in order for the louvers to work :eek:

That "triple check" kept me from ordering about $200 of steel that I MIGHT eventually use, if only 'cause it was on the rack - NOT 'cause it was what I woulda PREFERRED :rolleyes: - so tomorrow, instead of being REALLY cheesed off I might actually get to start cutting parts :thumbsup:

Speaking of which, I finally quit putting it off and ordered one of these
EVO380-Lowes.JPG
The military discount puts that price about $20 less than the saw goes for anywhere else on the net, and it'll come in handy soon since I STILL haven't ordered a new bow for the Jet bandsaw (that'll hafta wait til it's raining again, too much to get done to wanna open THAT can of worms when there's perfectly good project weather :D )

I probably better go ahead and order the other three ventilation kits too, before my "vent guy" forgets he promised me 10% off my NEXT order too :D ...Steve
 
   / Container Weld Shop build - #463  
BukitCase;: Speaking of which said:
566815[/ATTACH]
Steve

Gee and after only three years of researching models and pricing and helping everyone else get theirs!
 
   / Container Weld Shop build -
  • Thread Starter
#464  
Yup, 'bout TIME I put my money where my mouth is - at least I bought the one I recommended, guess I ain't QUITE ready to go into politics :laughing: ...Steve
 
   / Container Weld Shop build - #465  
"You missed the part where the FAN is 16" square, and the INLET air louver is a 24" square opening" <<<<I missed it because I'm still thinking that the fan and louvers are one unit and requires only one pattern, plus I have a slight case of ADD caused by to much lead paint, guess I'll have to wait til you install the two piece pattern louver fan, tomorrow.

I got a Dewalt abrasive saw for Christmas 5 years ago, went through two blades and that's all I wanted, the slowest most useless/unused tool I ever had, it makes too much dust, cuts way to slow, heats the material up way to much, why those things were ever on the market is beyond me. Right now I'm not sure if I want a steel cutting skill saw or a steel cutting chop saw like the one you ordered or a steel cutting band saw, I am leaning more towards the steel cutting skill saw.
 
   / Container Weld Shop build -
  • Thread Starter
#466  
OK, the fan and louvers ARE one unit, when the fan turns on it pushes its louvers open - but unless there's ANOTHER hole to let fresh air INTO the container, the fan would just DEADHEAD and probably burn up after a while - so there is a SEPARATE, BIGGER louver WITHOUT a fan - THAT one goes at the OTHER END of the container and has a little motor that opens THOSE louvers every time the temperature controller (thermostat) turns on - then when things cool down, the controller turns off the fan (and the separate louver motor) and BOTH sets of louvers close.

So, this (intended for greenhouse) ventilation "kit" consists of a dual controller, which runs a louvered fan AND a separate motorized INLET louver - that way, if you mount the fan at the dead end of the container (up high) and the inlet louver at the DOOR end of the container (down low, preferably shaded) you get "flow-through ventilation" -

This particular kit is sized for a greenhouse that is HALF the cubic footage of a 40' container, 'cause they recommend that a greenhouse gets one complete air change per MINUTE - but since I'm NOT planning on growing PLANTS in there (not even the LEGAL kind :laughing:) I figured that one air exchange every TWO minutes should be plenty...

Oh, and I don't think this'll get done TOMORROW - turns out, those "cutting templates" are gonna be the EASIER part of the job. Next, I'll need to make my OWN "un-equal leg angle" out of the 3/16"x6" flat bar I got today, and the 1/4"x2" flat bar I already had - then those will get cut up and made into "window frames" that'll stick out thru the square holes far enough to allow the louvers to open, PLUS enough room for bug screens and security bars (the 24" square holes will be down low, and too easy for trailer trash neighbors to crawl thru if my dobermans don't eat 'em first)

Know whatcha mean about abrasive saws - I had one (ryobi) hated that thing. So when #1 son wanted to use it to fit some pavers in a walkway he was building, I bought him a couple masonry blades for it and told him I never wanted to see it again :thumbdown:

Saws: they each seem to have their strong, weak, and useless points - I have 2 of the 4x6 metal band saws, one's over 30 years old and still going strong; plus the big Jet (gonna be a winter project, replacing that bow means completely disassembling the whole saw ( gearbox, bearings, wheels and bearings, guides, oiler, etc) and putting it all back together with the new bow, then starting from scratch and aligning it to cut true - I'm thinkin' if I don't goof around it'll probly be a 3 FULL day job before it's ready to go again.

I also have the cheapo HF version of the metal cutting skill saw (my local HF carries the metal cutting 7-1/2" blades; add a cheap NORMAL saw and you're sorta there) - it works good for thin stuff, used it (with a piece of straight angle as a guide) cutting 16 and 14 gauge sheets, face shield NOT optional... I went that way 'cause there's NO WAY I'm gonna treat either of my REAL skill saws that way, I use 'em to break down plywood when I don't wanna fight a BIG table saw in a SMALL space...

The "dry cut" saws like I ordered will cut thicker stuff, but do NOT like to cut flat - mine even comes with a angle block so you can cut square tube starting on a CORNER - same with angle (corner goes UP), and flat bar you set on EDGE instead of flat. One of the U-tubes on that saw shows cutting 3/4" x 4" flat bar, and the cut was only about .002" off of dead square.

My Jet saw (when it's workin' right) doesn't care HOW you cut, just so it'll fit in the saw. It's also the ONLY type you can gang cut with - I've cut up to 8 pieces of 2" square tube at a time with it (like when I was making the roof modules for the short container) that way it's easy to have all the "rafters" EXACTLY the same length - I welded those 8'x12' modules up sitting on jack stands (with a few shims, and a REALLY hard-clamped diagonal brace) on the gravel, and when I was done the diagonals measured less than a sixteenth different on all of 'em...

Then there's the portabands - I have the milwaukee, and it's useful for NON-precision stuff that you DON'T wanna drag a whole stick to the saw - with practice I've got where I can cut steel CLOSE to square; so if I need a fairly short, ACCURATE and SQUARE piece of heavier stuff I'll cut it about 1/8" long, then clean that SMALL piece up on one of the bigger saws.

Sooo, manana it's time to put a new blade on the old 4x6 bandsaw and chop up some flat bar - that 3/16" thick stuff is pretty floppy, so I'll bring a couple more roller stands up from the other shop and put one about every 4-5 feet... Steve
 
   / Container Weld Shop build - #467  
"OK, the fan and louvers ARE one unit, when the fan turns on it pushes its louvers open - but unless there's ANOTHER hole to let fresh air INTO the container, the fan would just DEADHEAD and probably burn up after a while - so there is a SEPARATE, BIGGER louver WITHOUT a fan - THAT one goes at the OTHER END of the container and has a little motor that opens THOSE louvers every time the temperature controller (thermostat) turns on - then when things cool down, the controller turns off the fan (and the separate louver motor) and BOTH sets of louvers close."

WELL FINALLY something makes since..................Air outtake requires air intake from other end on the container which is facing the north pole so's to suck in cooler air, think I got it now. In my old shop didn't have to wooooory about air intake, it wasn't insulated and had high walls, not like airtight containers are. Without an air intake the fan might suck that container in like a soda can before the fan burns out. in that case you'd have to add in a pressure switch, you might need one anyways just in case you can't handle the pressure, you gotta watch the pressure, nothing worse than too much pressure.......

PS, you didn't have trouble writing 20 page book reports in school did you...........................I'll have to come back tomorrow.
 
   / Container Weld Shop build -
  • Thread Starter
#469  
Caramba - abla usted espaniel?? (Translation: Holy crap, do you speak "dog"??!? :D:D:D
 
   / Container Weld Shop build -
  • Thread Starter
#470  
Wow, tough room ;)

Oh well, moving on....

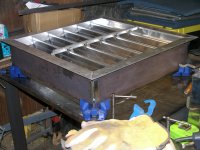
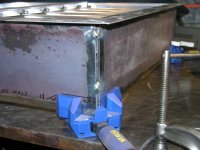
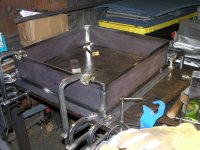
Got a little more done on the bigger louver insert today - a test fit after tacking the 3/16"x6" sides together; if it looks like the corner gap is a bit bigger at the top of the joint than at the bottom, it's 'cause it IS - when I was checking sizes, etc, I didn't notice that the pivot points for each louver stick out about 1/16" past the aluminum frame, so the part of the steel insert where the louvers mount needs to be just a little wider than the rest - too late to start over, so I just clamped the sides a bit further apart at the top before I tacked 'em -
DSCN3403.JPG - it's easier to see in this pic - DSCN3404.JPG
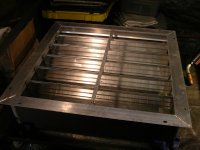
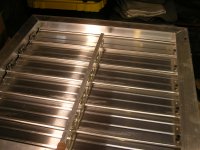
This is what the louvers look like open and closed; that bar down the center gets a spring/chain/actuator motor. Gravity closes, motor opens by pulling the bar downward - DSCN3405.JPG DSCN3406.JPG
The 1/4"x2" mitered flat bar that's clamped to the table will get welded to the vertical pieces, then the whole assembly (minus the louvers til later) gets welded into the hole that'll get cut in the container wall - then, from outside to in will be 1/2" 1018 cold roll rods vertically every 2" across the opening with another welded in the center horizontally (for 2-legged varmints) - inside that will be 1/2" hardware cloth (smaller, 4-legged varmints) then a window screen/frame - the louvers themselves will protrude into that frame by about 4" or so, that's why the 6" sides - otherwise the louvers would hit the screen. DSCN3407.JPG

Then the aluminum framed louvers will get bolted to that 1/4"x2" mitered steel frame, that way I can clean/change/replace louvers if necessary (AND clean the screen), WITHOUT the 2-legged varmints being able to unscrew anything that'll give 'em access.

I'm keeping copious notes on my phone (notepad app) during this "prototype" so hopefully the other 8 (incl. an extra 2' louver for the other shop, to match the exhaust fan I already have in there), won't take much longer for ALL of 'em than this ONE has taken... OK, where's the "dang, I hope I didn't just lie to everybody INCLUDING myself" emoji??!?

Oh, and I'm writing the book itself; it's up to YOU guise to write the book REPORT :laughing: ...Steve
 

Tractor & Equipment Auctions

https://www.accessnewswire.com/newsroom/en/healthcare-and-pharmaceutical/nerve-alive-supplement-reviews-inspired-by-nervecalm-for-natural-nerv-1044754
https://www.accessn...
2016 New Holland Boomer 47 4WD Front Loader Utility Tractor with Bush Hog BH16-2 (A50322)
2016 New Holland...
2016 LINK-BELT  235X3 SPIN ACE EXCAVATOR (A50854)
2016 LINK-BELT...
John Deere Hsld 2510 H Nh3 Applicator (A50514)
John Deere Hsld...
TOP HAT TRAILER MFG. LIGHT PLANT TRAILER (A50854)
TOP HAT TRAILER...
2023 CFG QNT45 Mini Excavator (A49461)
2023 CFG QNT45...
 
Top