Container Weld Shop build -

   / Container Weld Shop build -
  • Thread Starter
#441  
"And what's with the red primer"
That pic was shot immediately after I did a real heavy coat; it's just Rustoleum Ruddy brown, I think it's called - dries more brown than that pic. It's a close match to the container color, so it gets the wife's vote :D

Yup, all welds are Lincoln L56 wire, it's 70S6, .035 diameter, 75/25 running 22 volts/375 IPM...thinking about trying spray with same wire (dual shield's too expensive) - my LWS stocks a couple spray mixes, 90/10 and 98/2 (the 2 is Oxy) I just recently filled BOTH of my 300CF tanks with C25, so it'll be awhile before I have an empty to trade (If I do at all, that is) - if/when, I'll probly try the 90/10 mix - adding Oxy to a weld never seemed like a good idea, I always thought that's what flux and shield gas was tryin' to AVOID...

'Sposed to be over 90 manana and back up to 100 by Thursday, might hafta move that "portable" A/C down to the wood shop while I'm workin' on plasma templates for the ventilation on the containers... Steve

Oh, I hadn't seen that cast iron spray before; looks to me like it's just an add-on to a victor torch with a squeeze bottle full of iron powder - preheat the weld area, spray some powder on, melts instantly, cools quick, stays put - other than that, I'm just guessin'...
 
   / Container Weld Shop build - #442  
The last time I used Rustoleum primer, I think the instructions said if a real heavy coat is applied, it should be lightly and gently sanded so the color coat will adhere and foam a malicture surface for a uniform color, you must a have a uniform color so's the top clear coat can be evenly applied creating a tuff finnish that will be long lasting, resist UV sun rays and squirrels.

15 years ago at my former weld supplier I tried to have him get me some 95/5, said he couldn't, probably more like wouldn't so he suggested I try that tri mix welding gas, I used half bottle and took it back, was disgusted at all the porosity I got with it, I think your right oxigen dont belong in welding gas.

This former welding supplier sold out last fall and retied and now this new supplier bought him, he already has a car parts business. I've been talking to him and he seems more accommodating and said he keeps on hand 90/10 welding gas because he said these new 350 Miller welding inverters suggest using it. Not sure about that but he said give him a few days notice and he can get me 95/5 or 90/10 in my smaller gas bottle for about the same cost and since mine is getting low, think I'll give that 90/10 a try.

Dont worry about the 100* just keep thinking winter is coming, mind over matter.............
 
   / Container Weld Shop build -
  • Thread Starter
#443  
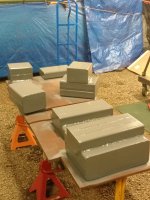
I'm so tired of those blocks by now I'm tempted to just put 'em in primed, but I know from experience I'd be hosin' 'em with MORE paint before long - I got some red scotchbrite pads, they kinda match the primer so I'll probly give 'em a swipe or three with the pads - I got plenty of "smoke gray" paint rattle cans, maybe give 'em a coat of that manana...

I wouldn't mind havin' one of those mm350's, but for that kinda $$$$ I'd rather have this
12" x 36" Gunsmithing Lathe with Stand | Grizzly Industrial
to keep my mill company - what they want for a mm350 would buy that lathe, AND the first $2k of "extras"...

"Dont worry about the 100* just keep thinking winter is coming, mind over matter" Thanks fer tryin' to cheer me up :rolleyes: - 'sides, MY version of "mind over matter" is "If ya don't MIND, it don't MATTER" - an' I'm gettin' old enough and cranky enough I DO mind, dang it :mad:

Got started on the templates for cutting the holes in all 4 containers for the exhaust fans and motorized louvers - it's nice that all of the containers use exactly the same dimension corrugated cor-ten steel, so I only need ONE template for the 16" fan and ONE for the 24" louvers in order to install 'em in all 4...

Here's what I got done today (after moving nearly everything in the shop, scrounging around for enough scraps of 3/4 ply to do what I want, etc..)

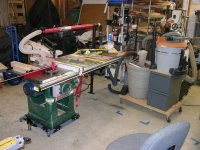
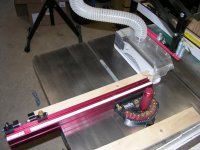
My old PM66, and a miter gauge that probably costs more than some saws - DSCN3386.JPG DSCN3387.JPG - saw's kinda old, but I got it lined up so it'll cut within less than .2 degrees, runs so smooth I can (and HAVE) balanced a nickel on the table with it running.

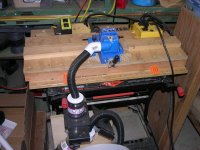
I still need to spend some time working out improvements to dust control on the saw, it didn't have a motor cover when I got it and I'm moving the lower dust port 90* so it'll be under the extension table, that way both dust collection hoses will be together - one to the bigger cyclone and the overhead to the shop vac. Also need to come up with a slick internal "ramp" that'll encourage the dust to actually WANNA go to the port...

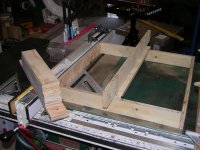
Anybody who's ever used pocket holes KNOWS how important alignment is; when you tighten those screws, they pull the joint tight - and if the cut isn't exactly 90 degrees, then neither is that joint - DSCN3388.JPG
Another reason for that high-dollar miter gauge - multiple stops and a sliding extension lets me repeat crosscuts up to about 3 feet long, exactly the same - DSCN3389.JPG which means I can actually expect things like this to end up SQUARE - DSCN3390.JPG DSCN3391.JPG

I got all the pocket holes drilled in that frame before I came up for dinner, it's gettin' a bit cooler so I'll probably go back down to the shop and do the ones for the smaller frame - hopefully I can get 'em put together in the morning BEFORE it gets too hot again. Then once THAT's done I'll need to scribe both of 'em to the corrugations on the wall, and finally add some "spider legs" that'll keep them from falling out of the hole once it's cut with the plasma... Steve
 
   / Container Weld Shop build - #444  
Now I've been around welding all my life but this is the first I've heard of this, very few good info video's on it but this one shows what's going on fairly good. It's called Spray Powder welding, never seen anything like it, I happen on it while checking out some old cast iron threads on TBN. I was looking for foundry shops that make cast iron parts, haven't found that yet, but take a look at this and see what you know about it, like is this welding process for flat only?
Cast iron spray powder welding - YouTube

Powder torches are all position. I have done a lot of hard facing with a Victor version. Nickle based powder. Oxyacetylene.
 
   / Container Weld Shop build -
  • Thread Starter
#445  
Good to know; thanks LW - bit expensive for a toy, but not if you NEED it.

Amazon.com: Victor 384-1265 VPT-1 Powder Spray Torch Kit: Industrial & Scientific

I've done very little hardfacing, used Stoody rod - too small an area (scarifier pockets in a box scraper) - by the time I got an arc settled it was time to STOP. Looks like the O/A setup would make it easier...

Got a little more done on my templates for the vent kits for 4 containers, came up for lunch about 2pm, then made the mistake of lookin' at the temp in the shop - a big glass of ice water in the air conditioned house kept lookin' better and better :rolleyes:

Meantime, both small and large templates are getting close to done - just need to scribe/cut both to match the corrugations, then add some inside corner blocks and the "spider legs" and they'll be ready. If the weather doesn't quit tryin' to cook me (especially INSIDE the containers) it'll be one of those "before breakfast" jobs for sure.

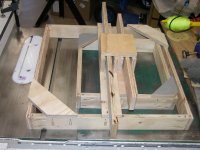
That rib on the back of each one (and the added on "wide place in the road") makes 'em strong enough I can STAND on 'em with all 185 lbs, so I shouldn't hurt 'em cranking up a "cargo bar" between walls to hold 'em in place for the plasma - DSCN3392.JPG - a happy "semi-accident"; by clipping an un-needed small corner of one of the gray corner braces, they nest together for storage DSCN3393.JPG

(sometimes it's the LITTLE things that make ya smile :D )...Steve
 
   / Container Weld Shop build -
  • Thread Starter
#446  
Got some more done in the wood shop before common sense took over :rolleyes:

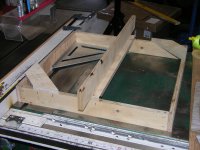
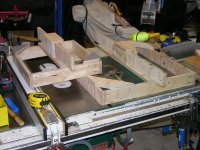
Still on the plasma templates for ventilation stuff; I had used a piece of scrap plywood held up against the side of the little 20 foot container and marked off where the ribs and valleys of the siding came, initially just to verify that all 5 of the containers used the same spacing so I'd only need to build one template of each size -

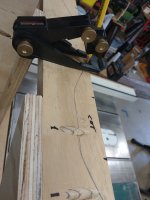
Next I used that same piece of ply to figure out the best way to "scribe" the edge so it would conform to the sides - otherwise, I was concerned that the plasma torch would find a way to get UNDER the template where it was about 1-1/4" away from the steel (think "Murphy's Law") so I played around with the plywood and a cabinet scribing tool I already had; found out if I left the end pin off the tool and "jackknifed" the pencil, it would touch down in a valley with the pencil right at the same height as the peak (this is a GOOD thing :D)
IMG_20180808_142055580.jpg IMG_20180808_141937192.jpg IMG_20180808_135358875.jpg

If any of this isn't clear, don't hesitate to ask - I sometimes forget just how far outside the box my thought processes can get (WHAT box??!? :laughing:) - gotta go "spray some gray" (paint, that is) - as hot as it is, it'll probly dry BEFORE it gets to my "mil spec lego blocks" :rolleyes: ...Steve
 
   / Container Weld Shop build -
  • Thread Starter
#447  
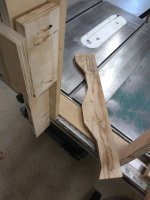
If you look at the last pic in my previous post, you'll notice a pocket screw hole in an area that will get cut AWAY in order to fit the template to the side of a container :confused: - these templates are NOT glued, only pocket screwed, which made me kinda nervous about the guide SHIFTING while in use :thumbdown:

This is ONLY a problem for the smaller of the two templates; the 24" one will have the two side rails AND the center "pusher" area still at FULL DEPTH, so no loss of strength on THAT one.

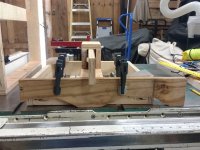
My solution - break out the glue, make some EXACTLY 90* inner cleats, make some EXTERIOR 90* clamping blocks, glue 'em in (with a few more screws for good measure :laughing:) - the pics -

IMG_20180809_122944870_HDR.jpg IMG_20180809_123006898.jpg IMG_20180809_123355077_HDR.jpg IMG_20180809_124040226.jpg IMG_20180809_124941447_HDR.jpg

The explanations -

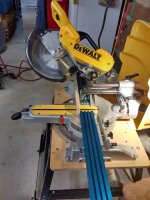
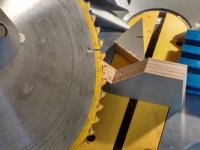
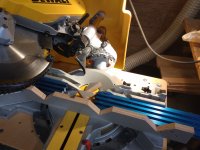
pic 1; I'm using a couple of the features of the 12" DeWalt, Makita and Bosch saws (maybe others) - one is the bevel, I hadn't needed that before. The other is the depth stop - this allows you to slide the saw but keep the blade at an adjustable height OFF the table, so you can do things like quickie dadoes, or (in this case) cut a 90* Vee in a piece of wood to make an outside corner clamping block. Also in that pic is a "bandaid", it's that blue groovy-lookin' thing
Multi Track for Jigs and Custom Fences-Multi Track - Rockler Woodworking Tools
Normally I use those ON EDGE for a longer fence, etc; use 'em on the woodworking drill press, router table(s), miter saw, various jigs - they've gotten more expensive than when I got 'em, think I have 4 or 5 of 'em and some of the track (scroll down on that Rockler page)

For THIS application, I found out that the DeWalt saw will NOT cut to its preset depth all the way to the fence - so I used the blue things to "shim out" the fence by 3", and it just made it. That way I could preset the blade depth at a 45* angle and cut the Vee out by flipping the board..

Pic 2 - Closer shot, getting ready for the first cut
Pic 3 - REALLY close shot, second cut after flipping the board (easier than swapping to RIGHT side bevel each time)
Pic 4 - One piece of scrap ply was long enough for 3 blocks (woulda been 4 if I'd thought a bit more)
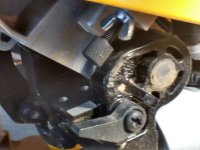
Pic 5 - This is what lets you NOT cut all the way thru when that's what you need - notice the wing nut near the top of the pic, that's the lock for the knurled head screw just below it which sets depth - below that near the bottom of the pic is the stop itself, seen in the STOP position - to disable that, you just swing that stop up and back and it stays out of the way. Bosch and Makita have the same function but it looks a little different, I couldn't find anything about the Milwaukee or new Delta "cruiser" about this.

I finally bailed when it hit 97 in the shop; even a 30" fan on high wasn't helping much :eek: Had a late lunch, will probably go back down (to the OVEN) and see whether the pizza's done yet :rolleyes: - if not, next 2-3 days are supposed to be below 90. Need to get the corner blocks glued/screwed in so I can fire up the jig saw and "cut the wiggles out", then it's time to get some power to 2 of the containers and put these templates to work... Steve

For those who're almost as confused as I am, once the wiggles are cut out I'll post a pic or two showing how the templates will get used - oh, and the lego blocks ain't RED any more :D IMG_20180808_221037622.jpg
 
   / Container Weld Shop build - #448  
View attachment 566032 View attachment 566033 View attachment 566034
If any of this isn't clear, don't hesitate to ask - I sometimes forget just how far outside the box my thought processes can get (WHAT box??!? :laughing:) - gotta go "spray some gray" (paint, that is) - as hot as it is, it'll probly dry BEFORE it gets to my "mil spec lego blocks" :rolleyes: ...Steve

If you look at the last pic in my previous post, you'll notice a pocket screw hole in an area that will get cut AWAY in order to fit the template to the side of a container :confused: - these templates are NOT glued, only pocket screwed, which made me kinda nervous about the guide SHIFTING while in use :thumbdown:

I finally bailed when it hit 97 in the shop; even a 30" fan on high wasn't helping much :eek: Had a late lunch, will probably go back down (to the OVEN) and see whether the pizza's done yet :rolleyes: - if not, next 2-3 days are supposed to be below 90. Need to get the corner blocks glued/screwed in so I can fire up the jig saw and "cut the wiggles out", then it's time to get some power to 2 of the containers and put these templates to work... Steve

For those who're almost as confused as I am, once the wiggles are cut out I'll post a pic or two showing how the templates will get used - oh, and the lego blocks ain't RED any more :D View attachment 566158

I looked at the previous post, didn't notice the pocket screw hole dilemma, I noticed why such a fancy pencil holder, dont see the practical beneficial functionality of it, to me it's comparable to how many Frenchmen does it take to screw in a light bulb............sorry forgot you was French.

So now your making something to hold a fan then something to work and hold the luvers out of plieblewood with no glue? The exhaust fans I seen are all one unit, make a window frame for it, screw it in and done, wiring it is optional.

And what kind of color did you use on the steel blocks, looks like crap, might as well been battleship grey, I had in mine candy apple red with blue stripes for a leveling reverence indicator.
Oh and if I was spending 4k+ on lathe I'd get one with combo milling machine/drill press on it, makes it handy to turn drill and mill at one place if short on space. I had the $2,500.00 one until 5 years ago, thinking about getting another one next year.
 
   / Container Weld Shop build - #449  
Powder torches are all position. I have done a lot of hard facing with a Victor version. Nickle based powder. Oxyacetylene.

Guess that question was answered, thought it might be for flat only, but like Steve posted, ouch at almost $500.00, then on the other hand if I knew what I was doing and had half dozen exhaust manifolds to weld, could easily get the money back. For me cast iron would be the main reason to have one of those torches, if it works as good as some say.

Hard facing and weld buildup can be done just as easy with mig or stick without all the heat distortion, cherry red to me is hotter than inner pass welding of 300*, at the shipyard, high strength steel welding has a requirement of no more than 300 temp between passes, on mild steel there's no max heat limit excetp on me, when I start to sweat that means I'm working to hard, again.
 
   / Container Weld Shop build -
  • Thread Starter
#450  
"dont see the practical beneficial functionality of it,"

The "fancy" parts are what make it work; the purpose is to accurately transfer the NON-flat profile of anything to a SECOND piece that needs to FOLLOW that profile - IOW, make ONE thing fit the SHAPE of ANOTHER thing - these are typically used to trace the shape of a not-so-straight wall, onto the side of a kitchen cabinet and then CUT OUT that shape on the cabinet side so it MATCHES the wall...

AccuScribe PRO Scribing Tool | Rockler Woodworking and Hardware

The wood frames I'm making will match the corrugations of the steel walls of the containers, and each frame is 1 inch smaller each dimension than the HOLE I need to cut (a "window") so the plasma torch can ride along the edges of the frame and cut the correct size hole for the fan (16" square) and the louver inlet vent (24" square)

These are NOT going to be PART of the install, only a PATTERN so I don't screw up the container wall. I had thought about just using zip disks, but the thought of cutting 4 feet of 13 gauge cor-ten steel (per hole) by holding a side grinder over my head long enough to do that, from INSIDE a container that tends to be well over 100 degrees inside even on a cloudy day, does NOT appeal to me - I'd rather spend LONGER than that in a cooler place making an accurate template, then cutting that ACCURATE hole in about 5 MINUTES or less with the plasma.

Any actual FRAME installed in the hole (like an outside drip molding for example) will be STEEL, fully welded primed and painted. The end result will be a full exchange of all air in each of the containers once every two minutes, with the exhaust fan pulling out the hottest air from the NON-door end, near the ceiling while "make-up" air is brought in thru the 24" square, motorized louvers near the ground on the door end.

When it's done it'll all be controlled by a thermostat. This should keep the containers reasonably comfortable even in pretty warm days, instead of them reaching 140 degrees at the far end (I've actually MEASURED it that hot)

"The exhaust fans I seen are all one unit, make a window frame for it, screw it in and done, wiring it is optional."
That's EXACTLY what I'm doing; but they're going in STEEL CORRUGATED WALLS, and need to be leak-proof and secure. I haven't even gotten to the security bars I'll need to weld across the outside (remember my lovely neighbors??!?)

The gray - I guess beauty's in the eye of the beholder; that color goes well with the sorta brick red-brown of the containers, and the BOSS likes it :laughing:

" if I was spending 4k+ on lathe I'd get one with combo milling machine/drill press on it"

All the combo machines I've seen have a round column on the mill - my mill is square column, not only is it VERY rigid but I can get back EXACTLY to the same place after moving, 'cause the head doesn't swing around when I raise or lower it; the ONLY thing that'll move things side to side is the TABLE. Mine ain't quite a Bridgeport, but it's a LOT more than a glorified drill press. Also, space won't be a problem once the mill is in its new home, there'll be plenty of room for a REAL lathe to keep it company.

Well, it's 'sposed to be quite a bit cooler the next 2-3 days, better get some sack time so I can take advantage of it... Steve
 

Tractor & Equipment Auctions

10' Poly Feed Trough (A50515)
10' Poly Feed...
Michelin CARGOXBIB High Floatation Tires (SET OF 4) (A52128)
Michelin CARGOXBIB...
2025 JMR 36in Mini Skid Steer Bucket Attachment (A50322)
2025 JMR 36in Mini...
2006 MACK CV (GRANITE) BOB TAIL KILL TRUCK (A52472)
2006 MACK CV...
2017 Schulte FX107 84in Rotary Cutter Attachment (A50322)
2017 Schulte FX107...
2016 CATERPILLAR 299D2 SKID STEER (A51242)
2016 CATERPILLAR...
 
Top