OP
BravoXray
Elite Member
- Joined
- Dec 17, 2019
- Messages
- 3,357
- Location
- Nothern Indiana
- Tractor
- Kubota BX2230, John Deere 430 Diesel
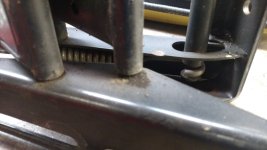
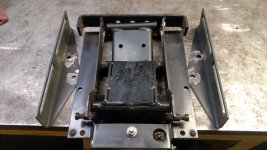
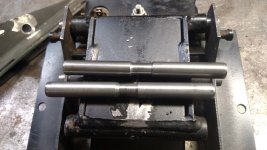
Yesterday I took a look at the seat suspension off the 430. It's gotten progressively looser over the years, until now it's just plain sloppy. The seat will move side to side a couple of inches, and rock back and forth three of four inches. Looking at the pivot points, all the bushings were worn out, and a couple of the bushings were worn completely through and the shafts were wearing into the tubes holding the bushings. Of course, it was welded together. So, I fired up the grinder with a cutoff disk and ground through a couple of the shafts that had enough side clearance so as not to grind up the tubes or the mounts. Then I ground the welds that held the pins in the mounts flush and was able to drive the stubs out with a BFH and a punch. The two other shafts didn't give me enough room get in and cut them with out buggering up the tubes and mounts, so I ground those welds down flat and was able to drive the pins out.
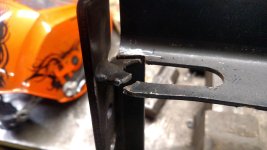
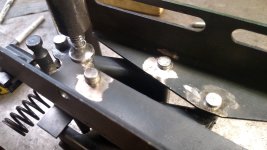
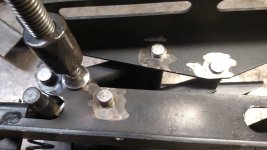
In addition, the piece at the front of the top part of the mount where the tension adjusting bolt goes through was broken loose on both sides and twisted from the force exerted to tension the rather stout springs used in the suspension. Some hammering, twisting and bending got it back close to the proper position, and I MIG welded it up so it's usable again.
Some searching on the web led me to this company, who makes complete suspension units and pin and bushing sets to repair them,
Seat Suspension Bushings & Rods for John Deere 318 322 332 4
I'm not sure whether I'm going to get one of the kits, or drill the holes in the brackets out and weld in 1/2" pins, as the tubes for the bushings are very close to 1/2" ID. That would give a lot more bearing surface, be it steel on steel, than the 3/8" pins and bronze bushings. Either way, I'm also going to add grease zerks so they can be lubricated. I'm sure that no more than I use the 430, the 1/2" pins would last a long time, especially with proper lubrication.
While I'm at it, I think I'm going to replace the seat with a more comfortable seat like I put on my Kubota BX2230 a while back. After I bought the one for the BX, Rural King had an online sale on the same seat that sold in the store for $200, for $50, SHIPPED. I immediately ordered one just in case I needed one for some other project. I just have to make sure it will fit inside the cab that goes on the 430.
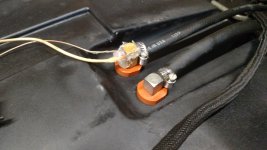
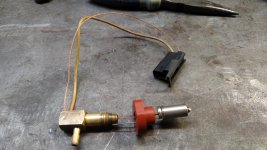
Also, I had noticed that sometimes when I filled the fuel tank all the way up, I would see a little leakage coming off the font of the fuel tank under the seat pan. The fuel line fittings for the supply and return lines press into rubber grommets pushed into holes in the top of the plastic fuel tank. With the seat pan off, I could see that fuel was seeping out around both of the grommets and running down the front of the tank. I bought two of the grommets and pulled both fuel fittings out to replace them. The return line fitting has two wires, one going into it that goes to a low fuel switch that hangs down into the tank. The other one goes to the fitting itself. The wire to the sensor could be slid in and out of the fitting quite easily, so I knew it would let fuel leak by it, so after I put the new grommet in and pushed the fitting into it, I cleaned it thoroughly and sealed it up with some RTV.
The supply line fitting apparently is supposed to have a short tube with a pickup screen extending into the tank, but it was broken off, so I drained the tank and fished it out. I put on a new piece of tubing and the screen and installed it into the tank. So, I shouldn't have a fuel leakage in the future.
In addition, the piece at the front of the top part of the mount where the tension adjusting bolt goes through was broken loose on both sides and twisted from the force exerted to tension the rather stout springs used in the suspension. Some hammering, twisting and bending got it back close to the proper position, and I MIG welded it up so it's usable again.
Some searching on the web led me to this company, who makes complete suspension units and pin and bushing sets to repair them,
Seat Suspension Bushings & Rods for John Deere 318 322 332 4
I'm not sure whether I'm going to get one of the kits, or drill the holes in the brackets out and weld in 1/2" pins, as the tubes for the bushings are very close to 1/2" ID. That would give a lot more bearing surface, be it steel on steel, than the 3/8" pins and bronze bushings. Either way, I'm also going to add grease zerks so they can be lubricated. I'm sure that no more than I use the 430, the 1/2" pins would last a long time, especially with proper lubrication.
While I'm at it, I think I'm going to replace the seat with a more comfortable seat like I put on my Kubota BX2230 a while back. After I bought the one for the BX, Rural King had an online sale on the same seat that sold in the store for $200, for $50, SHIPPED. I immediately ordered one just in case I needed one for some other project. I just have to make sure it will fit inside the cab that goes on the 430.
Also, I had noticed that sometimes when I filled the fuel tank all the way up, I would see a little leakage coming off the font of the fuel tank under the seat pan. The fuel line fittings for the supply and return lines press into rubber grommets pushed into holes in the top of the plastic fuel tank. With the seat pan off, I could see that fuel was seeping out around both of the grommets and running down the front of the tank. I bought two of the grommets and pulled both fuel fittings out to replace them. The return line fitting has two wires, one going into it that goes to a low fuel switch that hangs down into the tank. The other one goes to the fitting itself. The wire to the sensor could be slid in and out of the fitting quite easily, so I knew it would let fuel leak by it, so after I put the new grommet in and pushed the fitting into it, I cleaned it thoroughly and sealed it up with some RTV.
The supply line fitting apparently is supposed to have a short tube with a pickup screen extending into the tank, but it was broken off, so I drained the tank and fished it out. I put on a new piece of tubing and the screen and installed it into the tank. So, I shouldn't have a fuel leakage in the future.