Restarting My '70 Nova Project

   / Restarting My '70 Nova Project
  • Thread Starter
#91  
The joy of rebuilding an old car! The gap tolerances were pretty big back in the day.
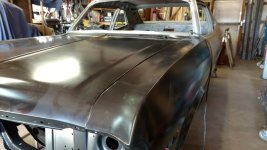
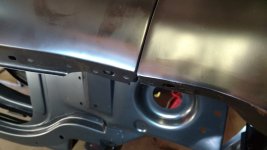
According to the assembly manual, the door gap is specified at 3/16" +-0.40".
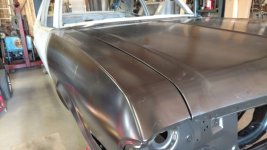
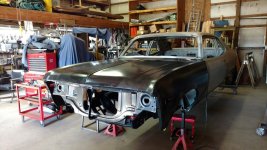
I did some more shimming, pulling and pushing again this afternoon, and I think I got it to where the door gap is okay, and the rest of the alignment is acceptable. I'm going to have my friend, who is a body man take a look at it to see if it passes muster. It's going need a little bondo at the door gap to even out the area I had to recontour, but other than that it looks pretty good.
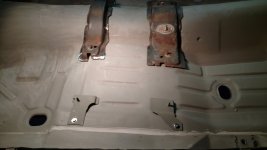
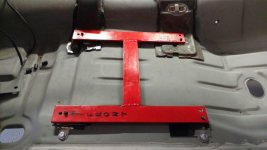
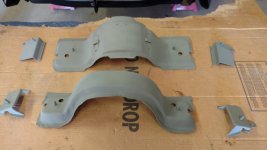
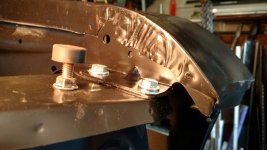
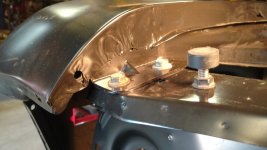
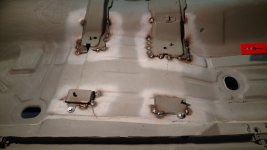
While I was looking for the seat tracks for the bucket seats, I came across a set of OEM seat mounts pulled out of another Nova. I bought them off Ebay a few years ago and forgot I had them. I spent a couple hours grinding off spot and MIG welds and hammering the inner mounts back into shape, and they fit pretty well, better than the aftermarket ones. The outer mounts have holes that bolt to the original bench seat mounts, so I don't have to figure out where to mount them. I also ordered a set of tracks for my application, and they'll be here tomorrow. Then I can get all the mounts in the correct position to weld them in place. Going to blast and prime the inner mounts first though.
Won't be able to do it tomorrow though, as I am going with a friend 270 miles north into Michigan to retrieve a '96 Dodge 2500 pickup with a 5.9 Cummins that he bought from another friend. It blew a head gasket and when torn down has four scored cylinders, so the engine is going to have to come out and be overhauled, even though it only has just over 100K on it. The owner doesn't want to spend $10-$12K they want to overhaul it, so he sold it to my local friend. Going to be a long day.
 

Attachments

  • IMG_20210921_164139754 (Medium).jpg
    IMG_20210921_164139754 (Medium).jpg
    357.5 KB · Views: 155
  • IMG_20210921_164251860 (Medium).jpg
    IMG_20210921_164251860 (Medium).jpg
    381.1 KB · Views: 154
   / Restarting My '70 Nova Project
  • Thread Starter
#92  
Made some more progress today. I blasted and primed all the bucket seat mounts and after I clean the primer off the floor pan where they will be welded and edges of the mounts, I'll be ready to get them welded in. I even made a jig to make sure they are aligned properly.
A friend came over to help me get the hood unboxed and mounted up. I put a couple of studs in the front hinge bolt holes, and that made it easier to put the hood on. Just screwed them into the front bolt holes and stuck the studs in the front holes in the hinges and it was pretty easy to start the rear bolts. After the rear ones were in, it was easy to remove the studs and put the front bolts in and snug them up.
The hood fits pretty well, but had to do a little work to take some of the curve out where it meets the fenders. Got it looking pretty good now. Only trouble spot is at the left front where the hood and fender meet. The front edge of the fender extends too far forward and is too high. The hood stop/bumper is adjusted all the way up to get the hood even with the fender. It also measures almost 1/2" higher at the point it bolts to the radiator support. Looks like it is going to need some surgery like the right fender did. After I get that area fixed, we'll get the hood and fenders primed and blocked out.
I can hardly wait. :rolleyes:
 

Attachments

  • IMG_20210926_155609683 (Medium).jpg
    IMG_20210926_155609683 (Medium).jpg
    466.3 KB · Views: 155
  • IMG_20210928_162748330 (Medium).jpg
    IMG_20210928_162748330 (Medium).jpg
    489.1 KB · Views: 147
  • IMG_20210928_173234761 (Medium).jpg
    IMG_20210928_173234761 (Medium).jpg
    705.8 KB · Views: 144
  • IMG_20210928_173241572 (Medium).jpg
    IMG_20210928_173241572 (Medium).jpg
    518.3 KB · Views: 143
  • IMG_20210928_173249326 (Medium).jpg
    IMG_20210928_173249326 (Medium).jpg
    581.6 KB · Views: 150
  • IMG_20210928_173257113 (Medium).jpg
    IMG_20210928_173257113 (Medium).jpg
    810.6 KB · Views: 156
  • IMG_20210928_173305186 (Medium).jpg
    IMG_20210928_173305186 (Medium).jpg
    474.5 KB · Views: 154
   / Restarting My '70 Nova Project #93  
Looking Good !!
 
   / Restarting My '70 Nova Project #94  
I looked at my Dad, with his gorgeous '69 Camaro that I had grown up with. Since I was old enough to be aware, that car had been parked in my parent's garage. It was faded, dusty, with something green growing out of the carpeting; but it was mine! Nonetheless (y)
 
Last edited:
   / Restarting My '70 Nova Project
  • Thread Starter
#95  
After closely examining the left fender for the reason for it's misalignment, I discovered that the internal reinforcement that runs from the forward firewall mount to the radiator support is spot welded out of position, about 1/4" too low. That's why it is too high at the top where it meets the door, and at the radiator support. On the right fender, the support is up snug against the underside of the top of the fender, the left side it's down 1/4" from the front to the rear.
So, it looks like I'm going to take it off and drill out the spot welds to get it into proper position. Looks like 12-15 spot welds, so it shouldn't be too much of a job.
I love aftermarket parts.
 

Attachments

  • IMG_20210929_160143865_HDR (Medium).jpg
    IMG_20210929_160143865_HDR (Medium).jpg
    639.5 KB · Views: 147
  • IMG_20210929_160211223 (Medium).jpg
    IMG_20210929_160211223 (Medium).jpg
    574.3 KB · Views: 152
   / Restarting My '70 Nova Project
  • Thread Starter
#96  
Got the seat mounts all welded in today. Had to use an angle grinder with a stiff wire brush on it to remove the primer in the areas to weld. Not sure what the metal man used, but it is some tough primer. After I got to bare metal, I gave the areas a quick coat of weld-through primer. Welded them all in and gave it another coat of self etching primer.

Not to tackle that d@*n fender.
 

Attachments

  • IMG_20211001_152354942 (Medium).jpg
    IMG_20211001_152354942 (Medium).jpg
    409.5 KB · Views: 146
  • IMG_20211001_153705620_HDR (Medium).jpg
    IMG_20211001_153705620_HDR (Medium).jpg
    427.9 KB · Views: 154
  • IMG_20211001_155635634 (Medium).jpg
    IMG_20211001_155635634 (Medium).jpg
    432.5 KB · Views: 154
  • IMG_20211001_160403323 (Medium).jpg
    IMG_20211001_160403323 (Medium).jpg
    393 KB · Views: 142
   / Restarting My '70 Nova Project
  • Thread Starter
#97  
Pulled the hood off, and then the problem fender. After a long look at it, to fix it, I'd have to drill out almost every spot weld on it, as both the top reinforcement and the one going down the fender ahead of the door are spot welded in the wrong positions. So I would have to drill out 30+ spot welds and then figure out how to hold it all in alignment to weld back together.
Nope.
Going to order a new fender from one of a few venders that all say they MIGHT have them in stock in late November, since they're setting in containers on ships setting off the coast of California waiting to get into port and get unloaded.
 
   / Restarting My '70 Nova Project #98  
This is what you might want and could use, and IMO with a few alignment/witness marks sharpied-on before going in might help make the fender saleable if not usable. With a tad of practice/skill one can easily remove spot welds without drilling through both components. Grind the remainder of whichever side flush and puddle-weld once in position, either from pics shown or tacked while in situ, perhaps your way to a decent fit.


btw, IMO w/o the engine cradle (AKA sub-frame) to also check/align to any front clip fit can be a guess. 'Loose-assemble' as many things you can 'qualify' (AKA 'locate') to help get the other bits in line.
 
   / Restarting My '70 Nova Project
  • Thread Starter
#99  
Before you removed the hood, did you adjust the front up to match the top of the fenders? (Flush at front and probably back only) If so and it gave the appearance that the hood was bowed, being higher than the fenders in the center only? Sometimes old and non lubricated hinges will cause the hood to bow when forced to close. If it has bowed slightly, the hood would also pull back from the very front of the fenders. I hope I’m explaining in an understandable way. I just thought I would throw it out there as I have seen a bent hood from rusty hinges before. Could the hood have a tweek in it from a previous fender bender? Body alignment can be so frustrating...

by the way, the seat mounts look great! Looks like factory. I was hoping to see your jig for holding them straight during welding. (y)
Yes, before I took the hood off a friend and I spent quite a while adjusting and tweaking the hood and fender to try and get a good fit, but the fender's dimension from the firewall mount to the front edge next to the hood is 1/4" - 3/8" longer than the right fender, and the original fender. The fender shell is not only attached too high on the mounting reinforcements, but also shifted forward too far. I figured this out by comparing the amount of metal that is folded over and spot welded to the rear vertical reinforcement piece at the rear edge where it meets the door, with the amount on the other fenders. Again, its about 1/4" to 3/8" less than the others.
The hinges were lubed and work very freely, so they aren't a contributing factor, and the hood is new. It fits well back at the cowl, and has a consistent gap of 1/8" or so from the front to rear on both sides, so that isn't a factor. There is a slight bit of excess bow in the hood about a third of the way back, maybe 3/32" or so, but that isn't nearly enough to cause the amount misalignment present at the front, and it's the same on both sides.
The first image in post #104 shows the jig for positioning the seat mounts.
Thanks for your suggestions.
 
   / Restarting My '70 Nova Project
  • Thread Starter
#100  
This is what you might want and could use, and IMO with a few alignment/witness marks sharpied-on before going in might help make the fender saleable if not usable. With a tad of practice/skill one can easily remove spot welds without drilling through both components. Grind the remainder of whichever side flush and puddle-weld once in position, either from pics shown or tacked while in situ, perhaps your way to a decent fit.


btw, IMO w/o the engine cradle (AKA sub-frame) to also check/align to any front clip fit can be a guess. 'Loose-assemble' as many things you can 'qualify' (AKA 'locate') to help get the other bits in line.
I have a spot weld cutter like you suggested. I used it a few times over the years, and if used carefully, works pretty well. Yes, if using the removed piece again, you have to grind the remaining spot weld flush to get a good fit. I usually give it a coat of weld-through primer before plug welding the parts back together.

The fact is though, that it would be a large amount of work to completely disassemble the fender and supporting pieces and then weld it all back together again. Especially problematic is the rear edge next to the door where the skin is wrapped around the internal support, crimped, then welded again. Even then, the curve at the front next to the hood is wrong and would have to be cut apart and reshaped. I just don't feel like tackling that much work is worth my time and effort.

The subframe is bolted up in the proper position with new mounts, and was located using the alignment holes and 5/8" pins in the forward subframe mounts and the body mounts as spelled out in the assembly manual. Misalignment of the subframe will have more of an effect on the proper wheel alignment with respect to the rear axle than with the alignment of the fenders, because of the large holes at the front where radiator support sits on the subframe. The holes are ~1" and the bolts are 1/2", so there is plenty of tolerance at that point. The radiator support is new also, and when I compared it with the old one, other than it not being bent near the left headlight mount, it is nearly identical. It sets just where it should for the fenders to attach at the front.

At this point, I decided to order a pair of new fenders from a dealer that guarantees their fenders will fit and are very good quality, for only $50 more a piece than regular stock fenders. They expect them to be in stock in mid-November, so I'll have some time to work on other parts of the project like the seats and a few other items.
Near the top of the list is to drag out the engine I built up to put in it and get it fired up for the first time. It's a 434 cu.in. SBC stroker motor, built on a four bolt 400 cu.in. Chevy truck block. I'm going to mate it with a TKO600 five speed with a .64 overdrive. That with the 3.55 rear gear will give me a 60mph cruise at about 1900 rpm.
The original numbers matching 350/300hp L48 engine and M21 Muncie transmission are overhauled and pickled for storage.

Thanks for your suggestions.
 

Attachments

  • IMG_20150920_155421378.jpg
    IMG_20150920_155421378.jpg
    2.4 MB · Views: 179

Tractor & Equipment Auctions

2018 Terex RL4 4000W Towable Light Tower (A49461)
2018 Terex RL4...
2012 PETERBILT 388 SLEEPER TRUCK (A51222)
2012 PETERBILT 388...
2020 KUBOTA RTV X1100C UTV (A51406)
2020 KUBOTA RTV...
CATALOG IS A GUIDE ONLY!! (A50775)
CATALOG IS A GUIDE...
2015 JEEP PATRIOT (A51406)
2015 JEEP PATRIOT...
4- 6 DRILL COLLARS (A50854)
4- 6 DRILL COLLARS...
 
Top