3R Home and Barn Project

   / 3R Home and Barn Project
  • Thread Starter
#1,231  
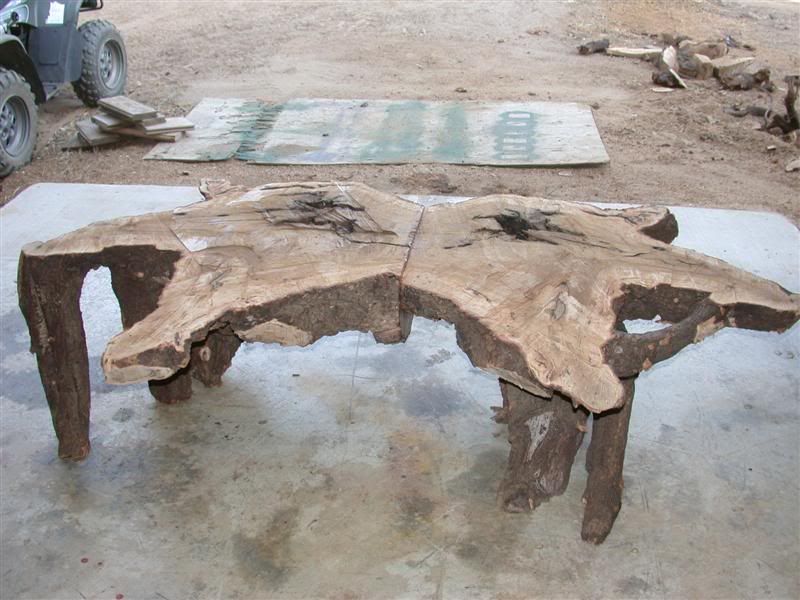
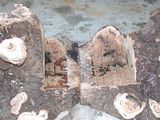
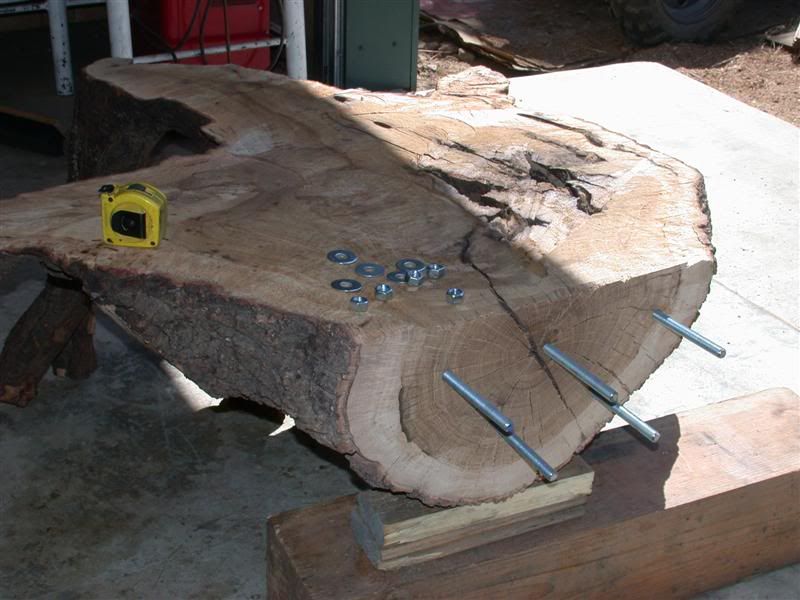
After I got the pockets done and lined the 2 halves together, I drilled bolt holes in each side.
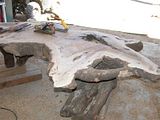
I then glued and bolted the halves together. When it was dry, I continued to work on the roots which are the legs to get them fairly level and all touching.


You can see there is a lot of variation in the table top surface, so I had a lot of planing to do to get them even.
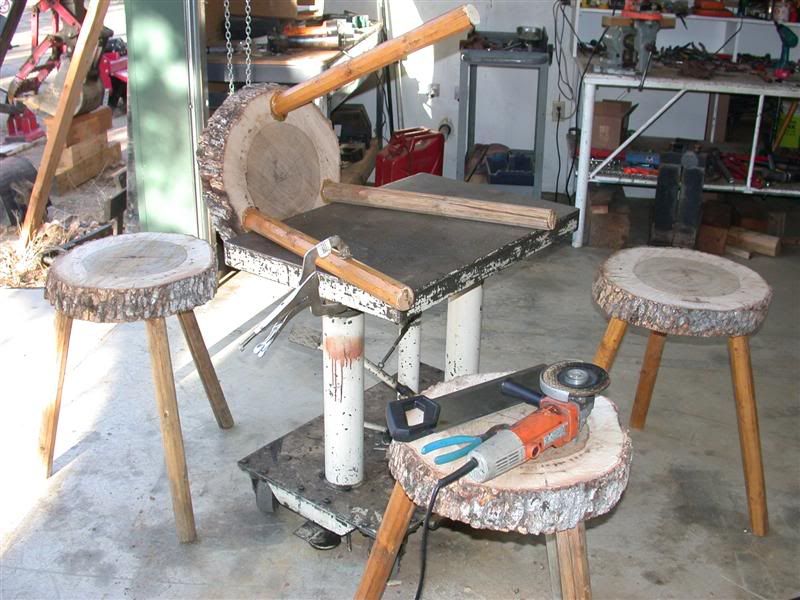
That's where I am right now. In fact, I got the top planed down pretty smooth and level. I have actually started sanding the top now after several days of planing. My next step is to sand with finer and finer sand paper.
You can see it's an interesting shape splitting the stump that way. The table is about 6 feet long and almost 4 feet wide from end to end. It's taken days of work so far.

Then I need to get some type of acrylic to fill up those big voids where some of the roots dip down from the table top. There are also some "burned and charred" voids in it. I want to be able to "see" down into those voids but have them eventually be level with the table top surface so nothing falls into them.
What should I use to do that?
Rob-

 
   / 3R Home and Barn Project
  • Thread Starter
#1,232  
Very nice Rob! Have you ever seen or tried one of those wood carving
wheels you use on your angle grinder? The teeth look like chainsaw teeth
and allow you to "carve" away lots of wood quickly.

Thanks for the reminder Dave.
I have seen them but didn't think of it until you just reminded me. I'll have to get one when I start working the sides of the table to blend in the bark and rough saw cuts better.
 
   / 3R Home and Barn Project #1,233  
Rob,

After sanding to your satisfaction, the easiest way to finish your table would be to use varnish (pracitcally any varnish will do - I use Waterlox which is a thin wiping or brushing varnish), pure China Tung oil, and Terps mixed in equal thirds. Apply the mixture liberally, let it soak in for 15 minutes, then wipe the surface vigorously until the surface feels essentially dry to the touch. Let the top dry for 24 hours and repeat the process . . . as many repeats as you feel necessary to get the finish you desire. Before your last coat, wet sand the top with 400 or 600 grit paper using mineral spirits as a lubricant. Then apply the last coat. My table tops get a minimum of 4 coats. More is better. IMO, the virtue of this finish is that it is very easy to repair if it get damaged. It doesn't build into an actual film finish which is difficult to repair.

PM me if you want more finish info or if this isn't clear.
 
   / 3R Home and Barn Project
  • Thread Starter
#1,234  
Oh, and here are the stools for the back deck.
They also need to be finished yet. I used an Oak log for the tops and left over spindles from my deck railing. I counter bored the bottom of the seats and press fit the spindles in for legs. They are only glued but the fit is very tight. I screwed on (and glued) the stabilizers (or whatever you call them) and the legs are very sturdy.
All this wood working goes very slow for me. I'm new to it.
Rob-

 
   / 3R Home and Barn Project
  • Thread Starter
#1,235  
Rob,

After sanding to your satisfaction, the easiest way to finish your table would be to use varnish (pracitcally any varnish will do - I use Waterlox which is a thin wiping or brushing varnish), pure China Tung oil, and Terps mixed in equal thirds. Apply the mixture liberally, let it soak in for 15 minutes, then wipe the surface vigorously until the surface feels essentially dry to the touch. Let the top dry for 24 hours and repeat the process . . . as many repeats as you feel necessary to get the finish you desire. Before your last coat, wet sand the top with 400 or 600 grit paper using mineral spirits as a lubricant. Then apply the last coat. My table tops get a minimum of 4 coats. More is better. IMO, the virtue of this finish is that it is very easy to repair if it get damaged. It doesn't build into an actual film finish which is difficult to repair.

PM me if you want more finish info or if this isn't clear.
Thanks for that tip. I see you are a pro so I will listen carefully.
Do you see those voids in the photos? What should I do to fill them up? I really don't want to have any "holes" in the table top. I've seen those scorpions inside plastic, you know and I was thinking maybe I could use something like that to fill the voids. I've read where varnish is a great all around finish and will probably use that for the final finish. But right now I'm stuck on filling those voids up to the table top level.
HELP ... hahaha.
Rob-
 
   / 3R Home and Barn Project #1,236  
Rob
You can fill those voids with acrylic or epoxy just like the scorpion paperweights. You can use the West system (a brand name) to coat the whole thing which will finish it and "glue" together any cracks or faults. Most boat repair places will have it or hobby stores that have casting materials for those paperweights. Since the epoxy dries by reaction you can fill a lot of the void each time. I have seen stuff that they use to imbed coasters and coins in bar tops -- don't remember the name. Don't use any coating like varnish or oil on the wood until after you have filled the voids.
I think it will look marvelous
ps HF has the chainsaw blade to fit in your 4.5" grinder -- its called a Lancelot
Google table top epoxy and you will find suppliers of the material to fill the voids -- it is not cheap cause those are big holes!
regards
 
Last edited:
   / 3R Home and Barn Project #1,237  
Thanks for that tip. I see you are a pro so I will listen carefully.
Do you see those voids in the photos? What should I do to fill them up? I really don't want to have any "holes" in the table top. I've seen those scorpions inside plastic, you know and I was thinking maybe I could use something like that to fill the voids. I've read where varnish is a great all around finish and will probably use that for the final finish. But right now I'm stuck on filling those voids up to the table top level.
HELP ... hahaha.
Rob-

Rob,

I agree with Studor. West System Epoxy is a great product to fill the voids. I don't use it as a surface finish though, although it can be done. I prefer the more natural look of the oil/varnish/terps mix I wrote earlier about. You can also mix colors into the epoxy if you want a different look. This attached picture of a natural edge maple desk I made used West System with black tint to fill a large crack which I then additionally stabilized with "butterfly" inserts.

The second attached picture shows a natural edge oak dining table with the finish I described.

Rick
Untitled Document
 

Attachments

  • Mianne_desk2.jpg
    Mianne_desk2.jpg
    6.4 KB · Views: 188
  • NK dining table1.jpg
    NK dining table1.jpg
    107 KB · Views: 182
   / 3R Home and Barn Project #1,238  
Rob you mention the back deck for the stools. Are the stools and table going to be exposed to the outside weather? That will affect the type of finish you want to use.

MarkV
 
   / 3R Home and Barn Project
  • Thread Starter
#1,239  
Studor and Rick,
Thank you for the tips on that resin and examples of the tables too.
That resin is what I am looking for to fill those big voids. Once they are filled up, I will make up my mind on whether or not I want a real shiny finish or less. I was looking for something that will hold on the bark too, so it looks like it will serve both purposes, right?

Rob you mention the back deck for the stools. Are the stools and table going to be exposed to the outside weather? That will affect the type of finish you want to use.

MarkV
Hi Mark,
The stools will be outside on the deck so I will probably varnish them.
I read where varnish is a good all around finish for stuff like that,
The table will go inside the home.
I'm hoping it will turn out pretty nice since I want to give it to my wife for her up coming birthday. Plus, it's going to be inside our living room so I want it to look pretty good. Right now I am moving to 100 grit since I got all the plane marks completely out. Next maybe 150 grit and then ...??
What do you guys think of the table shape so far?
 

Tractor & Equipment Auctions

20711 (A50323)
20711 (A50323)
Hercules Gun Safe (A55758)
Hercules Gun Safe...
2007 Honda CR-V SUV (A53424)
2007 Honda CR-V...
Woven Landscape Fabric (A53117)
Woven Landscape...
Red Cedar Wood Bench Swing (A55758)
Red Cedar Wood...
ATLAS 84" BOX BLADE (A51243)
ATLAS 84" BOX...
 
Top