You are using an out of date browser. It may not display this or other websites correctly.
You should upgrade or use an alternative browser.
You should upgrade or use an alternative browser.
3rd function valve cost
- Thread starter OldJazzR
- Start date
- Views: 25159
More options
Who Replied?
/ 3rd function valve cost
#1
old and tired
Veteran Member
- Joined
- Jan 15, 2019
- Messages
- 1,934
- Location
- Raleigh, NC/Hillsville, VA
- Tractor
- L2800 HST, 2005, R4 tires
With you installing it? or a dealer / mechanic doing the work?
You might want to start here... call them to make sure they have your model specs. I'm pretty sure this is turn key with hoses but I would make sure:

You can look for cheaper but you'll have to buy hydraulic hoses and that cost is pretty high....
You might want to start here... call them to make sure they have your model specs. I'm pretty sure this is turn key with hoses but I would make sure:
Get The Best Live Load 3rd Function Auxiliary Hydraulic Kit For Your Tractor
Get free shipping on a world class live load 3rd function hydraulic kit only at Everything Attachments. Save $50 when you order with our industry leading Wicked Root Rake Grapple!
www.everythingattachments.com
You can look for cheaper but you'll have to buy hydraulic hoses and that cost is pretty high....
tradosaurus
Super Member
- Joined
- May 8, 2017
- Messages
- 6,082
- Location
- Texarkana, TX
- Tractor
- Kubota MX5400 HST, heavy duty bucket, 3rd function, R1 tires (rears filled), 2 remotes
For my new MX5400 I was quoted $1000 for the 3rd function kit and install (3rd Function (380.331A))
old and tired
Veteran Member
- Joined
- Jan 15, 2019
- Messages
- 1,934
- Location
- Raleigh, NC/Hillsville, VA
- Tractor
- L2800 HST, 2005, R4 tires
The W.R. Long is somewhat pricey (for a single function) but it give you power at the press of a button. The high price is for a clean, compact install. If you want to get your hands dirty and save some money you can plumb a single valve for less money. Or go the route I took and installed a 3 spool to also power a hydraulic top-n-side link, for an extra $150 for far more function and features.
Ugly, yes sure... but it's still functional and that's all I wanted. A grapple sitting un-used... that's just sad!?!?
I don't recommend using this Single valve is: 1 Spool 8 GPM Prince MB11B5C1 DA Valve
The 3 spool (even if you don't use it for years) is more bang for the buck: 3 Spool Prince MB31BBB5C1 DA Valve
Install it and save for the hydraulic top and side link - beside, I think it takes Brain about that long to build them
The install is the same for both valves... I am cheap so I mounted my 3 spool above the FEL valve so that I could re-use some hydraulic hoses.
You need to hook the valve up in "series", one after the other. Think of Power Beyond as High pressure out. Instead of going back to the 3 point hitch, you insert the new valve between them. Remove the old power beyond hose from the FEL and mount it to the power beyond out of the new valve. Then buy a new hydraulic hose to attach from where you just disconnected from the old valve's power beyond and feed the high pressure IN port of the new valve to complete the circuit (route).
Other than "T'ing" the 2 valve's low pressure return to Tank lines together... and running lines to the grapple and to the rear remotes (or directly into the hydraulic Top-N-tilt cylinders), you are done.
First step I took was mount the 3 spool... above the FEL valve. Drilled a couple holes for the base plate. Then drill holes to mount the new spool... after that I used a garden hose to measure distances for the hydraulic hoses...
One thing I did not do (but would the next time) is get the hydraulic hoses with ends that would screw directly into the new spool. I used adapters and that cost me more.
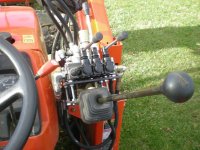
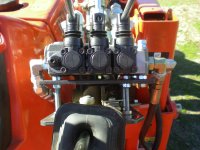
Photo 1 is the Finish product, a birds nest of hoses. I prefer to have that out in front of me. Hoses are routed underneath the tractor to the rear. Grapple hoses are straight along the FEL arms (not pictured).
Photo 2 another angle of finished install.
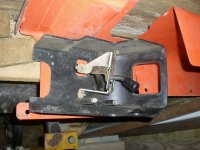
Photo 3 is removal of the cover and removal of the lock... just unbolt things!
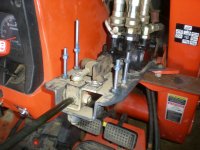
Photo 4 is installing bolts in the holes that held the cover on. The tall bolt will also be used to hold the new valve.
Photo 5 is mounting plate for new valve - note the extra two holes to the right - those are for the new valve.
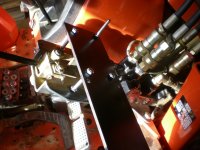
Photo 6 is the excess plate is cut off and the new valve is bolted to it, view from underneath...
Photo 7 is of the mounting plate again...
All together I had something like $700 into it... lots of $$$ in hoses. Get small hoses, the low flow works in your favor.
Ugly, yes sure... but it's still functional and that's all I wanted. A grapple sitting un-used... that's just sad!?!?
I don't recommend using this Single valve is: 1 Spool 8 GPM Prince MB11B5C1 DA Valve
The 3 spool (even if you don't use it for years) is more bang for the buck: 3 Spool Prince MB31BBB5C1 DA Valve
Install it and save for the hydraulic top and side link - beside, I think it takes Brain about that long to build them
The install is the same for both valves... I am cheap so I mounted my 3 spool above the FEL valve so that I could re-use some hydraulic hoses.
You need to hook the valve up in "series", one after the other. Think of Power Beyond as High pressure out. Instead of going back to the 3 point hitch, you insert the new valve between them. Remove the old power beyond hose from the FEL and mount it to the power beyond out of the new valve. Then buy a new hydraulic hose to attach from where you just disconnected from the old valve's power beyond and feed the high pressure IN port of the new valve to complete the circuit (route).
Other than "T'ing" the 2 valve's low pressure return to Tank lines together... and running lines to the grapple and to the rear remotes (or directly into the hydraulic Top-N-tilt cylinders), you are done.
First step I took was mount the 3 spool... above the FEL valve. Drilled a couple holes for the base plate. Then drill holes to mount the new spool... after that I used a garden hose to measure distances for the hydraulic hoses...
One thing I did not do (but would the next time) is get the hydraulic hoses with ends that would screw directly into the new spool. I used adapters and that cost me more.
Photo 1 is the Finish product, a birds nest of hoses. I prefer to have that out in front of me. Hoses are routed underneath the tractor to the rear. Grapple hoses are straight along the FEL arms (not pictured).
Photo 2 another angle of finished install.
Photo 3 is removal of the cover and removal of the lock... just unbolt things!
Photo 4 is installing bolts in the holes that held the cover on. The tall bolt will also be used to hold the new valve.
Photo 5 is mounting plate for new valve - note the extra two holes to the right - those are for the new valve.
Photo 6 is the excess plate is cut off and the new valve is bolted to it, view from underneath...
Photo 7 is of the mounting plate again...
All together I had something like $700 into it... lots of $$$ in hoses. Get small hoses, the low flow works in your favor.
Attachments


Last edited:
oosik
Epic Contributor
I had the Kubota dealer instal the grapple and WR Long 3rd function. Cost of valve plus all the plumbing and installation - $1000. I can load a picture but you kind of have to know what you are looking at. It's between the FEL vertical member and the shell of the tractor. Attached to the FEL vertical member. They obviously have done many of these. The valve itself and hoses are well protected.

_RaT_
Super Member
- Joined
- Apr 19, 2000
- Messages
- 5,855
- Location
- Peoples Republic of Northern CA.
- Tractor
- Kioti 3510-SE HST
Once you have it and use it on a tool like a grapple you will be glad you spent the money on it. On my L3940 it is attached to the loader, comes off with the loader. The advantage is you only disconnect the 4 loader hoses like normal and a single wire. I remove the loader every other day because I do a lot of mowing and the loader gets in the way of being maneuverable around trees. Tooth bar on the bucket is indispensable when using the grapple.I have a L3710 GST, purchased new in 2000-01. I'd like to add a third function valve.
If anyone knows what this would cost installed please post it. Thanks!
JP
mike0000
Platinum Member
- Joined
- Jun 4, 2018
- Messages
- 691
- Location
- Southern Indiana
- Tractor
- Kubota RTV 900, Kubota L3901, Kymron YH 14 mini ex
oosik
Epic Contributor
The question is - would I have the dealer do it again or would I do it myself. I'd have the dealer do it again - in a heart beat. It's been eight years now with the 3rd function valve and grapple. Not even the slightest of problems. Absolutely the most used implement. It does things that this 79 year old fart never even thought of when he was 40.
Is yours a third function or diverter valve? I have the latter because it came on the tractor. The downside is that I can’t work the grapple and curl the bucket at the same time, which took some getting used to.
It also resulted in a lot of dropped material until I got used to closing and lifting in two steps.
mike0000
Platinum Member
- Joined
- Jun 4, 2018
- Messages
- 691
- Location
- Southern Indiana
- Tractor
- Kubota RTV 900, Kubota L3901, Kymron YH 14 mini ex
mike0000
Platinum Member
- Joined
- Jun 4, 2018
- Messages
- 691
- Location
- Southern Indiana
- Tractor
- Kubota RTV 900, Kubota L3901, Kymron YH 14 mini ex
Grapple came in yesterday, really enjoying learning what it can do and how to do it!Is yours a third function or diverter valve? I have the latter because it came on the tractor. The downside is that I can’t work the grapple and curl the bucket at the same time, which took some getting used to.
It also resulted in a lot of dropped material until I got used to closing and lifting in two steps.
Jstpssng, this is my first grapple, I do think it’s a diverter valve now that I have it, like yours I can’t do some of the functions at the same time.
Mike
ctgoldwing
Platinum Member
My grapple also came in yesterday I use the 3rd rear remote that I plumbed to the front. I can use the lift and curl functions of the fel at the same time as opening and closing the grapple. Going to take practice. I did 'harvest' a landscape feature out of the woods this afternoon tho. Not really big but fun doing it.


I use the 3rd rear remote that I plumbed to the front. I can use the lift and curl functions of the fel at the same time as opening and closing the grapple. Going to take practice. I did 'harvest' a landscape feature out of the woods this afternoon tho. Not really big but fun doing it.