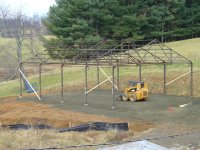
40x60 Farm Shop Build

   / 40x60 Farm Shop Build
  • Thread Starter
#21  
I would think the bigger pier, the better.

Looks like with a little more seat time, it wouldn't be too hard to make the pad bigger. Why don't you get or make more trusses to make the building as large as you want it? Seems it would be a lot cheaper to spend the money now to make it a little bigger then to build another building.

Eddie

I think I'll go with the 12" piers, the extra concrete won't be that much.

As for the size of the building, if I go any longer I'll be too close to the corn crib at one end and the barn at the other. Eventually there will also be a small milk house at that end of the barn, so space is at a premium. (plus this will give me an excuse to have a really large shop and another shed for equipment) :thumbsup:


A good resource for others who might be building a shop is this booklet Purdue University put out in 1980 about farm shops: AE-104

It has good info about size and layout, energy efficiency, heating/insulation, doors, equipping the shop, as well as other construction considerations. Being written 30yrs ago the layouts are smaller and more relevant to most of us compared to the mega farm shops that are being written about today.
 
   / 40x60 Farm Shop Build #23  
I would go with the 12" piers. Having a big workshop and another building for equipment storage sounds fantastic.
 
   / 40x60 Farm Shop Build
  • Thread Starter
#24  
Thanks for the replies.


We did end up going with the 12" piers and drilled the holes today. With some good help we were able to lay out the whole building in about 15min. With a transit and a 100' tape it's really easy:

1. Set the two pins (we use 16D double headed nails) for the back wall/long side with a tape measure and line them up with whatever you like. I lined them up so this building would be parallel to the barn.

2. Set the transit over the first pin using a plumb bob and get the second pin in the cross hairs. With the tape still stretched out, set the nails at the spacing for the piers or posts (12' OC in our case), using the transit to keep them in line between the two pins.

3. Rotate the transit 90* and set the next corner pin, which was 39'11" for this building.

4. Move the transit to the other corner on the long side and repeat step 3.

5. Stretch the tape between those two pins for the other long side and repeat step 2.

6. Check the square either by checking angle to the opposite corner, which was 39*45" for this building, or checking the diagonals which were 62' 5 1/8"


As we went we sprayed a small 2" circle around the nails with spray paint and set some reference nails 5' out at two corners so we could setup the transit again after the holes were drilled. The nails were then removed and the holes drilled with a 12" auger to a depth of about 48". Once I get the holes all cleaned up I'll make some little 9" square forms for the above ground portion of the piers. I'll see if I can get some pics up soon.


Question: I need to decide how high to make the piers off the ground, which will also correlate to the finished height of the concrete floor. That said, I will probably pour a 4" slab with radiant heat coils/piping, something which I have no experience with. Would it be advisable to insulate under the slab? What thickness foam board would I want to use? If I use foam board, would 2" of #57 gravel be enough for the base considering a well compacted and perfectly level clay base? I don't want my piers to be any taller than needed because the rest of the building without the floor will have a big gap under the tin. Thanks in advance.
 
   / 40x60 Farm Shop Build #25  
Thanks for the replies.

...

Question: I need to decide how high to make the piers off the ground, which will also correlate to the finished height of the concrete floor. That said, I will probably pour a 4" slab with radiant heat coils/piping, something which I have no experience with. Would it be advisable to insulate under the slab? What thickness foam board would I want to use? If I use foam board, would 2" of #57 gravel be enough for the base considering a well compacted and perfectly level clay base? I don't want my piers to be any taller than needed because the rest of the building without the floor will have a big gap under the tin. Thanks in advance.

With the TIN don't worry too much it is better to be HI as you can add TREATED Skirt Boards (T&G) around perimeter which keeps critters from digging UNDER the slab and or water weeds from rotting the bottom of the tin. EDIT IN attached a distance view of my construction, the POLES are no different than your concrete pour with metal attaching points, you don't want Metal too close to the ground anyways so adding the Skirt Boards around the perimeter will help you later if done NOW.

click pic for larger view


On mine I went with 16" of T&G Skirt Boards of which most of them on the high side had to be dug down to bury them, I then ended up adding 2 more layers (8" Treated T&G) for 32" in LOW side and 1 more on Hi side. This was where back fill gravel was contained, tamped, rolled and vibrated level. I added 3 layers of insulation, one layer of white 3/4" styrofoam, a layer of 1/4" Foil Bubble Bubble Poly Radiant Barrier insulation and a Final layer of 3/4" 250PSI Red Styrofoam. On all layers I/we taped the seems with poly box tape (free drop rolls from work off automatic boxing machines.) and used white poly tape for the Radiant barrier tape.

I ended up with somewhere between 4.5" and 5.5" of concrete in my barn, the thicker section is where my tractor drives in/out & planned. On top of the Styrofoam we placed 6x6 10awg Steel Concrete Mesh on Plastic Chairs on 2' x 2' grid and tied the Radiant Tube to that. It made even spacing real easy and the chairs were added prior to pouring crew getting there.

One thing is be sure to add some under ground PIPE Penetrations NOW! add floor drains, power in/out plumbing plumbing in/out penetrations. Even if they are never used NOW is time to do it. I WISH I had added two more as now I have future ideas that I should have included right off. Just missed planning enough.

From this pic click it and go to the photobucket site for a list of series starting on page 4 of the barn folder for all the stuff I've done.


Mark
 
   / 40x60 Farm Shop Build
  • Thread Starter
#26  
Some progress pics and info:

Holes for piers were drilled down to a depth of 4' and a diameter of 12":

P1020048sm.jpg

Building the forms, set using the transit and a string line, forms are built out of 2x8 and built to position the anchor bolts:

P1020049sm.jpg

P1020050sm.jpg

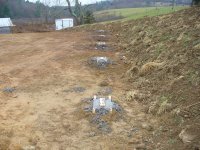
Finished piers, everything turned out square within 1/8":

P1020051sm.jpg
 

Attachments

  • jpg.gif
    jpg.gif
    183 bytes · Views: 308
   / 40x60 Farm Shop Build #27  
Do you have to go down so far because of frost heave?

How far is the bottom of the ditch from your wall? It looks pretty tight to get in there and mow or maintain the plants from overgrowing the area.

Eddie
 
   / 40x60 Farm Shop Build
  • Thread Starter
#28  
Do you have to go down so far because of frost heave?

How far is the bottom of the ditch from your wall? It looks pretty tight to get in there and mow or maintain the plants from overgrowing the area.

Eddie

I set poles and piers 4' deep partly because of the frost, but also to assure they are on undisturbed soil and not fill.

As for the bank behind the shed, it is pretty close at about 3'. The flat area close to the shed will be gravel and the bank behind the shed will be grass. I'll just weed-eat it a couple times a year or let the sheep and cows graze it.
 
   / 40x60 Farm Shop Build
  • Thread Starter
#29  
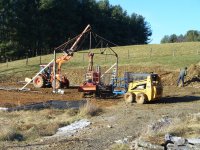
Once the piers were cured it was time to start erecting the building. The first truss was brought over and hung using a jib crane on the M9540. Once suspended we installed the posts, and set it in place, bolted it down and secured it with bracing and some triangulated rigging:
P1020053sm.jpg

The second truss was brought in and set in a similar fashion. The tractor and jib crane were used to hold it in position while we installed a few purlins to secure it:
IMG_2099sm.jpg

The M9540 worked out great, with the jib crane fully extended it would reach to 25', the top of the building is about 22'. That said, these trusses with posts attached are about at max capacity weight wise with that boom so far out:
IMG_2095sm.jpg

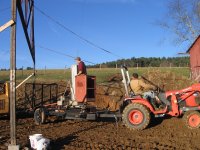
This bucket lift strapped to a trailer behind my B3200 was a real time saver. My father-in-law bought it at the same time we took down the building originally, we've used it for everything from attaching bracing and rigging to hoisting up purlins and tin:
IMG_2093sm.jpg

More to come...
 
   / 40x60 Farm Shop Build
  • Thread Starter
#30  
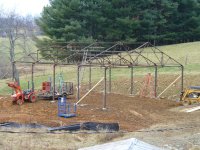
The basic structure took the three of us about 12hrs to build, with minimal bracing and about 4 purlins per section. Once that was up later in the week my brother and I set the remaining 25 or so purlins, the top wall girts and more of the bracing:
P1020054sm.jpg

Lately the local quarry has been having troubles with their crusher, so getting gravel has been hit-or-miss. Finally I was able to get about 50 tons of crusher-run brought in and I got that spread. Working in that terrible mud was starting to get old:
P1020055sm.jpg

This week we got started putting the tin on the roof and have about a third of it up. Progress has been slower lately due to lots of wind, rain and ice we've been having. More updates and pics to come as things progress.
 

Tractor & Equipment Auctions

Rims and Tires (A46502)
Rims and Tires...
Lockwood 14ft Even-Flow Box (A47369)
Lockwood 14ft...
(2) 200 Gallon Oil Tanks (A47369)
(2) 200 Gallon Oil...
John Deere WHP36A (A47307)
John Deere WHP36A...
2003 Buick LeSabre 4 Door Sedan (A46502)
2003 Buick LeSabre...
Mack Model R Truck (A47369)
Mack Model R Truck...
 
Top