48" Brush Hog Re-Assemble

   / 48" Brush Hog Re-Assemble
  • Thread Starter
#21  
Re: 48\" Brush Hog Re-Assemble

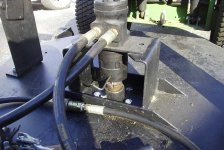
Fifth picture is of the hydraulic motor installed. The top half of the coupling fits into the open slots in the rubber thingy. You can see how the two halves mate up in this shot. Also, an allen wrench is used to tighten the set screw on the bottom half of the coupling. The set screw seats against the key in the shaft slot. All that is left is to put the two bolts back in that hold the motor and attach the blades.
 

Attachments

  • 337015-BrushHogRebuild05.jpg
    337015-BrushHogRebuild05.jpg
    57.7 KB · Views: 402
   / 48" Brush Hog Re-Assemble
  • Thread Starter
#22  
Re: 48\" Brush Hog Re-Assemble

Sixth picture is of the deck underside. I don't like to get under things. It is dangerous and scary. So I used the forks to tilt it up against my boat rack and strapped it in place so it wouldn't squish me.
 

Attachments

  • 337017-BrushHogRebuild06.jpg
    337017-BrushHogRebuild06.jpg
    77.8 KB · Views: 416
   / 48" Brush Hog Re-Assemble
  • Thread Starter
#23  
Re: 48\" Brush Hog Re-Assemble

7th and last picture is of the blades installed and the spare holes with the blade stopper bolts installed. I used grade 8 bolts and locktight, per Power Tracs instructions.

Hooked it all back up and tested in the brush in our back yard. Yeowch!!! It ate it up with amazing terror! /forums/images/graemlins/grin.gif

I'll check the bolts again after a half hour or so of operation and then after each use. I still have to call Power Trac to check on those blades that are bent up about a half inch. While running the brushhog, they appeared to be in the same place as when I first got the unit. So I wonder if they are supposed to be bent or straight. My guess is they are supposed to be straight. Anyone have the 48" brush hog and are your blades straight or bent up a little?
 

Attachments

  • 337019-BrushHogRebuild07.jpg
    337019-BrushHogRebuild07.jpg
    80.8 KB · Views: 697
   / 48" Brush Hog Re-Assemble #24  
Re: 48\" Brush Hog Re-Assemble

The coupling that you are talking about I beleive is called a love joy coupling, it helps absorbe some of the shock on the motor when the blades hit something hard.
 
   / 48" Brush Hog Re-Assemble #25  
Re: 48\" Brush Hog Re-Assemble

Mossroad,

Thanks for the pictures. Cannot type of bearing from the picture, but I don't blame you for not taking it apart. If it ain't broke, don't take it apart.

Duane
 
   / 48" Brush Hog Re-Assemble #26  
Re: 48\" Brush Hog Re-Assemble

Nice job, usual MossRoad quality.
PJ
 
   / 48" Brush Hog Re-Assemble #27  
Re: 48\" Brush Hog Re-Assemble

I have broken bolts on mine several times. I drill a small hole in the bolt and use an easy out to take the bolt out. It takes a two hour job down to 10 minutes.

The spare holes - I put bolts on washers to catch the blades from kick back. They tend to catch on the center post. You then have to loosen a bolt to pull the blade off the center. This (the extra bolts) was recommended by Power Trac and works OK.
 
   / 48" Brush Hog Re-Assemble
  • Thread Starter
#28  
Re: 48\" Brush Hog Re-Assemble

Thanks for the tips and welcome to TBN! /forums/images/graemlins/grin.gif
 
   / 48" Brush Hog Re-Assemble #29  
Re: 48\" Brush Hog Re-Assemble

</font><font color="blue" class="small">( Anyone have the 48" brush hog and are your blades straight or bent up a little? )</font>

The blades on my 48" brush hog became so bent that they consistently jumped the "stop-bolts" when revving up causing much frustration. I ordered a new set and can confirm they are absolutely straight in all dimensions.

Now, does anyone know a way to straighten bent blades so I can have a spare pair handy?
 
   / 48" Brush Hog Re-Assemble #30  
Re: 48\" Brush Hog Re-Assemble

A hyd press will do a good job, if you have access to one.
 
   / 48" Brush Hog Re-Assemble
  • Thread Starter
#31  
Re: 48\" Brush Hog Re-Assemble

How much were the new blades, if I may ask?
 
   / 48" Brush Hog Re-Assemble #32  
Re: 48\" Brush Hog Re-Assemble

</font><font color="blue" class="small">( How much were the new blades, if I may ask? )</font>

60 bucks (plus shipping) for two pieces of 1/4 steel with a hole and and edge. But WhadderYaGonnaDo.

My first attempt to straighten the bent blades was to sandwich them in a vice with the bowed sides facing each other. Cranked down the vice and waited two days. I thought this a rather clever idea.... too bad it had no effect at all. /forums/images/graemlins/frown.gif Guess I'll go looking for a hyd. press as suggested.
 
   / 48" Brush Hog Re-Assemble #33  
Re: 48\" Brush Hog Re-Assemble

/forums/images/graemlins/confused.gif "" too bad it had no effect at all "" /forums/images/graemlins/confused.gif

Because you failed to proceed to Step #2!! /forums/images/graemlins/smirk.gif


Step #1 - Clamp blade in large vise with bent area projecting.

Step #2 - Beat with large hammer to straighten.

Step #3 - Repeat Steps #1 and #2 until the entire blade is straight.


PS: If Step #2 has "no effect at all", immediately select a still larger hammer!!

PPS: I have successfully used this low tech method to straighen the blades from my Brush Cutter!

/forums/images/graemlins/grin.gif /forums/images/graemlins/grin.gif /forums/images/graemlins/grin.gif /forums/images/graemlins/grin.gif
 
   / 48" Brush Hog Re-Assemble
  • Thread Starter
#34  
Re: 48\" Brush Hog Re-Assemble

Ah, yes. The infamous STEP #2... Beat with large hammer. Surprising how that step not only solves a lot of problems, it also makes you feel better, no matter what the project! /forums/images/graemlins/laugh.gif
 
   / 48" Brush Hog Re-Assemble #35  
Re: 48\" Brush Hog Re-Assemble

Thought y'all might enjoy a picture of my "shade tree hydraulic press". /forums/images/graemlins/grin.gif
 

Attachments

  • 506694-2004SEP19-003-MD.jpg
    506694-2004SEP19-003-MD.jpg
    50.1 KB · Views: 336
   / 48" Brush Hog Re-Assemble
  • Thread Starter
#36  
Re: 48\" Brush Hog Re-Assemble

Yes, I do appreciate that. I will have to find a sturdy tree, ah, err, workbench and try that out on my blades. Also need to do that on one of my forks. Thanks for the tip. /forums/images/graemlins/wink.gif
 
   / 48" Brush Hog Re-Assemble #37  
Re: 48\" Brush Hog Re-Assemble

</font><font color="blue" class="small">( Step #2 - Beat with large hammer to straighten.)</font>

You misspelled "Power Trac wrench". /forums/images/graemlins/grin.gif
 
   / 48" Brush Hog Re-Assemble #38  
Re: 48\" Brush Hog Re-Assemble

All this information and these techniques can be found in your Power Trac Owner's Manual. Just look in the chapter entitled: <font color="green"> PERCUSSIVE MAINTENANCE </font> /forums/images/graemlins/grin.gif
 
   / 48" Brush Hog Re-Assemble
  • Thread Starter
#39  
Re: 48\" Brush Hog Re-Assemble

Since there has been some talk about the hidden grease zerk on the brush hog, here's a pictorial of the brush hog being re-assembled after I took it apart last year.

Hope you enjoy the resurrection of this post. /forums/images/graemlins/grin.gif
 
   / 48" Brush Hog Re-Assemble #40  
Re: 48" Brush Hog Re-Assemble

Resurrecting this one, once I found it...

Can anyone tell me the size of the 4 bolts on the stump-jumper for the 48" rough-cut, two which hold the blades and the two that serve as stops?

Are they 5/8"? How long?
 
Last edited:

Tractor & Equipment Auctions

Year: 2016 Make: Ford Model: Explorer Vehicle Type: Multipurpose Vehicle (MPV) Mileage: Plate: Body (A55853)
Year: 2016 Make...
2016 INTERNATIONAL PROSTAR TANDEM AXLE DAY CAB (A59904)
2016 INTERNATIONAL...
2012 JOHN DEERE 13-INCH REAR WHEEL SPACER FOR 10 BOLT HUB (A55315)
2012 JOHN DEERE...
2007 MACK GRANITE CV713 DUMP TRUCK (A60430)
2007 MACK GRANITE...
ALLMAND NIGHT-LIGHT PRO 4 BULB LIGHT PLANT (A52706)
ALLMAND...
2003 McCormick XTX 185 XtraSpeed Tractor (A56438)
2003 McCormick XTX...
 
Top