Al B's House rework

   / Al B's House rework
  • Thread Starter
#81  
And today we went and got forks for the hoe....

And they got in my paint chips for my floor, and I learned that you wear golf shoes when doing epoxy floors if you need to walk on them. Makes sense, just never thought about it.

Hopefully I will get a little done at the property tomorrow.
 

Attachments

  • DSCN2059.JPG
    DSCN2059.JPG
    402 KB · Views: 263
   / Al B's House rework #82  
Al ,If You wan't to pour more footing at once ,Here's a neat trick. At footing edge drive 2" pipe to refusal with a 90 lb. jackhammer every 5 ft. bolt low into old footing or wall. Now excavate and pour reinforced footing. remove pipe after 3 1/2 weeks. refusal is no downward movement after 1 minute of blows.

In your earlier pix ,you are measuring a window, in the background we see open studs. They are bowed. there is some point load there, why. Don't miss much after 45 yrs ,I guess
 
   / Al B's House rework
  • Thread Starter
#83  
Tool, the studs in the background of that pick were on the back of the bath. I think they are bowed from moisture, There does not seem to be any load on them, I will be cutting them out in the next day or two to sneak in my new Shower unit (#6 for those counting :) )

So, Friday evening was spent bringing the new forks out to the house, straightening fork holders with a big sledge and then trying to get the forks broke loose from the pivoting bar. No success yet.

I also spent some time trying to visualize the kitchen cabinets and washer and dryer into the basement, and the Drain line it will take to make them work.

See pictures, drain is all the way to the left, want sink about where yellow garbage can is, washer in the vicinity of 4 gang box and dryer near or under the window.
 

Attachments

  • DSCN2060.JPG
    DSCN2060.JPG
    418.8 KB · Views: 227
  • DSCN2062.JPG
    DSCN2062.JPG
    375.7 KB · Views: 209
  • DSCN2063.JPG
    DSCN2063.JPG
    364.5 KB · Views: 198
  • DSCN2064.JPG
    DSCN2064.JPG
    360.1 KB · Views: 209
   / Al B's House rework
  • Thread Starter
#84  
Today Hanna, Dean (10) Christina (16) and I all hit a good lick at it.
We cleaned up the tree stuff that Joey dropped for us, made a pretty impressive burn pile, especially when you consider it was only 1/3 of the tree. No picture today, it was raining when I got the camera out.

We then decided to work some of the plumbing issues. We got the 2 outside freezproof sillcocks in, and connected after a bunch of cussing, got the Vanity hot and cold lines run, as well as the Toilet water supply line, got the toilet base mounted and siliconed in place, got the vanity base installed, screwed to the wall and leveled, then got the new vanity fixtures in and working and then set the sink top on the vanity. I think I am getting water backfeeding through the lines on my occassionally. 85% will just solder no problem at all, then there will be one that I cannot get to flow to save my life. Had to go back and rework 2 joints so I can live with that.

Kids got a bunch of stuff cleaned up and hauled off a load of trash to the dump.

Dean drove the tractor while Hanna and I loaded it, it is nice that he is getting older, every now and then I want him to "Hurry UP" but have to remind myself that he is being safe and cautious, and that is exactly what I really want him to be.

Big Daddy came by and lent a hand, my bathroom fan now has screening over the outlet, and a screen back on my soffit vents where it pokes through.

Hopefully he will show tomorrow, and it won't be too wet and we can work on getting the carport up and going.

I picked up a set of hoses for the vanity, and a P-trap, so hopefully we can have it going tomorrow or Monday with any luck.

Feels like we are getting nowhere, but we are eating this elephant one bite at a time, Unfortunately, there have been some days where I have seemed to get a bite of the butt......... :(

As Harv would say, Life's good.

Oh, and checked out my plasma today, and it is still throwing a PIP light and a overtemp light... :( Thats not good.

We also moved a load of shop equipment out there today, engine hoist, engine stand, etc. etc.
 

Attachments

  • DSCN2065.JPG
    DSCN2065.JPG
    384.5 KB · Views: 236
  • DSCN2066.JPG
    DSCN2066.JPG
    369 KB · Views: 208
  • DSCN2067.JPG
    DSCN2067.JPG
    374.4 KB · Views: 211
  • DSCN2068.JPG
    DSCN2068.JPG
    373.3 KB · Views: 204
  • DSCN2069.JPG
    DSCN2069.JPG
    396.6 KB · Views: 204
  • DSCN2070.JPG
    DSCN2070.JPG
    384 KB · Views: 234
   / Al B's House rework
  • Thread Starter
#85  
So, in my continueing saga of finding the "easy" fix immediately upon completeion of the "harder" fix, it was mentioned on Terry Loves plumbing on my question about what to do on the floor with the hole cut too large that there was a repair kit for that............... (course, I fixed it prior to reading that)

So while in HD I look around the toilet flanges, nope, don't see anything, then realize that the same stuff is in many boxes, hmmmmm, start reading the boxes,,,,, There, top shelf, with a bunch of toilet flanges sticking out of the top,,, "Toilet flange repair kit,,,, For loose toilets, rotted floors, or I kid you not a bit,,, When the hole has been cut too big" $12,,,,,, Go figure.

Two metal plates that go on either side, comes with screws etc.......... I had honestly thought about going that route but decided it would be too much work etc. If I had realized they were there, galvanized, with all hardware for $12, would have been all over that like white on rice.

Chalk that one up right there with that other Oatey product that was made to slide inside the 4" CI pipe and tighten from the inside...

Some lessons you learn before, but many you learn after, long as nobody gets hurt, lessons are good. :)
 
   / Al B's House rework #86  
Seee Alan that is why we need you on TBN. because in the future when somebody cuts the hole for the toilet to big, you will be able to give first hand expert advice.
Wanted to ask you how is the water in the basement issue been for you after your remediation? You ahve metnioned now and then about it raining but you have not updated us on if the basement is staying dry or not. Just curious is all.
 
   / Al B's House rework #87  
AlanB said:
See pictures, drain is all the way to the left, want sink about where yellow garbage can is, washer in the vicinity of 4 gang box and dryer near or under the window.

Hey Alan is that grey tape a final fix on the drain? Hope not!!

Keep busy

Wayne
 
   / Al B's House rework
  • Thread Starter
#88  
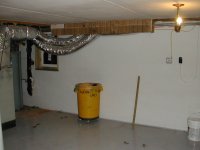
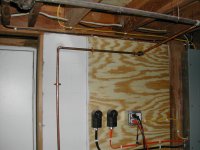
Well Rox, remediation is not done, mold is gone and walls are painted, but still have several issues to contend with, outside grade and gutters primarily. I have the water infusion slowed, but a long way from stopped. :D Going to have some problems with the paint on some of the lower portions. Going to be some rework / rethinking done, but want to get rid of several of the contributing factors first. But I can walk out the garage door and not be under water now. :)

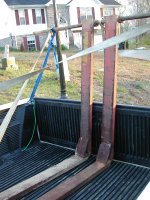
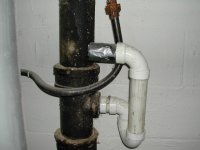
Come on now Wayne, give me some credit, that thare duct tape was the GOOD stuff :eek:

So, todays projects, kind of taking a break on a Sunday,

Stop by HF and pick up brad nailer,,,, and somehow end up with $200 worth of stuff in the cart.....

On the way out, realize I need a tube of construction adhesive,,, so just whip into HD and pick up one tube,,,,,, $400 + later darn dont we have nice new ceiling fans for the house :confused:

Highlights of the day,,,, working in the attic, screwing in a piece of drywall, and the DW folds up the attic stairs cause she wants to walk by....... As I am backing out onto them :mad:

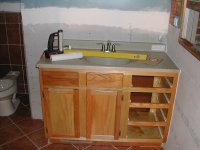
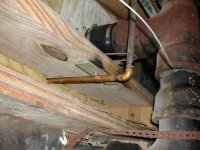
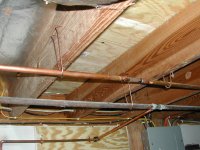
Got the wrong length water hoses for the sink... well the one side I did not measure at least... And I need a different P trap then standard because the sink is offset from where it was.

Got some trim nailed onto the vanity to assist in supporting the sink base.

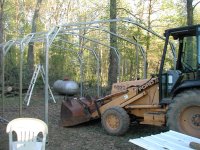
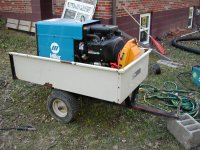
Welded up the anchor rods, for the carport and got them in, welded up the coupler for the welding trailer so we could tow it again.... So do you disconnect the battery from the welder that you are using to weld the trailer that the welder is sitting in :p

Got the frame of the Carport assembled. Went to hang the sheets of steel and the DW had to go to church................ So it was BACKHOE time...:D

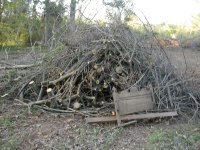
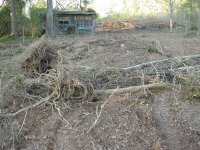
Got after a group of 5 or 6 trees out near the road, trying to learn how to run the backhoe, went pretty well, got them dug out, and dragged over to a burn area....

Then moved a bit of dirt to give access beside the mulch piles.... That went pretty well,,,,

Then fixed a big puddle in the drive area that is still dirt,,,, That went pretty well.................

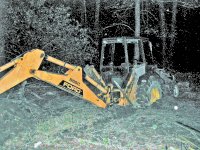
Then decided to scootch a bit of junk out from around the storage building so I could get the Hoe back there to level the building with... Hmmmm looks a bit soft, the dozer had some problems here, well, push gently, yep, looks ok, pushing the stuff back,,,,,,,,,,,,,,,,,, And I think I found the bad spot that the dozer got into.......... :eek: That did not work so well.................

So, when you are operating a 4wd Ford 555C backhoe, and the front wheels disapear under the mud,,, and the bottom step is on the ground, and the bottom of your hoe mount is in the dirt, and the rear wheels are spinning free..................... Does that fit the definition of "STUCK"............

I think instead of hoe sticking my way out, I just dug myself in deeper..... Hanna showed up about 8pm after I had decided it would have to wait another day,,,, so I assure you she will be getting pictures of this tomorrow.... :(

Not sure if I can stand going in to work tomorrow... Might just become sick to my stomach thinking about a sinking hoe..................
 

Attachments

  • DSCN2071.JPG
    DSCN2071.JPG
    375.1 KB · Views: 240
  • DSCN2072.JPG
    DSCN2072.JPG
    420.2 KB · Views: 232
  • DSCN2074.JPG
    DSCN2074.JPG
    381.8 KB · Views: 225
  • DSCN2075.JPG
    DSCN2075.JPG
    400.2 KB · Views: 236
   / Al B's House rework
  • Thread Starter
#89  
Lets see, 2078 is the parts of the tree that Joey cut down that we moved yesterday,,, less then 1/3 the tree...... Did I mention it was a big tree? Dean stacked the wood nicely with Babe...

2079 the little trees I took out with the hoe, 4 to 6" caliper I bet, nothing fast, but I know all the roots etc are out with them, and that is nice.

2080, the front entrance, slowly getting clearer, this is where the trees were this morning....:D

2081 the house is slowly starting to see some light... It is taking some time to get there, but one bite at a time, I am munching on this elephant.

2082 the parking area is busy,,, too bad the wrong stuff is there..... Never did figure out how to put up those sheets by myself... and for all you don't climb on a bucket folks,,,, Stop looking here ;)
 

Attachments

  • DSCN2078.JPG
    DSCN2078.JPG
    406.5 KB · Views: 225
  • DSCN2079.JPG
    DSCN2079.JPG
    431.5 KB · Views: 200
  • DSCN2080.JPG
    DSCN2080.JPG
    442.8 KB · Views: 201
  • DSCN2081.JPG
    DSCN2081.JPG
    435.4 KB · Views: 208
  • DSCN2082.JPG
    DSCN2082.JPG
    440.4 KB · Views: 223
   / Al B's House rework
  • Thread Starter
#90  
OMG,,,, Adobe photoshop to the rescue,,,,,,, well, maybe of my LOVELY WIFE :rolleyes:

THANKS JIM

So, Hanna took a picture of it in the dark and photoshopped it to lighten it, so yes, the quality is poor..

Bear in mind there are now 12" cinder blocks under the tires at the time this picture was taken.... :eek: I had been working on it a while before she showed up,,,, somehow, I feel this is one I will be reminded about for a long time to come....................... And she say's, YEAH you know that !
 

Attachments

  • DSCN2083_edited-2.jpg
    DSCN2083_edited-2.jpg
    579.2 KB · Views: 252

Tractor & Equipment Auctions

2012 PETERBILT 386 (A50854)
2012 PETERBILT 386...
2011 Nissan Titan SV 4x4 Crew Cab Pickup Truck (A50323)
2011 Nissan Titan...
P&H OMEGA 20-20 (A50854)
P&H OMEGA 20-20...
Texas Built 25' Stand Alone Inline Feeder (A50515)
Texas Built 25'...
2018 CATERPILLAR 259D SKID STEER (A51242)
2018 CATERPILLAR...
2019 Chevrolet Tahoe SUV (A49461)
2019 Chevrolet...
 
Top