B2620 Cab Installation and Modifications

/ B2620 Cab Installation and Modifications #21  
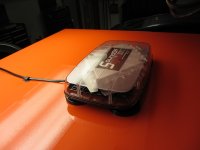
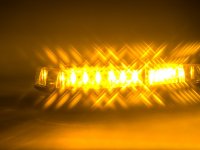
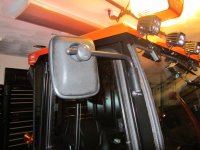
Here's some close-up pictures of the Rigid Industries Dually D2 LED Lights that I used. I'll try to get a picture of them at night to show how bright they are.

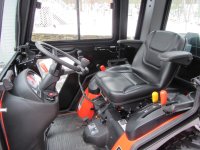
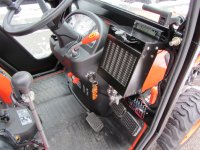
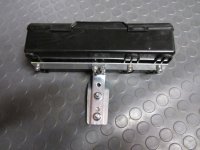
In addition, I had a request to show a close-up of the ATV winch rocker switch that I used for the chute control. If you need anymore, just let me know.

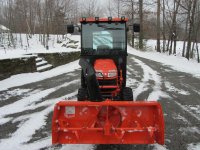
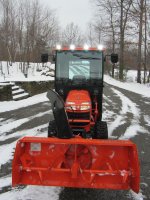
I really think you did an excellent job with this install.

Where did you mount the ATV winch on your tractor? I've been contemplating getting on for my B3200. Also, what strength winch did you get? (i.e. 2000lbs, 3000lbs, etc)
 
/ B2620 Cab Installation and Modifications #22  
Bidman1970;

No winch mounted.

The winch rocker switch is used to control the Shute deflector
 
/ B2620 Cab Installation and Modifications #23  
Bidman1970;

No winch mounted.

The winch rocker switch is used to control the Shute deflector

Doh! (as Homer Simpson would say).....makes sense....actually a really good location for the switch and it's usage!
 
/ B2620 Cab Installation and Modifications #24  
Eric;

Those LED's are nice!

Do you have any trouble with sticky snow not melting off or have you not had the chance yet to use during a snow storm?
 
/ B2620 Cab Installation and Modifications
  • Thread Starter
#25  
Those LED's are nice!

Do you have any trouble with sticky snow not melting off or have you not had the chance yet to use during a snow storm?

Thanks. Even though I haven't used them during a snow storm yet, I don't expect any trouble. They definitely get warm, which should be enough to melt any snow/ice accumulation immediately.

In fact, the entire light housing assembly is actually one big heat sink with large cooling fins in the rear (they weight a ton for their small size - looks are definitely deceiving in this case.) I believe their raw output is something like 2600 lumens per light fixture. A lot of power output for such a small light (which is the main reason I went with them.)
 
/ B2620 Cab Installation and Modifications
  • Thread Starter
#26  
I made some more progress today with the installation of the mirrors for the cab. Even though Sims provided me with a free mirror kit, I decided not to use their kit as I wanted something more substantial. Instead, I went with the Depco Little Hoss Mirror Kit along with some modifications to the arm assemblies.

In my opinion, the Sims mirrors were just too small and even though I wish the Depco mirrors were a little larger, it definitely fits the size of the cab much better than the Sims mirrors.

To install them, all I had to drill holes in the door frames and install 5/16-18" Rivnuts.
 

Attachments

  • mirror1.JPG
    mirror1.JPG
    252.9 KB · Views: 287
  • mirror2.JPG
    mirror2.JPG
    258.2 KB · Views: 249
  • mirror3.JPG
    mirror3.JPG
    318.8 KB · Views: 282
  • mirror4.JPG
    mirror4.JPG
    305.9 KB · Views: 309
  • mirror5.jpg
    mirror5.jpg
    52.6 KB · Views: 195
Last edited:
/ B2620 Cab Installation and Modifications
  • Thread Starter
#27  
Now that the cab is installed, I no longer had a place to mount my toolbox. The bracket that comes with the backhoe to mount the toolbox to the ROPS interfered with the cab.

Another member mentioned they mounted their toolbox behind the seat, so it got me thinking. Why not make a quick bracket to mount to the SMV bracket behind the seat?

After a trip to TSC, I came up with this design. When the weather gets warmer, I'll break out my welder and weld everything together rather than using bolts. For the winter, this should work just fine holding my 3-point hitch and snow blower shear pins.

In addition, I mounted an MTD chute clearing tool to the BX2750D. It fits right on the side of the chain house without having to drill any holes. It should work well for clearing slush from the chute when it gets blocked (actually, I needed to use it during the last snow fall.)
 

Attachments

  • chute.JPG
    chute.JPG
    266.6 KB · Views: 337
  • bracket2.JPG
    bracket2.JPG
    261.2 KB · Views: 280
  • bracket3.JPG
    bracket3.JPG
    269.5 KB · Views: 267
  • bracket1.JPG
    bracket1.JPG
    211.5 KB · Views: 243
/ B2620 Cab Installation and Modifications #28  
Nice mirrors!

Just watch running along buildings or trees...don't ask
 
/ B2620 Cab Installation and Modifications #29  
Eric, You do some very nice work!! My hats off to ya..May your wrench never slip..:laughing:
 
/ B2620 Cab Installation and Modifications #30  
Eric,
awesome job and including the clear pics of your fine work much appreciated!

To bad the cab company wasn't paying attention to their problems, and if I were them I'd be offering more than a set of mirrors for your engineering deficiencies as a consultant as it's obvious to me you have some special talents.

As the proud owner of a cabbed B3030 the last 3 years my advise to you as long as you're on a roll like you are, go ahead and install that blower/fan as
in my experience you'll definitely be needing it. Fogged over windows was a
real problem to figure out and I have air conditioning which works to get rid of the moisture which you don't. If it's there and you don't need it you don't have to use it, and judging by your obvious mechanic skills would have no problem coming up with the idea and fabbing up a removable mount to take it out in the summer if you'd want to. Or have it there to use when you add the air next summer if you use it for mowing because with the cab you'll find out quickly that you'll need it. Think "greenhouse" cooking heat in the sun.
Al
 
/ B2620 Cab Installation and Modifications
  • Thread Starter
#31  
Eric,
awesome job and including the clear pics of your fine work much appreciated!

To bad the cab company wasn't paying attention to their problems, and if I were them I'd be offering more than a set of mirrors for your engineering deficiencies as a consultant as it's obvious to me you have some special talents.

As the proud owner of a cabbed B3030 the last 3 years my advise to you as long as you're on a roll like you are, go ahead and install that blower/fan as
in my experience you'll definitely be needing it. Fogged over windows was a
real problem to figure out and I have air conditioning which works to get rid of the moisture which you don't. If it's there and you don't need it you don't have to use it, and judging by your obvious mechanic skills would have no problem coming up with the idea and fabbing up a removable mount to take it out in the summer if you'd want to. Or have it there to use when you add the air next summer if you use it for mowing because with the cab you'll find out quickly that you'll need it. Think "greenhouse" cooking heat in the sun.
Al

Thanks for all the kind words. In retrospect, it would have been better to spend the extra money and get the B3030 with cab given all the work that was involved with putting the Sims cab together including all the associated wiring and modifications. Plus as you pointed out, I'd have Air Conditioning for the summer! :)

As for the circulation fan, I had thought about making a magnetic mount for it with a plug so I can easily remove it when I'm not using it. I may still try to do this since it did fog a little when I was snow blowing for the first time. (Although, it was very humid and rainy at the time, so I'm hoping that's this will be the worst it's going to get.)

I should only need the fan for the winter since the cab panels will be removed for the summer (you need to pull the rear panel in order to use the backhoe.) I'll have to think about this some more and see how best to mount this, but I think behind the seat facing the front windshield will be the best location (plus I'll avoid hitting my head when I'm getting in/out of the cab! ;) )
 
Last edited:
/ B2620 Cab Installation and Modifications
  • Thread Starter
#32  
Here's a few pictures of the SoundOff Pinnacle LED Mini Lightbar that I installed on the roof of the cab. It's held in place with magnets, so I didn't have to drill any holes in the roof and risk getting leaks. It's really bright for it's relatively small size and has 28 different light patterns that you can program.

To change the light pattern, I also installed an additional momentary push button switch (that is separate from the on/off switch) on the side of my switch control panel. It works well, and I don't need to disconnect anything should I decided to change the pattern.

I'll try to make a video or get some better pictures at night of all the lighting to show how well everything works.
 

Attachments

  • lightbar.JPG
    lightbar.JPG
    200.4 KB · Views: 230
  • lightbar2.JPG
    lightbar2.JPG
    192.8 KB · Views: 234
  • lightbar3.jpg
    lightbar3.jpg
    97.3 KB · Views: 232
/ B2620 Cab Installation and Modifications
  • Thread Starter
#33  
Here's some much better pictures during the day of everything. This should be a lot clearer than the previous pictures I've posted.

I also finally picked up my BX2763A blade over the weekend, but I haven't had time to install it yet and take pictures. Will post pictures shortly.
 

Attachments

  • IMG_0818.JPG
    IMG_0818.JPG
    475.7 KB · Views: 294
  • IMG_0826.JPG
    IMG_0826.JPG
    474.4 KB · Views: 280
  • IMG_0819.JPG
    IMG_0819.JPG
    459.4 KB · Views: 366
  • IMG_0820.JPG
    IMG_0820.JPG
    338.7 KB · Views: 260
  • IMG_0822.JPG
    IMG_0822.JPG
    319.4 KB · Views: 348
  • IMG_0821.JPG
    IMG_0821.JPG
    307.7 KB · Views: 298
  • IMG_0828.JPG
    IMG_0828.JPG
    404.6 KB · Views: 331
  • IMG_0827.JPG
    IMG_0827.JPG
    366.2 KB · Views: 943
  • IMG_0823.JPG
    IMG_0823.JPG
    380.4 KB · Views: 347
  • IMG_0824.JPG
    IMG_0824.JPG
    401.8 KB · Views: 343
/ B2620 Cab Installation and Modifications #34  
Hi Eric.

You convinced me....

I just ordered two sets of those Dually D2 lights.

Is it one harness per pair of lights ?

Thanks, Tim
 
/ B2620 Cab Installation and Modifications
  • Thread Starter
#35  
I used one harness for both pairs of lights, however the load on the wires is pretty much at it's limit with the 7.6 amps load. I shortened the wires as much as I could, and I haven't ran into any problems (the wires never got even the slightest bit warm and I ran them for several hours while blowing during the last storm.)

Also, the wiring harness that comes with the D2's is much nicer than the straight Dually's. It comes with a relay and heavier gauge wiring whereas the Dually's don't.

Post pictures once you get them installed - I think you're going to really like them! Good luck!
 
/ B2620 Cab Installation and Modifications #36  
I used one harness for both pairs of lights, however the load on the wires is pretty much at it's limit with the 7.6 amps load. I shortened the wires as much as I could, and I haven't ran into any problems (the wires never got even the slightest bit warm and I ran them for several hours while blowing during the last storm.)

Also, the wiring harness that comes with the D2's is much nicer than the straight Dually's. It comes with a relay and heavier gauge wiring whereas the Dually's don't.

Post pictures once you get them installed - I think you're going to really like them! Good luck!

Eric,

Thanks for that info. I appreciate it.

I look forward to some pics when you get the chance.

Regards, Tim
 

Marketplace Items

207280 (A52708)
207280 (A52708)
Adams 16T Tender Body (A61307)
Adams 16T Tender...
LOAD OUT AND SHIPPING (A61166)
LOAD OUT AND...
205196 (A52706)
205196 (A52706)
2021 MULTIQUIP 25 WHISPERWATT AC GENERATOR (A59823)
2021 MULTIQUIP 25...
2019 PJ TRAILER 32FT GOOSENECK (A55745)
2019 PJ TRAILER...
 
Top