B7610HSD snowplow retrofit

   / B7610HSD snowplow retrofit #51  
dholly,

I'm glad you got everything working. It's a real nice looking (and now functioning) addition. This has been a very interesting thread. My curiosity is really piqued now and I need to go home and check the valve on my B7610 to see which P/N I actually have. I sure don't remember ever having a detent towards the right..... Hmmmmm.
Thanks again for a great post!


Regards,
Duber
 
   / B7610HSD snowplow retrofit
  • Thread Starter
#52  
Yep, between the individual parts, sub-assemblies, assemblies and kits, I can't make heads nor tails out of their part# system. Funny thing is neither can my dealer half the time!

I wonder if B2009-1 signifies for LA352-FL1 ???
 
   / B7610HSD snowplow retrofit
  • Thread Starter
#53  
Used the remaining flat stock to make a 2-position lower lift mount last night, although I had to temp rig a bolt until I can find my 3/4" bit to drill out for the cylinder pin! The first position gives good blade clearance height for working purposes, getting over the garage apron, etc. at full up, and the second position gives a few more inches for easy loading onto my trailer for transport if necessary. I did make sure to leave a little piston stroke for downforce.
 

Attachments

  • 776923-CIMG3612_0003.jpg
    776923-CIMG3612_0003.jpg
    71.2 KB · Views: 391
   / B7610HSD snowplow retrofit
  • Thread Starter
#54  
Deerlope is correct, this is a BIG and HD setup for a B7610. But that's GOOD! I wanted a blade heavy enough to clean well on float with one pass, as well as wide enough to make doing my drive in two passes (one up, one back) at full or close to full angle. There is no problem at all with the lift cylinder handling the blade weight. I did find the 60" blower weighs in at about 400lbs and, of course, I'm using the appropriate subframe to transfer forces so I think I'll be just fine.
 

Attachments

  • 776926-CIMG3613_0003.jpg
    776926-CIMG3613_0003.jpg
    55.8 KB · Views: 373
   / B7610HSD snowplow retrofit
  • Thread Starter
#55  
Happy Thanksgiving! I was thankful this am. to find a little of the white stuff to give the new setup a try. Didn't even bother with 4wd or the ballast box, and she worked like a charm. It was so much fun I surprised my neighbor by doing his long drive too!

Bring it on Ol' Man Winter! /forums/images/graemlins/laugh.gif
 

Attachments

  • 776928-CIMG3617_0003.jpg
    776928-CIMG3617_0003.jpg
    58 KB · Views: 393
   / B7610HSD snowplow retrofit
  • Thread Starter
#56  
</font><font color="blue" class="small">( Nice lookin job, but I can not beleive that you did all that to save a few bucks. Now when you want to use the FEL look what you got to change and unbolt. You could have had a better set up if you would have put a QA on the FEL, bucket and plow. It would then require only to throw 2 levers and uncouple 2 hoses. I had the same set up that you have but had a blower and a plow. It was about 2hrs min. just to change over to the FEL. But as long as you are happen with it and don't need the Fel in the winter you are all set. )</font>

I'm not sure why you would say that, but I can hook/unhook my loader in less than 1 min so no big deal there. Pulling the (2) main quick pins (which I likely will replace with a single long quick pin) and the lift cylinder pin for the plow is even faster. Admittedly, it takes a bit of jiggling to get the main pins on the plow frame installed, but not a lot of time. When it's on the dolly, I can drive right into it and small adjustments are pretty simple.

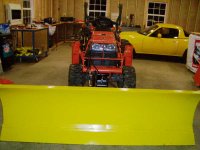
And 2hrs?! Gad, that must be due to the blower because last night I unhhooked the plow and it's hoses, moved the tractor and detached the FEL and hoses, then reattached plow and it's plumbing... all in a tic longer than 4 mins. I timed it. /forums/images/graemlins/wink.gif

Actually, I did think about Q/A for my loader arms and passed to go the route of the subframe. Why?

- I wanted the plow back closer to the tractor to help prevent side slip with the plow angled into heavy snow, and

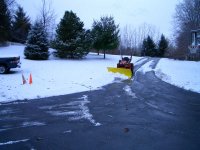
- there is a possibility this plow may be a stop gap measure on the way to a front mount blower (which is not in the checkbook right now). One look at the burning bushes that line both sides of our 600'+ driveway makes plowing a PITA --see pic-- so I may need the subframe anyways, and

- my out of pocket on the project is less than $900. IMHO, I got a heck of a lot better plow than the oem setup for much, much le$$. How much would the Q/A hardware cost for everything?

- figured if I decide to let someone else do the plowing or even throw a plow on my P/U some day, I could sell the subframe with male quick hitch and the plow for at least what I have in it, and

- I needed a decent project bigger than an ashtray for my very first welding-related project!

So, with that in mind, this setup is simple, quick and easy enough for me. I can live with it! And, when I get it sandblasted and painted up purty, you will be really jealous! /forums/images/graemlins/grin.gif
 

Attachments

  • 776944-CIMG2185_0003.jpg
    776944-CIMG2185_0003.jpg
    33.8 KB · Views: 355
   / B7610HSD snowplow retrofit #57  
Nice job dholly, glad you got to try it out! I love these kinds of threads with lots of pictures as the project moves along.

Happy Holidays!
 
   / B7610HSD snowplow retrofit #58  
Looks like it should do the job just fine! /forums/images/graemlins/ooo.gif Now back to the discussion about 3 vs. 4 way valves. The reference to an earlier thread had some info on identifying a 3 way or 4 way valve- "Both valves have 2 hexagonal pieces screwed into the end opposite the control handle. On the 3 way one of the pieces is about half as long as the other. On the 4 way valve the 2 pieces are float detent valves and are equal length." Does anyone think that simply by changing the lower cup to make it longer, that the 4th function could be obtained? I don't have a diagram of either valve setup handy, so maybe it wouldn't be possible.
 
   / B7610HSD snowplow retrofit #59  
</font><font color="blue" class="small">( Does anyone think that simply by changing the lower cup to make it longer, that the 4th function could be obtained? )</font>

The reason for the longer end cap is that the actual spool rod itself may be longer. On most valve designs, the spool rod, end cap, internal springs, washers and other components can be changed to change the functionality.

If you want to see how the different spool types work internally then you should go to the Prince Hydraulic web site and download the Model SV parts manual. Everything you ever wanted to know will be there.
 
   / B7610HSD snowplow retrofit #60  
Hello,

Great looking setup - and thanks for documenting the whole thing so well! I am in the process of adapting an old Meyers plow to my L4330 (by in the process I mean I have the plow dissassembled and I am about to start the process of grinding, cleaning, and painting the whole setup). I was considering building my own subframe but your post got me thinking about attachment to a factory subframe. Could you give me an idea how much your factory sub frame cost? I also live in upstate NY - if were not to far apart I would love to come and see your setup sometime!

Thanks,

John


Tractor & Equipment Auctions

2020 Kinze 3505 High Speed 6/11 Planter (A52128)
2020 Kinze 3505...
Toro Workman Low Profile Spray system 200 (A50322)
Toro Workman Low...
2013 Chevrolet Caprice Sedan (A50324)
2013 Chevrolet...
2010 Ford Edge SE SUV (A51694)
2010 Ford Edge SE...
Tallman Water Pump (A50774)
Tallman Water Pump...
(6) MF Suitcase Weights (A50515)
(6) MF Suitcase...
 
Top