Box Blade Build

/ Box Blade Build #1  

jb1390

Gold Member
Joined
Aug 27, 2010
Messages
431
Location
Southeastern CT
Tractor
Mahindra 3550, Hitachi 120-2
I wanted a box blade a little heavier than what I could get at tractor supply, and wasn't happy with the price on the heavy ones.

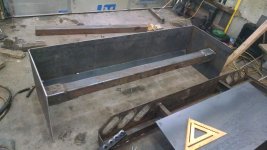
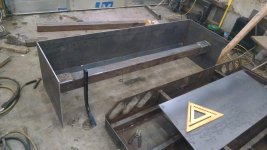
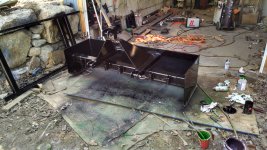
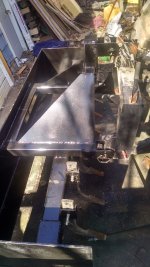
I used 3/8" mild steel for the box, and a piece of 4" by 1/4" wall box tubing for the crossbar.

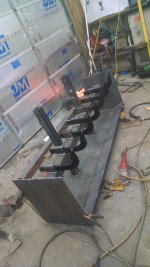
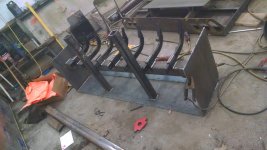
It went together very quickly, I had all the parts sheared by my steel supplier.

$335 including tax for a 4x8 sheet cut to size.

It's 20" tall, 24" deep, and 76" wide
 

Attachments

  • IMG_20150403_194351518.jpg
    IMG_20150403_194351518.jpg
    715.4 KB · Views: 610
  • IMG_20150403_194403621.jpg
    IMG_20150403_194403621.jpg
    729.8 KB · Views: 847
  • IMG_20150403_231241237.jpg
    IMG_20150403_231241237.jpg
    683.4 KB · Views: 676
  • IMG_20150403_231254127.jpg
    IMG_20150403_231254127.jpg
    756.9 KB · Views: 886
/ Box Blade Build
  • Thread Starter
#2  
No hardened cutting edges yet, it's just 3/8" steel on the bottom. I have the front and rear cutting edges angled and braced, so it's pretty strong there. Depending on how it's wearing in I may not bother with the bolt on cutting edges, it's not an implement I'm planning on using frequently.

I primarily wanted one for the ripper teeth, and to do rough grading to protect the loader arms.

Seems to work pretty well so far.
 

Attachments

  • IMG_20150413_131208595_HDR.jpg
    IMG_20150413_131208595_HDR.jpg
    1 MB · Views: 533
  • IMG_20150413_131219597_HDR.jpg
    IMG_20150413_131219597_HDR.jpg
    1,006.4 KB · Views: 443
  • IMG_20150416_092252606_HDR.jpg
    IMG_20150416_092252606_HDR.jpg
    1,005.6 KB · Views: 449
  • IMG_20150416_092303487_HDR.jpg
    IMG_20150416_092303487_HDR.jpg
    951.4 KB · Views: 413
/ Box Blade Build #5  
Nice built, they can never be too strong! Last winter, my box blade was my best friend, with numerus ice storm, backing up with the rear end of a tough box blade... the ice was just easily chipping away!

You will be happy!box blade.jpg
 
/ Box Blade Build #6  
As the previous one, nice build !
 
/ Box Blade Build #7  
No hardened cutting edges yet, it's just 3/8" steel on the bottom. I have the front and rear cutting edges angled and braced, so it's pretty strong there. Depending on how it's wearing in I may not bother with the bolt on cutting edges, it's not an implement I'm planning on using frequently.
How about some hard facing?
 

Attachments

  • Hard facing bucket.jpg
    Hard facing bucket.jpg
    241.1 KB · Views: 605
/ Box Blade Build
  • Thread Starter
#8  
How about some hard facing?

Not a bad idea, I don't currently have a stick welder but I've been thinking I need to get one just to learn. Would be nice practice for that process. I do have a miller econotig, theoretically that'll stick weld but I don't have a clamp for it right now, and it's limited to 150 amps at a low duty cycle.

Can you hardface along the edge of a piece of material?
 
/ Box Blade Build #10  
Can you hardface along the edge of a piece of material?
Sure!:thumbsup:
Contact Mark with Everlast, and see what kind of deal he can make you on a PowerArc 200, or 300.
 

Attachments

  • 3 Twins.JPG
    3 Twins.JPG
    234.4 KB · Views: 284
/ Box Blade Build #11  
That's a really nice blade, better than I could have built.

I do have one concern, where the top link attaches. It seems like it could use a brace from there to the top of the blade. There can be a lot of strain where the upright square tubing is.
 
/ Box Blade Build #12  
Good strong fab project! I lke it. What about the back square tubing not being the whole width? Would solidify a whole lot more I would beleive.
Is this box blade built only for loosening up materiel on your drive way? Any field trial yet? Would be nice to know how your tractor be fairing!:thumbsup:
 
/ Box Blade Build
  • Thread Starter
#13  
That's a really nice blade, better than I could have built.

I do have one concern, where the top link attaches. It seems like it could use a brace from there to the top of the blade. There can be a lot of strain where the upright square tubing is.

Your concern has merit. I also had concern in that section, but thought the 3" by 3/8" bar would be enough. I figured if it would fail, it would twist, since flat bar isn't very good in torsional loading. Well, it did.

I did test it before painting, and it stayed straight even ripping some hard ground and pulling out rocks.

This happened by hitting a rock pretty hard going backwards. I'm glad I didn't do anything to the 3 point arms.

I'll add gussets or something to keep it from happening again.

I was originally going to add a bar to the rear of the blade like you were thinking, but I found it was in the way too much if I wanted to adjust the ripper teeth. There are lots of designs with the large triangles like I used with no center connection, the reason mine bent is the horizontal section of flat bar as opposed to a formed end like the commercial unit. I'll add gussets and it won't bend again.
 

Attachments

  • IMG_20150501_084156771_HDR[1].jpg
    IMG_20150501_084156771_HDR[1].jpg
    1 MB · Views: 326
/ Box Blade Build
  • Thread Starter
#14  
Good strong fab project! I lke it. What about the back square tubing not being the whole width? Would solidify a whole lot more I would beleive.
Is this box blade built only for loosening up materiel on your drive way? Any field trial yet? Would be nice to know how your tractor be fairing!:thumbsup:

It would be stronger if the tubing went the whole width, but it's not necessary either. The "beam" to prevent bending is most important at the bottom of the blade, and it's 3/8" steel, with the front and rear cutting edges tied together to form a triangle. I just added the box in between the arms because I had a couple pieces of scrap material that fit in there nicely.

The blade is primarily for loosening rough areas before grading with the loader. I have one project I really need it for, which is cleaning up after burying this rock.

I doubt I'll use it on the small section of gravel driveway I have, a york rake is a lot gentler and all that I need to smooth things out there.
 

Attachments

  • IMG_20141008_174541132[1].jpg
    IMG_20141008_174541132[1].jpg
    1 MB · Views: 270
  • IMG_20141008_174605139[1].jpg
    IMG_20141008_174605139[1].jpg
    1.1 MB · Views: 247
  • IMG_20150408_184048457[1].jpg
    IMG_20150408_184048457[1].jpg
    1.1 MB · Views: 244
/ Box Blade Build #15  
Another good idea is welding another 3/8" flat bar on the bottom of the sides so it wears longer. The front corners wear the fastest. Hardfacing would be good their too.
 
/ Box Blade Build
  • Thread Starter
#17  
Very nice. I wish I had skills like that! How long have you been making your own implements?

Building them from scratch is a fairly recent thing. I started doing repairs on things 7-8 years ago, fixing a bucket here or there, replacing hydraulic piston mounting points, adding ss adapter plates, etc.

Then I needed to do some work on the flatbed for my truck, and ended up basically building a new one by the time I was done. That was a couple years ago. Since then, I've done 2 other flatbed stake body dumps including the scissor design and fabrication, which I enjoy doing - and it just made sense to do implements myself. They go together a lot faster than a truck body. Getting a plasma cutter and various collections of tools really helps things go together in a more efficient manner.
 
/ Box Blade Build
  • Thread Starter
#18  
:eek:
Maybe I shouldn't be using it to remove 18" diameter rocks.
:eek:
 

Attachments

  • IMG_20150510_150429118_HDR[1].jpg
    IMG_20150510_150429118_HDR[1].jpg
    1 MB · Views: 259
  • IMG_20150510_150441412_HDR[1].jpg
    IMG_20150510_150441412_HDR[1].jpg
    918.2 KB · Views: 260
/ Box Blade Build
  • Thread Starter
#20  
Ouch!:eek: Welp, maybe it's time for a little joint prep? 6010 root, 7018 cap.

Considering there's a hole in the side of the beam where the base metal ripped out, I'm not sure the welds were the issue.
 
 
Top