Bridge#2

   / Bridge#2 #1  

buggyman1

Platinum Member
Joined
Mar 27, 2009
Messages
543
Location
Kentucky
Tractor
Kubota B2150Hst
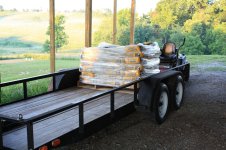
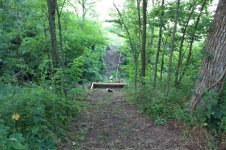
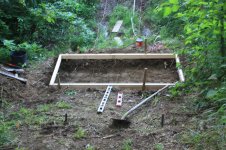
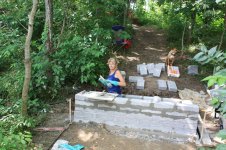
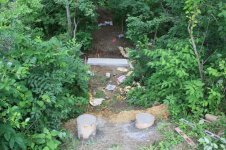
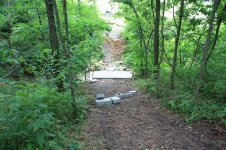
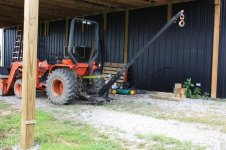
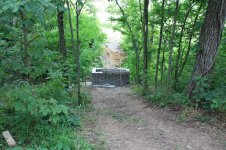
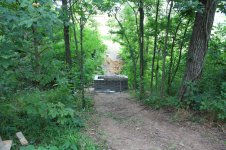
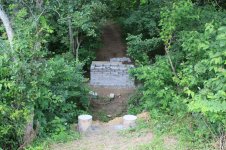
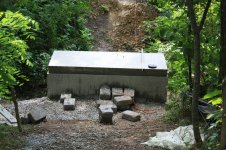
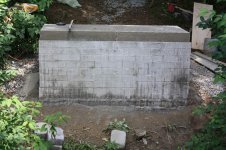
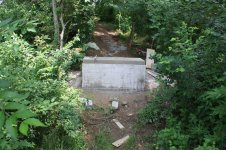
Here goes...Bridge#2: I bought a new mixer for the concrete, saves a ton of time, and I borrowed a friends generator to run it. This is the concrete for the footer, for the wall I plan to build to support the middle of the bridge. I used all of it and then some (59 bags). A truck couldn't get to the site is why I mixed it myself.
 

Attachments

  • 2b-001.JPG
    2b-001.JPG
    942.9 KB · Views: 798
  • 2b-005.JPG
    2b-005.JPG
    987.1 KB · Views: 656
   / Bridge#2
  • Thread Starter
#2  
I did manage to get the backhoe in there to dig the footer, and I used the FEL to transport the concrete. Here's some pics of the site, and the poured footer. The site is a lot steeper than it looks, the pics really don't do it justice. I used the zero-turn and my sprayer for the water supply (it holds 30 gallons). It took us all day to pour the footer (my girlfriend and me) in 90 degree heat.
 

Attachments

  • 2b-003.jpg
    2b-003.jpg
    275.3 KB · Views: 828
  • 2b-004.jpg
    2b-004.jpg
    318.4 KB · Views: 1,091
  • 2b-006.jpg
    2b-006.jpg
    335.4 KB · Views: 1,317
   / Bridge#2 #3  
You can get some perspective in that last pic of the footer after you poured it. Looking at the angle of the trees relative to the ground you can tell it's pretty steep there. But, it looks good so far! How much of a span will this bridge be? And how wide? How far above the drain will it be at the highest point? Should be an interesting project to follow so keep us posted!
 
   / Bridge#2 #4  
That thing is going to fall down. Ha Ha Just kidding.

Looking forward to following your thread.
 
   / Bridge#2 #5  
I'm glad you got a mixer to help with this build.

This will be a interesting project to follow, and it should turn out nice....because your other bridge was built strong.

These 2 bridges should increase your property value.


Thanks for starting a new thread on this, and keep us posted.
 
   / Bridge#2 #6  
Great start and pictures. Be cautious because I saw some structural engineers hiding in the bushes in one of those pictures, they may shut you down, one of them had a slide rule. Can't wait to see the progress.
 
   / Bridge#2
  • Thread Starter
#7  
You can get some perspective in that last pic of the footer after you poured it. Looking at the angle of the trees relative to the ground you can tell it's pretty steep there. But, it looks good so far! How much of a span will this bridge be? And how wide? How far above the drain will it be at the highest point? Should be an interesting project to follow so keep us posted!

It will be about a 33' span, 6' wide, and about 6' off the ground.
 
   / Bridge#2
  • Thread Starter
#8  
We got about 3" of rain last weekend, so we didn't get a lot done. Started laying block for the middle support, and got the piers dug (by hand) and poured. The piers are 4' deep by 12" and I hit solid limestone on the right one 4 feet down. I was happy. Here's some pics of the progress so far, and a pic of my brick-layer.
 

Attachments

  • 2b-021.jpg
    2b-021.jpg
    315.6 KB · Views: 1,443
  • 2b-011.jpg
    2b-011.jpg
    296 KB · Views: 804
  • 2b-007.jpg
    2b-007.jpg
    365.7 KB · Views: 706
   / Bridge#2
  • Thread Starter
#9  
This is the boom I made to help with the I- beams. I still need to paint it. I used it to get the mixer out of the creek. It's adjustable, and I can use it with the FEL also.
 

Attachments

  • boom001.jpg
    boom001.jpg
    243.7 KB · Views: 842
   / Bridge#2
  • Thread Starter
#10  
We got all of the block laid today. My plan is to fill up the inside with concrete. I'm planning on using some rock as filler, but it will mostly be solid. We laid 147&1/2 block all together, and used 8, 80# bags of mortor (for those who's counting). Here's some pics of the progress. Its slow going, but most of the grunt-work is done.
 

Attachments

  • 2b-025.jpg
    2b-025.jpg
    349.2 KB · Views: 678
  • 2b-028.jpg
    2b-028.jpg
    350.1 KB · Views: 530
  • 2b-029.jpg
    2b-029.jpg
    337.4 KB · Views: 1,070
   / Bridge#2 #11  
Very nice work!

That's going to be a nice bridge when your done....Your probably glad that you bought the mixer for this job:D

Nice job on the boom-pole!...Very well built also!

Thanks for sharing!

Keep us posted.
 
   / Bridge#2 #12  
That looks like it is going to be a great bridge.
 
   / Bridge#2 #15  
Man, that is a fine looking bridge. Great tips for the rest of us too on how to do this sort of thing. Great to see the whole gang involved too with the girlfriend and even the dog!!!

Keep em coming. Can't wait to see the rest of the build.
 
   / Bridge#2 #16  
Hi BuggyMan,

That looks like it is well thought out. So far moneywise, pretty inexpensive. The labor part is the main factor. What size timbers is the bridge going to be made of? When the water gets up, how high does it get? And where does your path lead to? The pics are great.
 
   / Bridge#2
  • Thread Starter
#17  
Hi BuggyMan,

That looks like it is well thought out. So far moneywise, pretty inexpensive. The labor part is the main factor. What size timbers is the bridge going to be made of? When the water gets up, how high does it get? And where does your path lead to? The pics are great.

I'm gonna use steel I-beams for the main supports. The water only gets up about a foot or so. The path just goes through the woods of our prop. We're planning on building an outdoor kitchen just to the right of the new bridge.
 
   / Bridge#2 #18  
Great thread. I'm enjoying your progress and following along with your updates. It's got me back to daydreaming about building a bridge over my spillway.

Eddie
 
   / Bridge#2 #19  
Nice bridge. To bad I dont have a place to build a bridge.:(
 
   / Bridge#2
  • Thread Starter
#20  
Here's some pics of the concrete poured for the top, its 2' deep with the rest filled with gravel (No.57's), ( 38- 60# BAGS ). I back-filled the upperside also with topsoil and 57's. The long span is 25 feet, with the shorter span about 10 feet, (I haven't poured the shorter-span piers yet, i'm waiting to install the long I-beams first as to not interfere or damage the other piers). Its been slow going up till this point, hopefully most of the back-breaking work is done.
 

Attachments

  • 2b-030.jpg
    2b-030.jpg
    299.9 KB · Views: 569
  • 2b-032.jpg
    2b-032.jpg
    265.5 KB · Views: 561
  • 2b-033.jpg
    2b-033.jpg
    308.4 KB · Views: 466

Tractor & Equipment Auctions

2007 MACK GRANITE CV713 DUMP TRUCK (A60430)
2007 MACK GRANITE...
2008 INTERNATIONAL MA025 FLATBED (A55745)
2008 INTERNATIONAL...
Blue Diamond 103709 (A53317)
Blue Diamond...
78" ROCK BUCKET (A52706)
78" ROCK BUCKET...
2013 Infiniti G37 Coupe (A59231)
2013 Infiniti G37...
iDrive TDS-2010H ProJack M2 Electric Trailer Dolly (A59228)
iDrive TDS-2010H...
 
Top