EddieWalker
Epic Contributor
bmac,
Good questions.
The OSB needs to be horizontally. The reasoning is that when two peices meat, that becomes the week point in the roof. Having the next row overlap that seam increases the strength of the pieces below it. Option A is the winner!!! LOL
There is no need to bevel the tops of the facia boards. I agree that you would get a slightly tighter fit, but it's one of those things that really doesn't matter and you will never know the difference one way or another.
I can't remeber is I said this or not, but I like to attach my fascia boards with screws. Nails into end grain is always the weekest way to attach anything. Ring shank nails are better, but nothing compared to plain old deck screws. I also think you get a cleaner look with screws since you can either leave them flush, or countersink them a bit.
Most rafters are on 24 inch centers, while most walls are built on 16 inch centers. If there is any advantage to lineing up your rafters with your studs, it's minimal, and maybe even too small to measure. Nobody does it, and to my knowledge, it's not code anywhere.
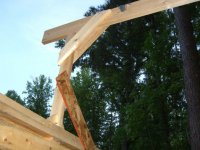
I will give you a touch of information on code and attaching rafters, and you can do with it as you please. In most houses, the rafters attached to the top plate of the wall by toenailing them in place. This has been done for decades and is still done today. In California, and I've heard rumors Florida and now Louisiana, require metal straps to wrap around the top of the rafter or truss and attach to the wall studs. Just before I left California, the added to that and require a continues strap from inside the foundation footing to the top of the rafter/truss. I don't know if it has to go over the rafter and back down still or not. This creates a solid line from the foundation to the roof.
Eddie
Good questions.
The OSB needs to be horizontally. The reasoning is that when two peices meat, that becomes the week point in the roof. Having the next row overlap that seam increases the strength of the pieces below it. Option A is the winner!!! LOL
There is no need to bevel the tops of the facia boards. I agree that you would get a slightly tighter fit, but it's one of those things that really doesn't matter and you will never know the difference one way or another.
I can't remeber is I said this or not, but I like to attach my fascia boards with screws. Nails into end grain is always the weekest way to attach anything. Ring shank nails are better, but nothing compared to plain old deck screws. I also think you get a cleaner look with screws since you can either leave them flush, or countersink them a bit.
Most rafters are on 24 inch centers, while most walls are built on 16 inch centers. If there is any advantage to lineing up your rafters with your studs, it's minimal, and maybe even too small to measure. Nobody does it, and to my knowledge, it's not code anywhere.
I will give you a touch of information on code and attaching rafters, and you can do with it as you please. In most houses, the rafters attached to the top plate of the wall by toenailing them in place. This has been done for decades and is still done today. In California, and I've heard rumors Florida and now Louisiana, require metal straps to wrap around the top of the rafter or truss and attach to the wall studs. Just before I left California, the added to that and require a continues strap from inside the foundation footing to the top of the rafter/truss. I don't know if it has to go over the rafter and back down still or not. This creates a solid line from the foundation to the roof.
Eddie