Creating a Lake

   / Creating a Lake
  • Thread Starter
#281  
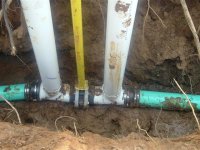
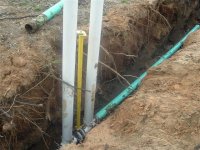
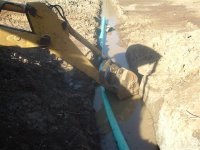
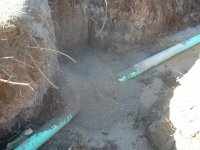
The valve assembly and pipe will sit at the bottom of the trench and into the bottom of the lake. Pretty simple except for the anti seep color and a cage to keep out debri from the entrance of the pipe.

One other problem that I had to address is the depth the valve will sit in the trench. Four feet deep. This makes it impossible to work the lever to open and close it.

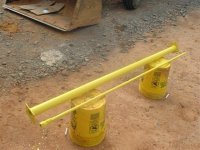
My solution is to extend the shaft up above ground level.

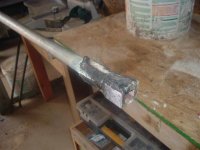
I took a 5 ft length of half inch galvanized pipe. On one end I hammered it flat, welded it up and the ground it to shape to fit inside the lever.

The other end I also hammered flat to the same width of the flat part of the shaft. I then cut some lengths of steel to create a box to slide over the shaft on the end of the valve.

Here's a pic of the box end.

Eddie
 

Attachments

  • 839147-Lake 091 (Small).jpg
    839147-Lake 091 (Small).jpg
    45.9 KB · Views: 1,523
   / Creating a Lake
  • Thread Starter
#282  
Who would have thought digging a lake would include welding and fabricating? /forums/images/graemlins/grin.gif

To hold the bracket for the handle and protect the shaft extension, I welded on some flat stock to the end of a 2 inch galvanized pipe. This should keep dirt and moisture out and protect it for the long term.

To add to this, I painted on a thick layer of Rustolium primer and then a coat of Rustolium paint. It's extra thick with runs all over it. Looks are not important for this, just another layer of protection.

Eddie
 

Attachments

  • 839151-Lake 095 (Small).jpg
    839151-Lake 095 (Small).jpg
    69.6 KB · Views: 1,333
   / Creating a Lake #283  
Eddie if my interpretation is correct, you are going to bypass the valve with an upwards loop to the normal water level ?

Are you going to put another T piece on top of the loop, as a breather, to prevent the closed loop from siphoning all the water out of the pond ?
 
   / Creating a Lake
  • Thread Starter
#284  
Renze,

Yes, you got it exactly.

It will be a loop to bypass the valve. I'm putting two more "T's" at the top of the pipes to creat the cross over and a vent. This will also allow me a way to run a snake down into the line if I need to clear it out for some reason.

My original plan was to install a syphon system that went along the top of the dam. Two reasons I didn't use that method was that I wanted a valve to manually open or close. Having to start the syphon to get it going seemed like a bit of a chore when I could just turn a valve. The other reason was I wanted to suck the water from the bottom of the lake. It's at the deepest part and hopefully it should pull a fair amount of silt when it's flowing.

How much silt is a total mystery to me. The more water that flows through the pipe, I'd assume the more silt that gets removed.

Eddie
 
   / Creating a Lake #285  
Hi Eddie,
Did you do any calculations on what a 6" pipe will flow? The only reason I ask, is that my neighbor has that type of arrangement in his pond, much smaller than yours, maybe an acre. He used 18" plastic corrugated pipe just above the normal pond surface and ran that to the bottom and then out the lower side of the pond. He said he needed the bigger pipe to handle heavy downpours.

Just curious.

scotty
Sorry Eddie I think I misunderstood what your doing.
 
   / Creating a Lake #286  
I worked on a drains on a pond at scout camp (read low budget) we had plenty of 8" pvc pipe so we put one in with an ell pointing up and cut the next pipe to about 4' put the bell up and removed the gasket put another length in that one about another 5' that could be cut off when correct level was determined. the drain was another one just straight in we couldent find a cap so we used a 9" mess hall plate held on end of pipe with some screenings behind it. The thought was put a steel pipe up pvc and break plate and run!!! screenings and plate would would wash out through pipe.

tom
 
   / Creating a Lake
  • Thread Starter
#287  
</font><font color="blue" class="small">( Hi Eddie,
Did you do any calculations on what a 6" pipe will flow? )</font>

Hi Scotty,

I haven't done any calculations on what the 6 inch pipe will flow. The spillway will handle the majority of the overlfow. This is just to allow me to lower the water level to kill off weeds on the shoreline. There's also the big "what if" scenerio that keeps me up at nights.

The overflow is another project down the road. After I finish the digging and moving of dirt.

Eddie
 
   / Creating a Lake
  • Thread Starter
#288  
Here's $600 worth of pipe. I bought 160 feet of 5 inch SDR 35 for this. I had considered Sch 40, but at $5 a foot and some serious sticker shock, I went for the good drain pipe.

The concrete is to stop the water from travleing down the length of the pipe. Smooth wall pipe is really bad for dams and from what I hear, it's very common for water to follow it all the way through.

Eddie
 

Attachments

  • 839968-Lake 096 (Small).jpg
    839968-Lake 096 (Small).jpg
    78.1 KB · Views: 1,530
   / Creating a Lake
  • Thread Starter
#289  
The valve is the smallest thing in here!!!

This picture shows the valve and extension pipes I fabricated. I put silicone on the fitting to keep out moisture and also act as a glue.

The SDR 35 doesnt' fit into Sch 40, so I used rubber unions from Lowes designed for adapting PVC to Clay Pipe. It's a perfect fit, but for the over kill factor, I doubled up on the hose clamps.

Eddie
 

Attachments

  • 839971-Lake 100 (Small).jpg
    839971-Lake 100 (Small).jpg
    65.1 KB · Views: 1,388
   / Creating a Lake
  • Thread Starter
#290  
This is another view of the valve assembly, but it shows it above grade a little better.

I really understimated how dificult it woud be moving around in the ditch. It's super slipery and my rubber boots would stick to the bottom if I stoped moving for more than a second.

I expected to finish this up and do a few other things before the storm hits tonight. When it got dark out, I was just starting to pour the concret on the pipe where I want it to stop the water.

20 sacks in the dark across muddy and uneven ground turned out to me just about all I could do. More than once I was ready to give up and deal with the consequenses.

It was only an hour after dark, but is sure felt like allot more.

I'll get some more pics when the weather clears up and I can get back down there.

Eddie
 

Attachments

  • 839976-Lake 099 (Small).jpg
    839976-Lake 099 (Small).jpg
    79 KB · Views: 1,503
   / Creating a Lake #291  
When you recover, a couple of pix of how you did the concrete would be very interesting.

You have a great project going here.
 
   / Creating a Lake
  • Thread Starter
#292  
The storm wasn't as bad as predicted. Only half an inch of rain, so it was worth the extra effort to get the cement dumped on the pipe.

To make it all fit in my trench I had to use my super duper pipe holder.

Works pretty good too!!! /forums/images/graemlins/grin.gif

Eddie
 

Attachments

  • 841307-Lake 102 (Small).jpg
    841307-Lake 102 (Small).jpg
    62.8 KB · Views: 1,760
   / Creating a Lake
  • Thread Starter
#293  
The concrete is to stop water from traveling up the length of the pipe. All it has to do is stop the water.

You can also buy an anti-seep color which is a piece of rubber cut into a square and stretched out by a wood frame. Then a hole is cut in the middle and the pipe is slid through it. This is the most common method.

I have no idea which is better, but for $70 worth of readi mix, it seems like cheap insurance.

Eddie
 

Attachments

  • 841309-Lake 104 (Small).jpg
    841309-Lake 104 (Small).jpg
    63.8 KB · Views: 1,470
   / Creating a Lake
  • Thread Starter
#294  
Last night I made this in my workshop. Sure is nice having a place to work on things with lots of room.

Anybody recognize what it's for? /forums/images/graemlins/grin.gif


Eddie
 

Attachments

  • 841314-Lake 107 (Small).jpg
    841314-Lake 107 (Small).jpg
    77.5 KB · Views: 1,646
   / Creating a Lake
  • Thread Starter
#295  
If you said it's a filter for my inlet pipe, you got it!!! /forums/images/graemlins/smile.gif

I used 3/4 PVC and 30 T's to create it. The screen is solid plastic and it's held on with tie wraps. Nothing larger than two inches can fit through there to clog up my drain line.

I wanted it long enough to still allow enough water to get through no matter how much debri settles to the bottom of the lake. The tent design is to cut down on what might settle on top of it.

It's held in place by the weight of the pipe. Once I backfilled the pipe, this became very solid.

Eddie
 

Attachments

  • 841318-Lake 108 (Small).jpg
    841318-Lake 108 (Small).jpg
    56.6 KB · Views: 1,337
   / Creating a Lake
  • Thread Starter
#296  
While walking around down there I noticed some of my trees are starting to bloom. Forgive me because I have no idea of what it's called, but this flowering trees has the most amazing purple flowers. They are fairly common, but spread out and not very large.

Anybody know what it is??? /forums/images/graemlins/confused.gif

Eddie
 

Attachments

  • 841322-Lake 109 (Small) (Custom).jpg
    841322-Lake 109 (Small) (Custom).jpg
    90.8 KB · Views: 1,531
   / Creating a Lake #297  
Looks like a Red Bud tree, not sure about the trees in Texas so I could be wrong. Our Red Buds will bloom in a few weeks here. BTW, nice job on the lake.
 
   / Creating a Lake #298  
Hi Eddie. We're about 50 miles northeast of you. That is most assuredly Red Bud. Ours are beginning to bloom also. The Dogwood are leafing out also. They will have very pretty delicate white flowers. We've been here a little less time than you've been on your place. We go around and mark all the Red Bud and Dogwood with surveyors tape so I don't accidently cut down either in the course of clearing brush and thinning on our 55 acres.

Michael
 
   / Creating a Lake #299  
The Red Buds are definitely blooming in this area, and the Bradford Pears have been blooming long enough that the wind yesterday blew a lot of the blossoms off and the leaves are growing fast now. I'm in the process of watering in a heavy dose of Weed & Feed and granular insecticide on the yard.
 
   / Creating a Lake #300  
I'll fourth on the Red Bud tree /forums/images/graemlins/grin.gif

And just for grins the next time your at Wally World go and price them.
 

Tractor & Equipment Auctions

Harper TV130 High Dump Turf Vacuum Sweeper (A59228)
Harper TV130 High...
2008 MACK CHU613 TRI AXLE 16FT DUMP TRUCK (A58018)
2008 MACK CHU613...
2006 Keystone Laredo 29RL 31ft. T/A 5th Wheel Travel Trailer (A55853)
2006 Keystone...
2013 John Deere 824K Wheel Loader (A56438)
2013 John Deere...
PJ  32 FLATBED GOOSENECK (A58214)
PJ 32 FLATBED...
iDrive TDS-2010H ProJack M2 Electric Trailer Dolly (A55851)
iDrive TDS-2010H...
 
Top