Creating a Workshop & Home

   / Creating a Workshop & Home
  • Thread Starter
#501  
It rained all day Saturday, so Steph and I went to the Dallas Safari Club Convention. Perfect timing since I hate going anyplace when it's nice out and I have dirt to move. /forums/images/graemlins/smirk.gif

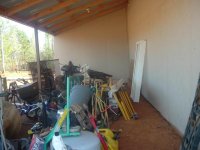
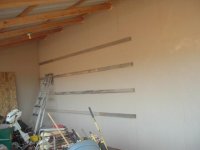
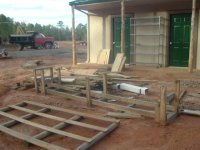
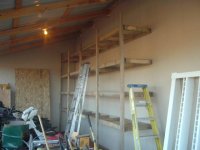
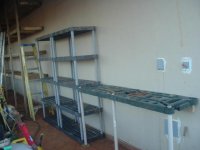
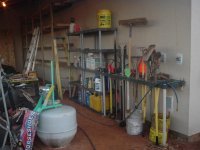
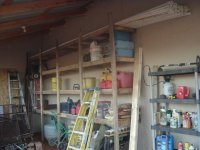
Sunday was too muddy to do any work on the lake, so I decided to start organizing my outdoor storage area. Just to remind everyone. It's 12 feet wide and 30 feet long. The inside wall is 12 feet tall and the side opening is 8 feet tall.

This is what I've been triping over for the last 4 months.

Eddie
 

Attachments

  • 815310-Workshop 056 (Small).jpg
    815310-Workshop 056 (Small).jpg
    53.6 KB · Views: 718
   / Creating a Workshop & Home
  • Thread Starter
#502  
The hardest part of any project is the planning. What do I need and where do I need it?

Sizing and spacing my shelves fell under this catagory. I've spent many hours pondering this in my mind while moving dirt. It's not just what I want them to hold today, but what I might have in five or ten years.

I made the bottom shelf three feet off the ground. This will give me enough room for most of my "big" stuff that's too heavy to pick up and put on a shelf. The rest of them are two feet up from the next. That puts the to shelf at 9 feet.

I'm using scrap and left over lumber for this project. The longest 2x4's I have are all 12 feet. Most are covered with concrete from being forms.

The shelves will be 16 feet long and 2 feet wide.

Eddie
 

Attachments

  • 815316-Workshop 061 (Small).jpg
    815316-Workshop 061 (Small).jpg
    33.2 KB · Views: 564
   / Creating a Workshop & Home
  • Thread Starter
#503  
Since I'm using scrap lumber for this, I've had to do some scrounging. When I built the house, I toss all my scrap pieces of wood into a pile. Over time, I find I use most of it up for smaller projects.

The shelves needed allot of 21 inch 2x4's. I hate cutting up a nice piece of wood for a bunch of small ones if I can avoid it.

In this picture, you can see a pallet and the frame my roll up door came in, plus the scrap pile. It took allot longer than I thought it would to take apart and remove the nails. Some people really love nailing!!!! /forums/images/graemlins/frown.gif

Eddie
 

Attachments

  • 815321-Workshop 066 (Small).jpg
    815321-Workshop 066 (Small).jpg
    55.8 KB · Views: 498
   / Creating a Workshop & Home
  • Thread Starter
#504  
Once the pieces were cut, it's was pretty easy to put them together. I'm using ten foot 2x4's for the posts. That gives me an extra foot of height above the top shelf. The reason for that is it's where I plan to store all my PVC pipe. I have lots of it, but no place to keep it so it's out of the way, out of the weather, but readily accessable when I need it. Now I do.

The posts have PT 2x4's nailed onto the bottom as feet. I didn't want the wood to sit on the dirt, even though it's dry, so I thought this would work.

Eddie
 

Attachments

  • 815326-Workshop 069 (Small).jpg
    815326-Workshop 069 (Small).jpg
    43 KB · Views: 483
   / Creating a Workshop & Home
  • Thread Starter
#505  
Years ago I bought some Rubbermaid shelves and a tool holder. They have worked great and I wanted to use them in this area. I have more hand tools than space for the tool holder and was going to buy another one when I got this idea.

I don't need the bottom part to hold the tools in position, and it's identical to the top part, so why not combine them into one super long tool holder. It was pretty easy to cut one end to line up flush eith the other, then screw it together from both ends so it's tight.

Than I put up a ledger board at the beginning of my storage area.

The grey boxes you see in the picture are my light switch, outdoor outlet and the big one on the bottom is a juction box with 4 12/2 wires dead headed. They will be used for future projects, but for now they are just in place waiting. /forums/images/graemlins/smile.gif

Eddie
 

Attachments

  • 815331-Workshop 070 (Small).jpg
    815331-Workshop 070 (Small).jpg
    39.4 KB · Views: 485
   / Creating a Workshop & Home
  • Thread Starter
#506  
Here's a picture of the tool holder and shelves fastened to the wall.

I put screws with washers through the palstic shelves and hardi siding, and into the the studs. This should make it all very stable and secure.

Eddie
 

Attachments

  • 815333-Workshop 071 (Small).jpg
    815333-Workshop 071 (Small).jpg
    40.9 KB · Views: 449
   / Creating a Workshop & Home
  • Thread Starter
#507  
I started organizing a little and put a few things away. This is the part I hate the most. Where to put it so I can find it when I need it, but it won't be in the way, or it will be nice and handy.

I plan to get it all cleaned up and organized today. My goal is to be able to park my CUT with bush hog attached in this space out of the weather!!!!

Eddie
 

Attachments

  • 815342-Workshop 072 (Small).jpg
    815342-Workshop 072 (Small).jpg
    52.4 KB · Views: 479
   / Creating a Workshop & Home #508  
Now Eddie, we all know how much Steph has done with you, are you SURE you can take credit for how nice that looks? Looks great, want to come over and fix up my barn too? Steph can take the photos and direct!
 
   / Creating a Workshop & Home
  • Thread Starter
#509  
Danny,

She's a great help on allot of what's been done on this place, but on this one, she was inside all day doing laundry. /forums/images/graemlins/frown.gif

With her help it would have been done in just one day!! /forums/images/graemlins/grin.gif

Here's the shelves all finished and most everything put away. There is still more stuff in different places that I'll get to, plus I want to go through my scrap wood pile and get that in there too.

Eddie
 

Attachments

  • 815741-Workshop 074 (Small).jpg
    815741-Workshop 074 (Small).jpg
    53.1 KB · Views: 551
   / Creating a Workshop & Home #510  
Things are looking great Eddie, keep it up! Don't ya just love that feeling of having everything put away, knowing exactly where it is for the next time you need it? Of course, KEEPING it that way is another struggle /forums/images/graemlins/smile.gif
 

Tractor & Equipment Auctions

2016 WITZCO RG-35 RGN LOWBOY TRAILER (A50459)
2016 WITZCO RG-35...
2020 ROLLINS 26' FG GOOSENECK TRAILER (A50459)
2020 ROLLINS 26'...
(1) 10ft Tarter Gate (A48837)
(1) 10ft Tarter...
New/Unused Self Dumping Hopper (A48837)
New/Unused Self...
VOLVO MT2000 MILLING MACHINE (A50458)
VOLVO MT2000...
2022 Kobelco SK85CS-7 Excavator (A48837)
2022 Kobelco...
 
Top