Creating a Workshop & Home

/ Creating a Workshop & Home
  • Thread Starter
#281  
Hi Larry,

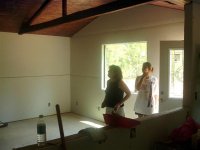
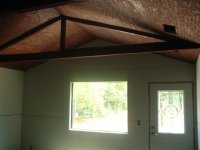
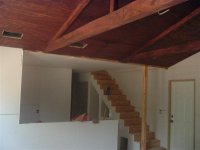
Thanks for the compliments on the beams. They are an expiriment thats turned out better than I'd hoped. I'm also going to do something similar on the stairs, but that's down the road.

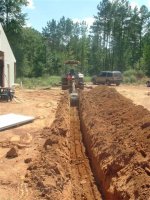
The Dozer was plan B if the CUT didn't work out. I was trying not to tear up the roads any more then I had to.

My lease is up the end of this month where I'm living now, so I will be living in the house by then. I have two more weeks of work, then several days to move everything in. One way or another, I'll be living there by Sep 1. Steph and the kids will wait until the interior is all finished with carpet and appliances. I figure by the end of September.

I did think of building a fireplace, but decided against it. Limited space, time and financing for something I rarely ever used in homes with fireplaces. I do have a fire ring from Cabelas that we enjoy using outdoors. More rustic and fun to sit around a fire outdoors anyway. The kids love to have a stick to burn along with adding wood to the fire!!!

Eddie
 
/ Creating a Workshop & Home
  • Thread Starter
#282  
As my deadline approaches, I'm running in a dozen different directions. I have water in the main line coming in and the meter is in place. Next week I shoudl get the OK from the Health Departement when they finish testing the sample.

It's now time to run the 1 1/2 inch water line into the building.

I'm also running a one inch line back across the road in the oposite direction for a future sprinkler system at my entrance.
 

Attachments

  • 717689-Workshop 390 (Small).jpg
    717689-Workshop 390 (Small).jpg
    80.3 KB · Views: 445
/ Creating a Workshop & Home
  • Thread Starter
#283  
While digging the trench, my front tire blew out. I mean it really blew out. I put a tube in it a year ago, and it just exploded, forcing the tire off the rim. It was so powerful that it ruined the bead of the tire and I had to buy a brand new tire. $81 for a tire, $10 to install it and another $4 for a valve. Oh well.

Here's the trench leading to the house. I only need to be a foot down, so it's pretty fast digging.
 

Attachments

  • 717692-Workshop 391 (Small).jpg
    717692-Workshop 391 (Small).jpg
    56 KB · Views: 480
/ Creating a Workshop & Home
  • Thread Starter
#284  
Here's the water meter. I've only seen them in the ground in a box, so it's interesting to see what one actually looks like.

The water district put the PVC fitting on it out of habbit and mentioned it to me after the fact. I need to replace it with a galvanized nipple for the back flow device.
 

Attachments

  • 717696-Workshop 392 (Small).jpg
    717696-Workshop 392 (Small).jpg
    85.1 KB · Views: 458
/ Creating a Workshop & Home
  • Thread Starter
#285  
Here's were it gets interesting. I'm familiar with residential construction and single family homes. No real experience with this bigger stuff and commercial applications, so things keep popping up that I didn't expect.

I knew I had to put a backflow device in to illiminate contamination back into the water mains. They do this for every customer. The one they want me to use is called a RPZ and must be installed above ground so it can discharge from teh bottom if there's a problem.

I have no idea how this happens, but understand that they want it installed in a certain way. No problem, tell me what you want and I will do it exactly that way. No thinking on my part. /forums/images/graemlins/grin.gif

The suprise came when I was told I had to have another RPZ for my sprinkler line "AFTER" the first one. Just because it doesn't make sense to me, doesnt' make any difference. If they want it, I'll do it. /forums/images/graemlins/wink.gif

The box on the left is for the meter. Then I went up an 18 inch nipple, a union and then a 12 inche nipple befor bringing it into the first 1 1/2 inch RPZ. I came back out the same way, then transitioned into Sch 40 PVC. I T'd that off down to one inch for the sprinkler line with a brass gate valve. That's int the box on the right.

The 1 1/2 inch PVC line continues to the house while the one inch line goes into another RPZ with the exact size fittings as the first one except one inch. It then crosses the road where it will remain caped until I get back to it.

Hope this makes sense. /forums/images/graemlins/confused.gif
 

Attachments

  • 717702-Workshop 395 (Small).jpg
    717702-Workshop 395 (Small).jpg
    87.8 KB · Views: 473
/ Creating a Workshop & Home
  • Thread Starter
#286  
I spent a little time on the tractor, and ALLOT of time with a shovel filling and smoothing. It's nice a pretty now, just needs to be tested and then I'll add building a doghouse to cover to my list of things to do. /forums/images/graemlins/frown.gif
 

Attachments

  • 717947-Workshop 397 (Small).jpg
    717947-Workshop 397 (Small).jpg
    59.8 KB · Views: 436
/ Creating a Workshop & Home
  • Thread Starter
#287  
To make sure somebody really wants to drive into it, I put in two 4 inch poles to help them know when they are getting too close.

I'll paint them bright yellow too. /forums/images/graemlins/grin.gif
 

Attachments

  • 717954-Workshop 396 (Small).jpg
    717954-Workshop 396 (Small).jpg
    64.3 KB · Views: 478
/ Creating a Workshop & Home #289  
Eddie-

A question about your soil: from all the pictures I have seen of your trenches, the soil appears to be uniform all the way to the bottom of the trench and looks to be on the sandy side. Is this true? Is your soil typical for your area of Texas?

Thanks,

Bonehead
 
/ Creating a Workshop & Home
  • Thread Starter
#290  
Hi Bonehead,

I'd say my soil is 90% Red Clay. I've found one small patch of iron ore, which is in the middle of my vinyl fence I'm installing, and another patch of sand in some pines I've been taking out. Not good sand, but sandy for my conditions.

The Red Clay goes down to 4 feet in some places, and way past what I'm able to dig. Under the Red Clay is a layer of Gray Clay. This is weird stuff. Doesn absorb water at all. The bottom of my pond is this, and I've drove my backhoe across it, through it and all over it with a foot of water over it. Water does not penetrate this stuff. If there's any gray clay or sediment on top of it, I'm stuck. The tires will spin and I have to use the hoe stick to pull myself out.

Hope this answers your question.

Eddie
 
/ Creating a Workshop & Home
  • Thread Starter
#291  
We had an inspector show up today. Yes, it's Sunday, but she wanted to see where her little girl was going to be living.

She also brought fried chicken, mashed potatoes, biscuts, peach cobler, sweet tea and chocolate chip cookies!! /forums/images/graemlins/smile.gif
 

Attachments

  • 718548-Workshop 407 (Small).jpg
    718548-Workshop 407 (Small).jpg
    32.3 KB · Views: 655
/ Creating a Workshop & Home
  • Thread Starter
#292  
Steph finished staining the ceilings and beams in a Red Oak by Minwax. We're both very pleased with the result and will do it again in our future projects.

This is the family room.

Notice the nice Texas Star on the front door. /forums/images/graemlins/grin.gif
 

Attachments

  • 718555-Workshop 400 (Small).jpg
    718555-Workshop 400 (Small).jpg
    43.3 KB · Views: 607
/ Creating a Workshop & Home
  • Thread Starter
#293  
Right off the family is the kitchen. The breakfast bar in between will be our only real eating area beside the sofa. No room for a table that we never use anyway.
 

Attachments

  • 718556-Workshop 402 (Small).jpg
    718556-Workshop 402 (Small).jpg
    35 KB · Views: 529
/ Creating a Workshop & Home
  • Thread Starter
#294  
The stairs have all the storage I was able to provide in them. There's many days of work ahead just finishing them off with some of the ideas I have. Nothing simple going on there. /forums/images/graemlins/frown.gif But in the end, I'm hoping for something unique and satisfying.

The door was an afterthought. It leads to the workshop.

During the drawing of the plans, we weren't sure of the exact location of the stairs, and how much space there was going to be.

Another mistake was in the layout we had originally planed for the furniture. My Mom was visiting at the time when the framing was just getting started and suggested we put the big sreen TV on a different wall then the plan called for. DUH!!! It changed everything and really opened up the space.
 

Attachments

  • 718569-Workshop 403 (Small).jpg
    718569-Workshop 403 (Small).jpg
    35.4 KB · Views: 557
/ Creating a Workshop & Home
  • Thread Starter
#295  
This is my home viewed from the inside of the workshop.

The wall will be covered in OSB on the bottom 4 ft, then sheetrock the rest of the way up.
 

Attachments

  • 718575-Workshop 398 (Small).jpg
    718575-Workshop 398 (Small).jpg
    56.3 KB · Views: 539
/ Creating a Workshop & Home
  • Thread Starter
#296  
Here's the latest view of the outside bathrooms. I haven't trimed the doors yet and the porch area needs a ceiling. Otherwise, it's looking allot better!!
 

Attachments

  • 718581-Workshop 399 (Small).jpg
    718581-Workshop 399 (Small).jpg
    49.8 KB · Views: 528
/ Creating a Workshop & Home #297  
Looks great Eddie..........continue fulfilling that dream /forums/images/graemlins/grin.gif
 
/ Creating a Workshop & Home #298  
</font><font color="blue" class="small">( ...an inspector show up today. )</font>

Eddie, did you pass... uh.. I mean did the building pass? /forums/images/graemlins/grin.gif
 
/ Creating a Workshop & Home #299  
</font><font color="blue" class="small">( During the drawing of the plans, we weren't sure of the exact location of the stairs, and how much space there was going to be.
)</font>

Eddie, I was showing Kathy your progress and she asked me how many bedrooms you will have and where they are located? I know you have the master bedroom upstairs, but I'm not sure of the other(s). I guess I could go back through your posts, but with a dialup, I might be half the day looking for that info. /forums/images/graemlins/blush.gif Can you tell me how many bedrooms and if they are both upstairs?

Things are looking really good. I know you are scrambling to get done by September. It looks like you're gonna make it to at least the livable stage on time. /forums/images/graemlins/cool.gif
 
/ Creating a Workshop & Home
  • Thread Starter
#300  
Thanks for the kind words.

Stephs and her Mom have lunch together every Monday, so after that is when I find out what she thought of the place. Turns out that she called "her" Mom on the way home to tell her all about the place. She's very excited about it and thinks it's going to be a great place for her daughter and grandkids to live!!! /forums/images/graemlins/smile.gif /forums/images/graemlins/smile.gif /forums/images/graemlins/smile.gif

As to the floor plan, or layout. The bottom level has the family room, kitchen, master bedroom and a bathroom. We put the bathroom off the hall, so there's no bathroom in the master bedroom. Not enough space.

Upstairs are the kids two bedrooms and the other bathroom.

Total square footage for the home is 1,032. The public bathrooms add another 320 sq ft of heated and cooled space. The workshop and utility room are 784 sq ft for a total of 2,136 sq ft enclosed. There are two covered areas so far, with two more to come. One it 12 ft by 30 ft and is where I'm parking my CUT and storing outdoors stuff, the other is the long 4 ft by 48 foot porch in front of the bathrooms.

In order to squeeze as much into such a small living area, we don't have a dining room or even a place for a table to eat at. I build a long breakfast bar in the wal seperating the kitchen and dining room that will handle three easily, and four if you like each other. We always eat on the sofa anyway.

Storage is under the stairs. The bedrooms will have the beds tight against a corner wall to allow space to get around and every inch will just about be utilized.

Thanks for the questions,
Eddie
 

Marketplace Items

Electric Oven (A60352)
500 BBL FRAC TANK (A58214)
500 BBL FRAC TANK...
2005 John Deere 7320 (A60462)
2005 John Deere...
2017 ISUZU NPR 18 FT  BOX TRUCK (A59905)
2017 ISUZU NPR 18...
2007 JLG E400 AJP TELESCOPIC/SCISSORING MANLIFT (A52707)
2007 JLG E400 AJP...
MACK MDRIVE TRANSMISSION (A60736)
MACK MDRIVE...
 
Top