Disc Harrow Alterations

   / Disc Harrow Alterations
  • Thread Starter
#21  
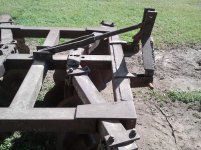
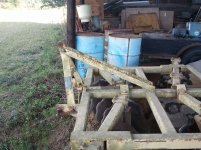
Don't intend to wear this thread out, but got just a couple questions left. After making a quick measurement tonight, it appears the 22" blades are going to be VERY close if they clear in places. Questions are:
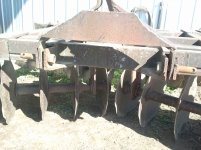
1) Are there any significant advantages of the 22" blades over 20" blades?

2) Any significant advantages between India or Brazil made blades questioned in above post?

3) Measuring distance between between rear gang inside blades tonight resulted in a 4" separation. Makes me consider moving back to 9' wide to get the separation back to 12" to 16". Any suggestions/ideas on that? Noticed this weekend grass wanted to gather in that tight space and if cutting in heavy grass could clog?

Thanks again for all the replies and advice.
 
   / Disc Harrow Alterations #22  
You can leave them where they are if you want but that isn't the proper way to set them. The forward set will throw the dirt outwards at speed and the rear set should be moved outwards enough to throw this dirt back in place no more and no less. The tossing of the dirt outwards and then back inwards is intended to help level out the soil.

To decide whether to go with the 20 or 22 inch blades, I think you need to be there to determine which ones will fit the best. The 22" blades can cut deeper than the 20" blades by an inch. I would look at the spool flanges and compare their diameter with other disks to make sure the blades are supported enough.

Some of the farmers who are more knowledgeable about the blades should be able to help you decide which blades are the better choice as far as country of origin.
 
   / Disc Harrow Alterations #23  
I don't see how the disk works properly with the rear gangs moved in like that.

The front gangs throw the dirt out wide.

The rear gangs need to be out there far enough to gather this dirt back up and throw it in to the middle again.

As you have it set up with the narrow spaced rear gangs, you will be leaving 3 ridges with every pass - one on each side of the disk where the dirt is thrown out but no longer gathered in. And one down the middle, where the rear gangs are now overlapping a ridge of dirt throwing it too close to each other.

Dirt might _look_ level while it is fresh & fluffy, but once the rain settles it down, you've got to have bad ridging with that setup!


As to size, bigger is better for blades, tho they will throw dirt farther, and will break on rocks a bit more easily. I think I would choose the less than most expensive thickness as you mentioned. Myself, I prbably would be happy with the blades down to 19 or 18 inches before changing, 20 inch is just broken in really, but sounds like you really want to change them, so might as well go for it. Do your blade cleaners allow 22 inch blades?

You probably won't notice much difference in the blades - basically as the metal gets harder it wears longer, but is more likely to shatter on rocks. So, you pick your poison, like anything a coin flip, what's gonna get you first? :)

As to tightening the gang, you need _all_ the dirt out between the spools and blades. All of it, shiney clean..... You actually streatch the axle when you tighten it up, the blades are held in tension.

I really have no idea how you are getting level ground from narrowing up the rear gang, that shouldn't be working out well at all. There have to be ridges forming, laws of physics.....

--->Paul
 
   / Disc Harrow Alterations
  • Thread Starter
#24  
rambler said:
I don't see how the disk works properly with the rear gangs moved in like that.

The front gangs throw the dirt out wide.

The rear gangs need to be out there far enough to gather this dirt back up and throw it in to the middle again.

As you have it set up with the narrow spaced rear gangs, you will be leaving 3 ridges with every pass - one on each side of the disk where the dirt is thrown out but no longer gathered in. And one down the middle, where the rear gangs are now overlapping a ridge of dirt throwing it too close to each other.

Dirt might _look_ level while it is fresh & fluffy, but once the rain settles it down, you've got to have bad ridging with that setup!

As to size, bigger is better for blades, tho they will throw dirt farther, and will break on rocks a bit more easily. I think I would choose the less than most expensive thickness as you mentioned. Myself, I prbably would be happy with the blades down to 19 or 18 inches before changing, 20 inch is just broken in really, but sounds like you really want to change them, so might as well go for it. Do your blade cleaners allow 22 inch blades?

You probably won't notice much difference in the blades - basically as the metal gets harder it wears longer, but is more likely to shatter on rocks. So, you pick your poison, like anything a coin flip, what's gonna get you first? :)

As to tightening the gang, you need _all_ the dirt out between the spools and blades. All of it, shiney clean..... You actually streatch the axle when you tighten it up, the blades are held in tension.

I really have no idea how you are getting level ground from narrowing up the rear gang, that shouldn't be working out well at all. There have to be ridges forming, laws of physics.....

--->Paul

I will check again since it has recently rained. After moving it in it looks too close to me too, but I have not noticed any issues with the finished results. I was primarily trying to make it narrower to make transport and storage easier.

I went by this afternoon to measure new 20" and 22" blades to see how close they measured. They were spot on. I would prefer to use the 22", but am very concerned they may have little clearance, if they will fit at all in some places. Makes me think the 20" is the safest route.

This disc does not have blade scrapers.
 
   / Disc Harrow Alterations
  • Thread Starter
#25  
I have been back after several rains and the area turned under with the rear gangs set close together still remains level. Even with them set in they still extend beyond what the front gangs throw out. Maybe that is why the end result is what it is. Regardless, I am going to move them back out during my rebuild. Just doesn't look right.

I started yesterday afternoon breaking the unit down. I have the frame and the gangs separated. My plan is check all parts to see what needs replacing/repairing, repaint and reassemble.

Few questions: 1) Any suggestions on painting/prep? Planned to use cup brush on angle grinder to prep surface. 2) Better experiences using brush on paint versus spray painting? 3) Number of coats primer and/or paint for durability? 4) Torn between painting JD green or different color. Old faded paint appears to have been some shade of red?

Getting chance to break in my new impact on this project and plan to replace all the hardware while apart. Some of this appears to have never been apart. Some required 3/4" drive tools with cheater pipe. Have about decided to stay with 20" blades due to clearance concerns. Any thoughts, ideas or suggestions of what has worked and didn't work are greatly appreciated.
 
   / Disc Harrow Alterations #26  
Seems like you have it figured out well enough, cleaning up the parts as best you can. I spray paint and brush just depends on what it is and how much trouble I want to go to.

I would recommend using something like Locktite Extend rust preventative treatment before putting on primer. I buy this from a Sherwin Williams paint store and brush it on. A gallon container should be about right for your project. For paint over this I would use a good polyurethane industrial primer and top coat in your color choice. The Deere brand paint is good too if you go that route. I wouldn't go with expensive auto paint as using a disk will wear the paint off in places regardless of what you do so that would be money wasted imo.


Painting and refinishing is like alot of things you can get lost in it but the preparations you make before the top color coat will determine the final results. With a project such as yours I would use a good cup brush and grinder wheel to clean everything up or have it all sandblasted. Next I would coat everything with the Extend product except the threads. Spray on primer let dry and sand smooth, reapply primer if needed for a second coat. Sand lightly between all coats then apply the top color coat with one light coat allowing it to get tacky before recoating with a heavier coat.

I consider myself an amateur painter not a professional so some others might have a better way to handle this and will chip in.
 
   / Disc Harrow Alterations
  • Thread Starter
#27  
Made it by Lowe's this evening and picked up several spray cans of the Locktite Extend rust treatment. I have a few pieces I am looking to have made and am not quite ready to begin the paint process. I did manage to get the main frame sanded down with wire cup on angle grinder. Don't seem to be getting a lot of comments on the paint process. I believe spraying is going to be easier to apply than brushing. The salesman at Lowe's recommended going somewhere else to look for more suitable primer and paint versus what they stock. He did speak highly of the rust treatment though. Anyone have any comparison of spraying versus brushing the paint on implements?
 
   / Disc Harrow Alterations #28  
If you have spray equipment I would go that route, but to paint a disc I wouldn't buy the equipment. I would prefer a good brush to using spray cans because of cost..

I did use spray cans once when I was a kid to paint a large Case field tractor, took several cases too.:D
 
   / Disc Harrow Alterations #29  
A good way to get a nice finish on a brushed on paint job is to use a spray bomb for the very last coat. Since there are more solvents in the spray bomb than in paint from the pail, this method allows the brushed on paint to flow out much smoother than if left as just brushed on. Much cheaper to do it this way than with all spray bombs and I believe you get a much better paint job using paint from a pail. Best of both worlds, eh? :)
 
   / Disc Harrow Alterations
  • Thread Starter
#30  
Placed order today for the 4" gang hangers. Once they arrive I plan to go ahead and prep them and the frame and get paint on that much. Still undecided on breaking down all of the blades and replacing them.

I do not have the tools for spraying paint. If I sprayed it would be from the rattle can. Seems like brushing would give a better coat, but at the same time spraying would put paint into those hard to get to locations.

Noticed that TSC has a Valspar line of paint stated to be for Tractor and Implement. They even have one that is listed as "Restoration" that is a little higher priced. They also have this line for primer. Any experience with this product? If priced less than JD brand paint any reason not to give it a try? Do not see any reason for a "Restoration" quaility finish on this particular item
 
   / Disc Harrow Alterations #31  
You can buy an acid etching primer in spray can form. The acid etch primer etches itself into the metal to form a really good bond and base for your top coat. I buy it at Home Depot. I am not sure how the acid etch primer would react with the rust stuff you are using? You can buy an inexpensive spray gun from Harbor Frieght ($14) and some really good acrylic enamel (automotive paint) that will put a high quality finish on your project and last for years. If you go with Polyurethane paint it is the top of the line finish, however you need to use a high quality respirator rated for acrylic enamel and or urethane paints (do your research to protect your health). I personally don't like the Valspar spray can paint. I just have not had good luck with Valspar. It faded badly on one of my projects and and I also had problems with it being too hard and chipping / cracking when using it on equipment.
I have a hitch welded on the back of my disc, to pull the drag harrow, or cultipacker or fertilizer / seed spreader.
 
   / Disc Harrow Alterations #32  
I would use the Deere paint in my locale as the small town I live in doesn't have a good paint store and choices are limited. When considering spray cans I would recommend Rustoleum "Painters Touch" line as these seem to have the best spray pattern of all the various brands I have used.

Thinkiing further about painting a disc it is probably easier and faster to buy a box of spray cans and geturdone. Not many flat areas to benefit from using a brush but there sure are a lot of cracks and crevices.
 
   / Disc Harrow Alterations
  • Thread Starter
#33  
Here is picture of frame ready for rust treatment. This part is pretty flat and might could be brushed. Sounds like best solution is to pick up spray paint at JD dealer after prepping and go with that. Sounds like worst case scenario is it might take a few more cans to spray it.

ForumRunner_20111124_153847.png
 
   / Disc Harrow Alterations #34  
Can you take a close up pic? Kind of hard to tell anything from this distance.
 
   / Disc Harrow Alterations
  • Thread Starter
#35  
Here is a closer picture. Also notice fracture found in frame. This is bottom of frame. Repair was made to top of frame. I do not believe this affects the structural integrity of the frame. Thought about taping over or sealing up and just painting over.

ForumRunner_20111125_105816.png
 
   / Disc Harrow Alterations #36  
Just me but I would run a grinder with a large cup brush over the entire thing before using the rust preventer. This will help with the finished appearance and the better the paint job the less rusting you will have long term.

Not sure where the fracture is you are talking about but now is the time to fix any problems. Might need to fishplate it.
 
   / Disc Harrow Alterations
  • Thread Starter
#37  
Couple more questions:
1) Any major issues blending brush on paint and spray paint if both JD brand paint? Any issues using a small roller versus brush? With this thing taken apart like it is I believe I may could roll most of it quicker and have a better finish.

2) Contemplating changes to the hitch. I really would like to get back to a Cat 1 pin for this to be able to use on multiple tractors. Have found a Cat 2 to Cat 1 pin. Has the same 1 1/8" threaded end with the 7/8" pin. Thinking of going this route to be able to best utilize the 1 1/8" hole already in the hitch. If pins start bending could easily swap back to a Cat 2 standard pin. Have been looking at the Pat's Easy Change too. Could go with the Cat 2 to Cat 1 on this and it would fit all of my current implements. If necessary, could remove the P.E.C. and still have Cat 2 capability.

3) With the hitch the way it is now, there was some give/play in it. I am considering modifying it to match the setup on the PICO disc we have. It uses separate attachment points for the pins and the lower 3 PT "A Frame" points. This seems to me that it would allow for tightening up better since with the old set up the pin serves to secure the lower 3 PT "A Frame" arms however you can't get them tight due to the design. Also plan to go back with two pieces of maybe 1/2" plate to secure the top of the 3 PT to the center of the disc where the attachments are made. Old set up had some type of drill stem/bracket system.

4) Decided to go ahead and add some 1/4" plate over an old fracture area just to help clean it up. Hope to get that and the new 4" square tubing gang hangers in soon so I can complete the paint process and start putting back together.
 

Attachments

  • Long Disc Hitch 2011-11-19 12.40.10.jpg
    Long Disc Hitch 2011-11-19 12.40.10.jpg
    678.8 KB · Views: 295
  • Long Disc Hitch 2011-11-19 12.41.05.jpg
    Long Disc Hitch 2011-11-19 12.41.05.jpg
    441.6 KB · Views: 316
  • PICO Hitch 2011-11-26 10.22.47.jpg
    PICO Hitch 2011-11-26 10.22.47.jpg
    541.6 KB · Views: 279
  • PICO Hitch 2011-11-26 10.23.31.jpg
    PICO Hitch 2011-11-26 10.23.31.jpg
    499.7 KB · Views: 302
   / Disc Harrow Alterations #38  
1) On the paint it is your call how you get a smooth even coat on the steel. Just make sure you work small enough areas at a time to overspray the whole piece before it starts to dry. You want just enough paint it can smooth out.


2) On the hitch if I recall right it is an 8 ft wide disc, and I am thinking you will need the Cat 2 pins to deal with the weight. You can try the cat 1 pins and see if these hold up but I have my doubts.

3) Not following you on this.

4) I would alot rather fix this frame issue now than have to take it apart again later.


Also try to wire brush it as I mentioned in above post see alot of paint tells me it hasn't been brushed enough.
 
   / Disc Harrow Alterations
  • Thread Starter
#39  
1) This will be my second painting project of this size. Have put a lot more effort and thought into this one as I want the end product to be better than the last. With the majority of the flat surface areas being 4" wide, it crossed my mind about trying maybe a 2" roller. Thought this might give a better finish than dealing with a brush.

2) It is a 8'/9' disc. I believe factory set up is 9'. The disc in the two pictures to the right above are of an 8' PICO brand disc we have. It has Cat 1 pins and our other tractors are all set up for Cat 1. Thought I would give it a try to see how it turns out. Worst case scenario is I am out a couple pins.

3) Notice that the lift pins on the "project disc" in the pictures on the left go through two pieces of steel with the bottom of the "legs" that run up to where the top link attaches simply drilled and the pin goes through them. The PICO disc on the right makes separate attachments to the metal for these two points. You can actually tighten the nut and hold the two pieces of metal together. With the "project disc" I could grab where the top link attaches and move it back and forth. On the PICO disc this is a rigid attachment. There is no play or movement.

4) Good advice on the repair. I was considering leaving as is, but decided against it.

I have went over the entire frame with angle and cup brush. Are you recommending that the metal be sanded until it is back to shiny metal? The painted areas you see have been over. Thinking it needs to be continued until no signs of any paint? Might be easier to use grinding wheel for that?
 
   / Disc Harrow Alterations #40  
Just me but I use a good quality china bristle brush for enamel paints and would probably go with a 2 1/2" angled sash brush. Buy a good brush if you wan't good results. Put on a light coat first let it get tacky and then spray a heavier coat on top. About the wire brush I use a rather large heavy and expensive cup brush on my 9" Bosch grinder, the smoother it is the better the finish will look. I wouldn't go overboard but a high solids primer is used to fill in the tiny pits and divits in the steel surface and is then wet sanded to a smooth finish. For a farm implement I would use a good primer to match the top coat sand it lightly and paint it. I would only use the grinding wheel where I had a thick layer of crap to remove, because the grinder swirls will show through the paint. Big jobs I will carry to a sandblaster, didn't think you would bother with that on this project.

If you are new to painting remember you can add more but if you put to much on it will run and drip. Best results are achieved with a light coat, let it dry for a few days, sand or go over it with steel wool #00 then paint with a second coat.

If this is an 8 or 9' disc I would go with cat 2 pins imo. The clevis style hitch may work for the cat 1 pins, if this is beneficial to you then try it and see.


Tractor & Equipment Auctions

2016 JOHN DEERE 35G EXCAVATOR (A60429)
2016 JOHN DEERE...
2010 Dodge Ram 4x4 Crew Cab Pickup Truck (A59230)
2010 Dodge Ram 4x4...
24in pin on tooth excavator bucket (A56438)
24in pin on tooth...
2014 HAMM H11IX PADFOOT ROLLER (A60429)
2014 HAMM H11IX...
John Deere 50 (A60462)
2017 HAMM HD+140I DBL DRUM ROLLER (A60429)
2017 HAMM HD+140I...
 
Top