DIY Cab - Finally decided it was time

   / DIY Cab - Finally decided it was time #1  

chim

Elite Member
Joined
Apr 7, 2002
Messages
4,116
Location
Lancaster County, PA
Tractor
Kubota L4240, Ford 1210
Much of the time I enjoy the open air and nothing around me. Then there are those times when my feet and fingers are freezing and it isn't that much fun anymore. After reading about numerous homebrew cabs I decided it was probably something I could handle. What I need is some guidance / tutoring in the finer points of welding. I successfully "glued" lots of stuff together but there is a lack of consistency. I'll never be a "real weldor" but there's a value in improving hobbyist skills. Here's some of the process:

A. Google and read everything I could concerning DIY cabs. Many helpful people posted and blogged about their experiences. There are lots of great ideas out there. No point in re-inventing anything.

B. Get a decent place to work on it. At home the driveway would be the workshop (never convinced Wifey of the need for a pole barn). Just so happens there is some space in the fab shop at work. More on that later.

C. Get pointers from guys who know their way around steel fab and with my welder, rather than have them make it for me. We have lots of machines at work, but I wanted to be tutored and use my Millermatic 175. Remember the old "give a man a fish / teach a man to fish" thing?

D. Have a plan. The amount of detail may be a lot different for different people. For some things I do it works best to make CAD drawings and have everything planned to the last nut and bolt. For others I go with solid concept, some desired details and a fluid plan. Flew with the latter this time.

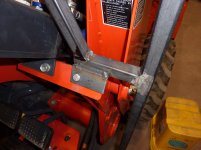
So, the plan involved a rudimentary sketch or two and a list of several items. Deemed necessary were glass (any plastic will eventually be scratched), wiper, heater and an interestng shape. One cab builder posted that the neighbors named his plexiglass cube first build "the Popemobile". Another noted his first build was, in his words "a cab which not only was an embarrassment to myself but my entire family both living and dead". Mine also needs to be sectional and removeable by 1 or 2 guys. Needs to mount to the tractor without scratching it all up.

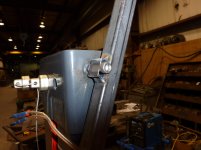
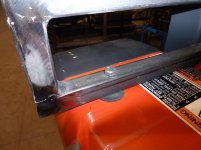
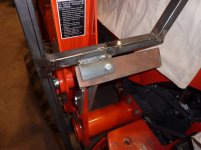
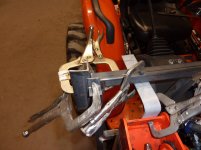
I gathered the steel, door handles, wiper and heater over the past month. This week I moved my stuff into the unoccupied work station in the shop at work. I had the welding super get me going and immerse me in things like what order to tack things to avoid the taco looking piece that should be flat. He worked on the back/top assembly with me and although I have a LOT to learn I'm off to a good start. Today I was able to get the front welded up and the right side all tacked.

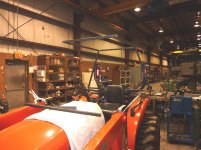
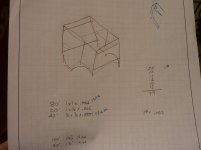
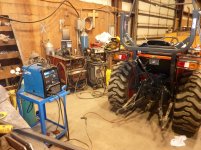
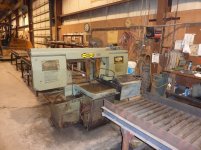
Here are the master plan, a couple shots of the work area and a saw that would scare the daylights out of my Harbor Freight 6x4. It cuts 6" schedule 40 pipe like nothing. One lever works the hydraulic ram that holds the material to be cut. Another lever controls up and down of the saw. Awesome piece of machinery.
 

Attachments

  • 4.jpg
    4.jpg
    710 KB · Views: 2,892
  • 1.jpg
    1.jpg
    620.7 KB · Views: 3,444
  • 2.jpg
    2.jpg
    872.2 KB · Views: 3,510
  • 3.jpg
    3.jpg
    897.6 KB · Views: 3,159
Last edited:
   / DIY Cab - Finally decided it was time
  • Thread Starter
#2  
The modular design is roof and rear as a piece, front as a piece and each side as a piece. To start the build it seemed like a good idea to do the back and top. These had readily available anchor points. The ROPS will not fit (and neither will most factory-cabbed tractors) where this needs to go. The welded-on nuts were drilled out to 3/8" and nylock nuts were used.

Since the back of the cab wanted to be in front of the ROPS, it eliminated the flashers in their factory position. The existing light holes worked for anchoring the bottom of the back wall. This rubber washers keep the frame clear of the fenders. I plan to weld a couple of blocks onto the back that will help bear the weight.

Here's where the project stood yesterday when I left. The rear /top framing was welded.

For anchoring the front wall, the heavy steel for the FEL stick looked like a winner. So I added a mirror-image bracket on the left side for support.
 

Attachments

  • 11.jpg
    11.jpg
    722 KB · Views: 3,087
  • 6.jpg
    6.jpg
    523.3 KB · Views: 2,553
  • 7.jpg
    7.jpg
    627.6 KB · Views: 2,503
  • 8.jpg
    8.jpg
    645.5 KB · Views: 2,970
  • 10.jpg
    10.jpg
    726.3 KB · Views: 2,809
   / DIY Cab - Finally decided it was time #3  
Looking really good. It's great when people set out to learn new skills and take on a useful project. I bet that cab will be nice in bad weather. My tractor is open and bush hogging today got me covered in dust and debris.
 
   / DIY Cab - Finally decided it was time
  • Thread Starter
#4  
After a full day today, here's what it looks like. Whatever is clamped represents the different sections. The spaces where there are double bars will be filled with sheet metal. This includes the little box over the "HST" on the fender, the odd-shaped spot in front of the rear tire and the long narrow space at the top. Another tube will be added at the top (front and rear) to carry the metal all around the top at the same width. There will also be another at the base of the windshield.

It may be several days till there's any meaningful progress. Still thinking some of the door details through. Oh, but there is one last observation to share - you CAN'T have too many clamps!
 

Attachments

  • 14.jpg
    14.jpg
    655.7 KB · Views: 2,386
  • 13.jpg
    13.jpg
    811.9 KB · Views: 4,529
   / DIY Cab - Finally decided it was time #5  
Looks like you have a real plan here . Very nice so far, and to have an area to work like you have is definitely a morale booster. Then to mention your supervisor, who is willing to help with this project. WOW I have been looking at my rig and measuring and mentaly drawing pictures, just need a kick in the butt to get going. Keep up the good work and keep us posted.
 
   / DIY Cab - Finally decided it was time #6  
Your frame work looks great!
 
   / DIY Cab - Finally decided it was time #7  
Looks good so far! Some day maybe I will get ambitious. I am not sure if I am looking at this right, but you will not be able to have the cab on without the FEL? Probably not a huge deal, but I always like to leave options open. Like maybe someday a front mount snow-blower or plow.
 
   / DIY Cab - Finally decided it was time
  • Thread Starter
#8  
................I am not sure if I am looking at this right, but you will not be able to have the cab on without the FEL?..............................

Good question. I have the loader attached during fab so there isn't any chance of building anything that will interfere with the loader. The loader can come and go independently of the cab. The front support for the cab is on the bracket that holds the joystick. That stays with the tractor when the loader is removed.
 
   / DIY Cab - Finally decided it was time #9  
looking good so far! I like the looks with the angles!
 
   / DIY Cab - Finally decided it was time #10  
Hyd - mec is serious saw material..... I would say one of the best. I have a new 1600 Ellis which for a private shop is a very quality piece. A 252 Miller MIG is also a good choice. With little practice will make you look like a pro.
Your doing a great job with layout. Love the wheel arc openings... fancy ! If the cab extends past the fenders how are you going to fill the space between the fender and the steel structure ? Your post proves one does not have to be a professional metals person to construct a cab.
 
   / DIY Cab - Finally decided it was time
  • Thread Starter
#11  
Hyd - mec is serious saw material..... ....................................... If the cab extends past the fenders how are you going to fill the space between the fender and the steel structure ? Your post proves one does not have to be a professional metals person to construct a cab.

Thanks guys. That saw is awesome. It has a hydraulic vise that grabs the material being cut with the flick of a lever. Another lever raises and lowers the saw.

The amount of sealing things will depend on how much heat leaks out / cold leaks in. The cab fits fairly tight across the back. I filled under the seat with a piece of "cow mat" cut to fit pretty closely. The sides do have about 3/8 of an inch between the cab and the upper part of the fender. These areas will probably get some of that stick-on foam weatherstripping stuck to the cab.

As the fender curves down the gap increases quite a bit. For the curved part of the framing I used 1/2 x 1 steel tube because it seemed a better candidate for bending than the 1 x 1 the rest is made from. The 1/2 x 1 follows the curve of the fender closely enough I plan to fasten a strip of conveyor belt or similar material to the bottom of the 1/2 x 1. Sort of an ingrown fender flare. That would leave about 1/4" gap between the top of the rubber to the bottom edge of the fender. If it's too drafty maybe a few slices of a "memory foam" mattress topper we no longer use will help.

Things are being laid out to avoid contact between the cab and tractor as best I can. When the cab is removed in the spring the tractor shouldn't have rub marks and scratches.

There are some hurdles to go, but you're correct about not needing to be a professional to build a cab. A lot of research of old threads and noting the successes and pitfalls of others who have been there before me really helped. It was still intimidating to pull the Kubota into the shop and look at the cart of metal that was supposed to be a cab.
 
   / DIY Cab - Finally decided it was time #12  
Very nice work Chim, and you're lucky to be able to do the fab work at your employer's shop! I suggest you check McMaster-Carr McMaster-Carr for various types of weatherstripping to seal your cab and glass work. With the effort you're putting into this project; there is no sense in cobbling together weatherstripping from other materials that may or may not work.

By the way; don't you just hate grinding welds? I know I do.

That is an interesting coincidence concerning your comment about clamps and my signature line.
 
   / DIY Cab - Finally decided it was time
  • Thread Starter
#13  
Very nice work Chim, and you're lucky to be able to do the fab work at your employer's shop! I suggest you check McMaster-Carr McMaster-Carr for various types of weatherstripping to seal your cab and glass work. With the effort you're putting into this project; there is no sense in cobbling together weatherstripping from other materials that may or may not work.

By the way; don't you just hate grinding welds? I know I do.

That is an interesting coincidence concerning your comment about clamps and my signature line.

Thank you. Don't know why I didn't think of McM/C before. They are on our vendor's list and have what I've been looking for. The sentiment on clamps is probably shared by all those who like to make things. I'm working on the cab this week on a "stay-cation" and hope to have it completed soon.
 
   / DIY Cab - Finally decided it was time
  • Thread Starter
#14  
Got back at it today and made some serious headway. I started attaching the brackets that will hold the different sections of the cab together. The plan is to use a gasket between the sections. To help align the pieces and compress the gasket there's a pry hole in the tab.

Another of the photos is taken at a more straight-on angle of the right fender. A previous picture from a different angle made it look like the hand bent radius is a lot worse than it is.

Last shot is of the left side. Just a couple more pieces to frame around the door and then on to door frame fab and adding flanges for the glass.

mjncad - McMaster is shipping gasket material today/tomorrow. Thanks again.


18 small.jpg15 small.jpg16 small.jpg17 small.jpg
 
   / DIY Cab - Finally decided it was time #15  
Lookin god. Better hurry up though. Big snow will be here soon. I was out in the snow today. Only downside is you have to open door to let farts out
 
   / DIY Cab - Finally decided it was time #16  
will you cab have doors on both sides? I made on years ago for a Ford 1310 I had and made it with one and hated it!!! When I got the Kubota B7510 I retrofitted the cab to it and resigned it to have 2 doors and am soooo glad I did!!! I also echo the sentiment about you can never have too many clamps!
 
   / DIY Cab - Finally decided it was time #17  
will you cab have doors on both sides? I made on years ago for a Ford 1310 I had and made it with one and hated it!!! When I got the Kubota B7510 I retrofitted the cab to it and resigned it to have 2 doors and am soooo glad I did!!! I also echo the sentiment about you can never have too many clamps!

Did you post any pics of your cab on another thread? I have a B7510 and am interested in seeing how you fabricated it. I just don't want to hijack this thread..
 
   / DIY Cab - Finally decided it was time
  • Thread Starter
#18  
will you cab have doors on both sides? I made on years ago for a Ford 1310 I had and made it with one and hated it!!! When I got the Kubota B7510 I retrofitted the cab to it and resigned it to have 2 doors and am soooo glad I did!!! I also echo the sentiment about you can never have too many clamps!

It will have two doors. The right door won't get used unless something happens that prevents me from using the left one. The plan is to remove the cab in warm weather but it might be nice to lift both doors off during the transition in the spring and fall.

Cigar Face - we had a dusting here today. I'm hoping to wrap up the build really soon.
 
   / DIY Cab - Finally decided it was time #19  
I love McMaster-Carr's selection and customer service, which helps take some of the sting out of their prices.
 
   / DIY Cab - Finally decided it was time #20  
chim, perhaps I missed it, but do you plan to bolt the sections together for easy removal? I'm planning a cab for next year and want to go with a modular design so it can be removed in sections instead of the whole works.
 

Marketplace Items

Tank Only (A59076)
Tank Only (A59076)
2013 Ford Explorer SUV (A59231)
2013 Ford Explorer...
2014 Ford Taurus Sedan (A59231)
2014 Ford Taurus...
2004 Pierce Tilt Crew Cab Enforcer Fire Truck (A55853)
2004 Pierce Tilt...
FUTURE 6' CLIP-ON FORK EXTENSIONS (A60432)
FUTURE 6' CLIP-ON...
2025 Ligchine Spiderscreed Concrete Screed (A59228)
2025 Ligchine...
 
Top