DIY Mini Digger

/ DIY Mini Digger #43  
Don't let the lack of comments put you off Colcreate, you have knotched up nigh on 3000 views already, so pleanty of people are keen to see your progress. You really do seem to know what you are doing, so that's why not many are chipping in with suggestions.

We seem to go through periods on TBN when picutures no longer upload, not your fault. At your rate of progress, you may be on to the final coat of paint before they get the upload sorted - you deserve a break for a few days.:)
 
/ DIY Mini Digger
  • Thread Starter
#44  
Don't let the lack of comments put you off Colcreate, you have knotched up nigh on 3000 views already, so pleanty of people are keen to see your progress. You really do seem to know what you are doing, so that's why not many are chipping in with suggestions.

We seem to go through periods on TBN when picutures no longer upload, not your fault. At your rate of progress, you may be on to the final coat of paint before they get the upload sorted - you deserve a break for a few days.:)

Cheers Eric, I've taken a few days off boating and diving so no updates for a few days anyway.
 
/ DIY Mini Digger
  • Thread Starter
#45  
you have inside the frame work done and over with for the 4 pieces. but it is the 4 pieces that stick out. the edges furthest away from the machine of these 4 pieces that are more likely to "bend / warp / stretch" kinda opening up like your mouth / jaw opening. causing slop to happen in your holes / bushing / pins. maybe some sort of triangle brackets or like added in. once you figure out your swing cylinder and out riggers go.

once i went out and looked at those initial 14 TLB. i have since looked at TLB's out on road ways say for local township / county, and i can see slop / bending / warping in the same area. and these are newer units.

EDIT ATTACHED PICTURE
View attachment 436582

Thanks for taking the time to post this Boggen.
Once I have full functionality and am nearing the end of the basic build I intend on stripping it completely down for final welding and painting before reassembly. At that point I will build in some more strength to the key areas such as those you suggest although I won't be able to extend the width of the pivot plates as the boom mounting will foul.
The pivot pins will be capped and secured at the end with bolts as well, effectively tying the assemblies together and preventing the plates from spreading. That coupled with the strength and shape of the boom mounting should do the job. The bending moments will be spread over all four mounting plates as a complete assembly rather than on any single or pair of plates.

I haven't rounded off the corners of the pivot plates yet as I have been saving up for a plasma cutter. Now it's arrived I can be more creative and will be in danger of putting in gussets in every corner regardless. :D
 
/ DIY Mini Digger
  • Thread Starter
#46  
OK, I've managed to connect up the hydraulics now using a temporary reservoir tank that I made from a steel box that was lying around. It's a bit on the small side but fits nicely in the space and can be replaced with a larger custom made thing at a later date.
Here's a description of how I have plumbed the hydraulic circuit:
1P3060 hydraulic pump, around 27lt/min @ 1500rpm
Pumps directly to a Danfoss A80 priority valve on the orbital steering valve.
Output of steering valve goes to an old marine double ended steering ram that I adapted and fixed to the Land Rover front axle.
The priority valve ensures I will always have flow and pressure to steer regardless of other demands on the system.
Main hydraulic flow is taken from priority valve outlet and piped up to a 1/2" - 6 bank spool valve mounted at the front of the digger.
This valve is a bit of an overkill here but has a power beyond (carry over) feature which shares the hydraulic flow with the huge ex-Massey Ferguson backhoe valve that is now fixed in place at the rear.
I'm using one of the front spool valve functions to drive the main transmission 160 hydraulic motor which works well except that in neutral it locks off the motor completely rather than allowing free-wheeling. I will have to change out this spool at some point as it is too jerky and something will break. The other five spools will be used for the Front End Loader that I haven't even though about yet.
At the rear the massive backhoe valve fitted in nicely and is now fully operational.
The flow from this valve returns to the tank via a tee piece to a filter unit currently mounted above the reservoir.
The return from the front spool valve also feeds back to the filter via this tee.
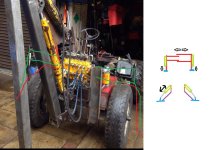
Here's a photo of the backhoe and valve.
image.jpg
The main boom is now 100 x 100 x 6mm RHS, I'm using the lighter 90 x 90 x 5mm RHS as the stick but will be plating both sides with 5mm thick steel plates now I have a plasma cutter.:D
The boom top ram mount has two positions and at its lowest point will allow deeper digging, not sure if this was a good idea or not but it's all welded up now so it's staying...
The rest of what you see here is a mock up just tack welded together to figure out stuff. I've already changed it since I took the photo but it was too dark when I finished to take another.
The 2" stick ram has since been changed out, it leaked and was too heavy and too short a stroke. The stick pivot and lengths have also been changed.

I'm working on the slew rams and brackets now....
 
Last edited:
/ DIY Mini Digger
  • Thread Starter
#48  
Backhoe slew rams

I'm back to work now so progress will slow up on this project...:thumbdown:
Here's where I am at the moment:
The slew ram brackets were cut from 10mm thick steel plate and have been tack welded in place
image.jpg
The cylinder ends are fastened to a chassis crossmember, I'll cut a piece of heavy angle to span across the top of these 1" pins to reinforce the mounting and support the false floor that will cover the rams.
image.jpg
The boom has full 180 degrees of movement and it seems the rams will work together quite well. I would have liked slightly heavy more powerful ones here but will see how these work under load. Just need to get all the hoses made up.
The dipper ram (should that be called a stick ram?) that was leaking has been swooped out and a 1 1/2" ram with a longer stroke has been fitted. The extra stroke has enabled me to move the pivot point further down the arm I now have a 1:4 ratio which should give me more force at the bucket.
Large 5mm triangular plates have been tacked onto both sides of the length of the boom to provide the bottom mounting for the dipper cylinder.
 
Last edited:
/ DIY Mini Digger
  • Thread Starter
#49  
Backhoe stabilising legs?

Backhoe legs?? Not sure what to do here so would welcome your comments on this and any photos of ones others have built.

Some backhoes have a ram leg either side which move vertically and can be set down to stabilise the machine when digging. If I used this option the rams would sit inside of the rear wheels so wouldn't be a very wide footprint.

Other backhoes have arms either side that fold down often giving a wider or longer footprint. This option seems the most complicated due to the space available.

Both above types can be operated independently so can be used to level the machine.

The other method used on diggers/excavators is a shallow but strong blade the full track width of the machine which is operated by a single short stroke ram. The blade can be used to dig in and lift the machine but can't level it. It can also be used to scrape the ground level as well. This option seems the easiest and having only one ram would leave a hydraulic circuit free for other uses like a bucket thumb.....

Which design should I go for (or any other ideas)?
I have rams for each method, just not sure if I need to go too OTT here...
 
/ DIY Mini Digger #50  
Backhoe legs?? Not sure what to do here so would welcome your comments on this and any photos of ones others have built.

Some backhoes have a ram leg either side which move vertically and can be set down to stabilise the machine when digging. If I used this option the rams would sit inside of the rear wheels so wouldn't be a very wide footprint.

Other backhoes have arms either side that fold down often giving a wider or longer footprint. This option seems the most complicated due to the space available.

Both above types can be operated independently so can be used to level the machine.

The other method used on diggers/excavators is a shallow but strong blade the full track width of the machine which is operated by a single short stroke ram. The blade can be used to dig in and lift the machine but can't level it. It can also be used to scrape the ground level as well. This option seems the easiest and having only one ram would leave a hydraulic circuit free for other uses like a bucket thumb.....

Which design should I go for (or any other ideas)?
I have rams for each method, just not sure if I need to go too OTT here...

I like the blade idea. But how much clearance with there be??
 
/ DIY Mini Digger
  • Thread Starter
#53  
/ DIY Mini Digger #54  
In the end, you will realize that there is nothing that can pay for something that was build by ourselves :) The blade idea is good too, and it will save you 1 spool, that you could use for a thumb maybe in the future
 
/ DIY Mini Digger #55  
one more option. "side shift" legs get pushed out via cylinder, and then each leg has a foot that goes down.

===========
scraper blade good. but would push for both scraper blade and 2 adjustable out riggers / legs to level machine.

your machine most likely verstile enough with the 4 wheels and steering to get up close to say a basement wall and dig down around it. but con... your machine will be all setting at an angle. or you will be digging out a trench and one end you will come up on a building side. but all setting side ways on uneven ground. resulting in a larger hole needing to be dug out.

scraper blade = good just to make clean up work quicker and easier pushing dirt back into trench. and cleaning up pile of dirt along a trench and smoothing everything out.

might push for scraper blade on opposite side of machine than what backhoe is on. other words 2 out riggers on back and scraper blade on front for kinda of a mini TLB (tractor loader backhoe) setup. so you have some extra weight out in front, and at same time able to take some weight off of the front axles so you do not bust / bend them. i have used bucket on the TLB i have multi times to dig into the ground out in front. to keep my rear from being pulled back into the hole i am digging with backhoe. if blade was directly under the backhoe. i would of most likely caused a side cave in, and went down into hole with the machine.

attachment.php

(red ) fold out legs, drawn in kinda center between front / rear wheels of were it hinges?

(green) side shifter legs. maybe swung out and locked in with a pin around rear wheels. and then each leg has a hyd cylinder.
 

Attachments

  • minidigger out riggers.jpg
    minidigger out riggers.jpg
    83.2 KB · Views: 2,055
/ DIY Mini Digger
  • Thread Starter
#56  
Boggen, the side shift idea is cool but would be quite complicated to build with sliding sections. It would probably need 4 rams and more hydraulic circuits than I can spare (or afford).
I will have a loader bucket on the front eventually which will help anchor things down when using the backhoe. So at the rear I'm thinking I won't need to go too heavy, just something to lift the wheels off the ground. The blade idea seems favourite the more I look at it, but I'm wondering if I will miss not being able to level the machine.
I saw a heavy excavator being transported on a wagon today, it had a heavy blade with fold down hydraulic legs actually mounted on each side of the blade frame. Best of both ideas....!
 
/ DIY Mini Digger
  • Thread Starter
#57  
Backhoe slew rams

Here's some pictures looking down on the slew rams with the boom on full lock to the left, in the middle and full lock to the right.
image.jpgimage.jpgimage.jpg
The hoses have been made and fitted to feed diagonally across the cylinders so when one ram pushes the other ram pulls. I will try taking a video over the weekend if I can get it out of the workshop.
image.jpg
Full 180 degree movement (when I re-route the boom hoses...)
Also need to cut and re weld the slew brackets on the boom as I welded them crooked:(
 
/ DIY Mini Digger #58  
Boggen, the side shift idea is cool but would be quite complicated to build with sliding sections. It would probably need 4 rams and more hydraulic circuits than I can spare (or afford).
I will have a loader bucket on the front eventually which will help anchor things down when using the backhoe. So at the rear I'm thinking I won't need to go too heavy, just something to lift the wheels off the ground. The blade idea seems favourite the more I look at it, but I'm wondering if I will miss not being able to level the machine.
I saw a heavy excavator being transported on a wagon today, it had a heavy blade with fold down hydraulic legs actually mounted on each side of the blade frame. Best of both ideas....!
What if you made a "U" shaped frame with the two top points of the U attaching to the tractor and a pivot at the bottom where the blade attaches (so the blade can pivot to make one side or the other higher)? Then have a pair of cylinders with swivel ends (like: 3X8X1.5 DA HYD CYL TOP LINK SELF ALIGN BOTH ENDS ) that attach directly to the blade.

That would let you level the tractor with the blade.

Aaron Z
 
/ DIY Mini Digger
  • Thread Starter
#59  
Interesting idea Aczlan, that might actually fit. Rather than a U shape though I think two separate parallel arms rose jointed at both ends. Running horizontal from under the chassis to each end of the blade and two rams like you describe running vertically down from the channels each side of the valve block.
Might have a tendency to sway from side to side though, panhard rod?
 
/ DIY Mini Digger #60  
Interesting idea Aczlan, that might actually fit. Rather than a U shape though I think two separate parallel arms rose jointed at both ends. Running horizontal from under the chassis to each end of the blade and two rams like you describe running vertically down from the channels each side of the valve block.

Rose jointed?? You mean like the "eyes"
 

Marketplace Items

2015 Ford Transit Connect Passenger Van (A59230)
2015 Ford Transit...
UNUSED IRANCH MINI EXCAVATOR RAKE (A60432)
UNUSED IRANCH MINI...
HYD QUICK ATTACH STUMP GRINDER (A52706)
HYD QUICK ATTACH...
UNUSED RAYTREE RMA42 HYD AUGER (A60432)
UNUSED RAYTREE...
UNUSED IRANCH HYD THUMB CLAMP (A60432)
UNUSED IRANCH HYD...
UNUSED RAYTREE RMSC78-78" HYD SOIL CONDITIONER (A60432)
UNUSED RAYTREE...
 
Top