BeeferMan
Gold Member
Take it to a machine shop with a big press, or an auto body shop with a frame machine - it'll straighten...
Kevin:
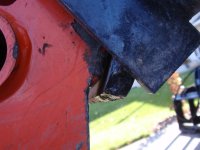
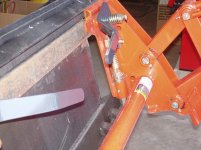
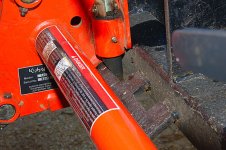
It is hard to see, but you must be referring to the plate that appears just above the top of the threaded rod extending through the spring. So, that plate is close enough to the top of the rod to keep it from lifting?
My L4330 (2007?) does not have it.
There were many complaints about this a few years ago, and Kubota made a kit like my home made one to fix it. Now I see the permanent fix.
Called two dealers today to get the price of a new QA assembly. One quoted $630 plus tax, the other $657 plus tax.
Time to get out the saw.
I'm gonna attempt to repair it myself using 638's and Ductape's advice. Cut the tube in two, then attach to bucket to ensure proper vertical and rotational alignment of the QA plates. Once connected this way, the displacement of the tube ends at the cutoff point should tell me which direction things need to be moved.
Well, let's just say your area sounds quite a bit different than my area. In my area a press is what makes the county's weekly newspaper.I do not know about your area, but here we have several large welding shops which have nice presses.
")
Thanks for the advice. I'll do a little more calling around and see what I can come up with, but I'm not optimistic.When I bend stuff I start with the press route, usually cheap & effective, even if they only get it real close you have a lot less work to finish the job.
You may get by with just some final heating of the tube rather than cutting or you could just blow the welds and put in a new tube.
20 to 50 bucks and a half hour will get stuff fixed with the ol' 60 ton press at my local shop.
Well, let's just say your area sounds quite a bit different than my area. In my area a press is what makes the county's weekly newspaper.
Jay
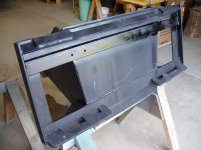
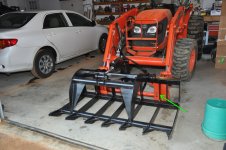
You need to check your grapple fit. It should not come off on one side.
I have a Markham bucket that was made "to skid steer spec" per Markham.
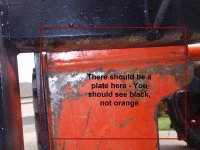
That may be true but it does not work right on Kubota due to the rebated top of the QA device.
Compare the fit to you bucket, look at the top and the bottom by the beveled pins.
Also the pins should have stops above them when latched
When hooked there was 1/2" open on the bottom by the beveled pin
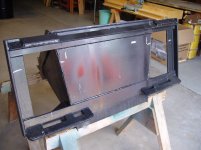
I had to weld in a piece of steel to shim the top where it belonged, no problems since.
The pic should show the issue that I had.
Post #64 and on... http://www.tractorbynet.com/forums/attachments/179052-grapple-width-7.htmlWow. Where were you when I was fighting this issue last fall?
Another Gator/Markham grapple falling off victim... What I did - based on what Gator told me to do - was to weld on a second plate they sent me to the lower pin attachment bracket that essentially made it double thick. This did NOT solve the problem but it improved it. I was thinking about adding some blocking below that top tube for the QA top to hit against similar to what you showed, kevin. You have any more close-ups of your fix? This just reinforces the fact that I need to do that this year. Modifying brand new equipment to make it work as intended is not my idea of a good product...
I know a lot of people like these grapples, and they sure are pretty handy (when not falling off), but this one has a serious design flaw. They also told me I was "the only one" they had ever heard about with this issue. I doubted it then, and I really doubt it now.
I need to look into the pin stop issue also.
Jay - I wouldn't blame yourself. I think you are another victim of this design flaw.
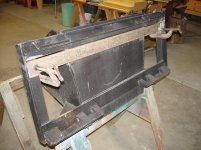
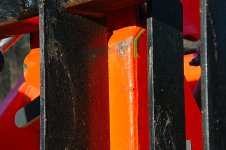
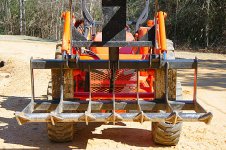
Completed pic on top. During tack welding on the bottom for clarity.


Edit: Thinking about this more, this relates to a concern I had about the space behind the QA plates being open. I didn't realize that the Kubota plate's upper edge being recessed like that was quite the issue it is. I thought the plate needed to be there for other reasons (ease of mounting and stopping the plate from pushing through when stressed). If you are saying it is keeping the QA mount out of place, then it all adds up. Man I'm glad I saw this thread...

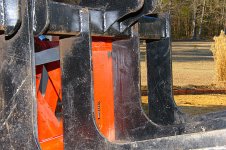
I don't think the shim on the bottom is going anywhere at this point... there must be 5 lbs of weld on each side. I didn't trust my welding skills, so I welded every inch I could access. But I think I can still make it work with a hefty piece af angle set in between the tines on the ends in front of the QA plates. Based on the fact that the shim did imporve it, I think if I stop the QA mount from moving any more at the top, it should work fine, but the better fix would have been to do what you did up front. The shim at the bottom makes the bottom bracket incredibly sturdy now
The grapple design is different from your bucket as the upper bearing surface is actually the main tube backbone of the unit. They would have had to add on an additional plate (like I will be doing) so it isn't as simple a case as yours, but that's no excuse.
Not having dealt with other QA mounts before, I wasn't aware the Kubota style was different at the top, so it wasn't obvious to me that the top was the problem. Mine was bought from Gator (same outfit, post-Markham) and they acted totally clueless when I called them on it. I even told them what tractor I was using and they still had no clue.
Thanks for the info!
Jack, I just now saw this. Missed it somehow.Jay
You can try Pepper's machine shop, just off Hwy 84 as you go under the I-55. First left and up the hill. Or Poters body shop in Brookhaven.
I would add one more vertical on each side so that 2 are in contact as opposed to 1. That would insure that the QA can't twist under load.