FEL Grapple from Scratch W/ Lots-O-Pics

   / FEL Grapple from Scratch W/ Lots-O-Pics
  • Thread Starter
#21  
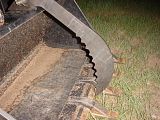
Overall shot of what the jaws look like on the bucket. I need to remove that center hook & install a 1/2" plate on top of the bucket to support the grapple and for something thick to weld brackets to.


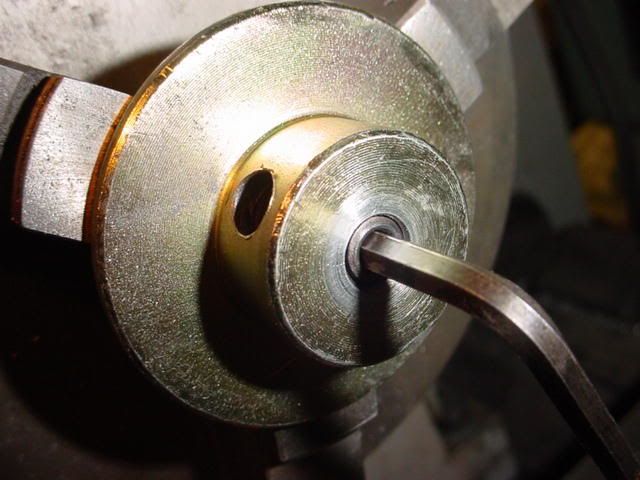
Closer view of a jaw - It looks sweet. Rob did a great job designing all the parts to put this together.


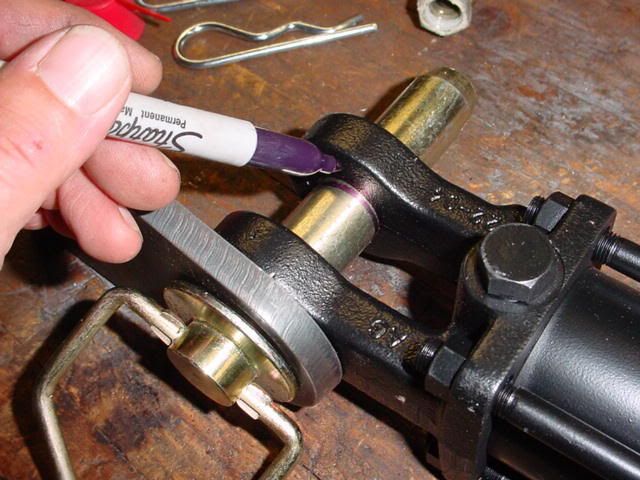
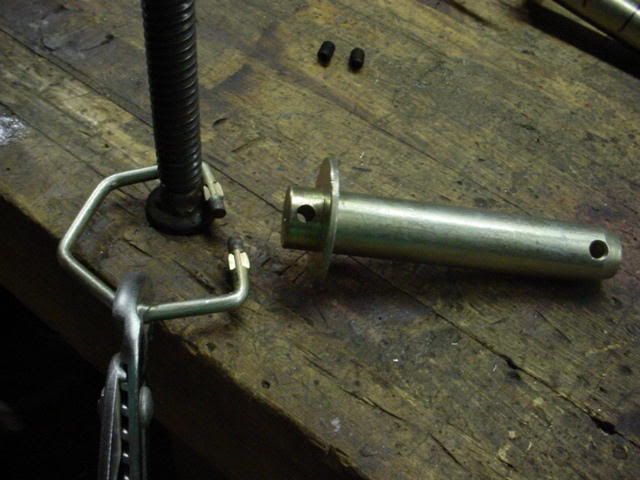
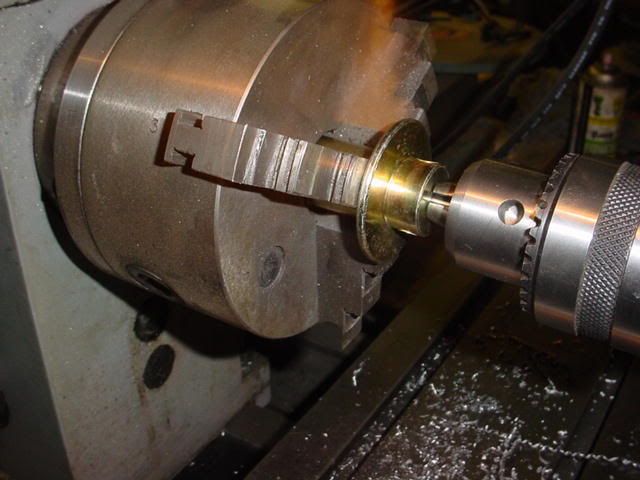
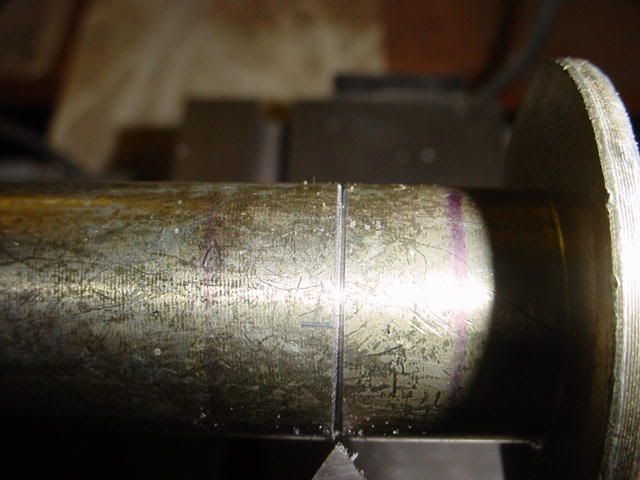
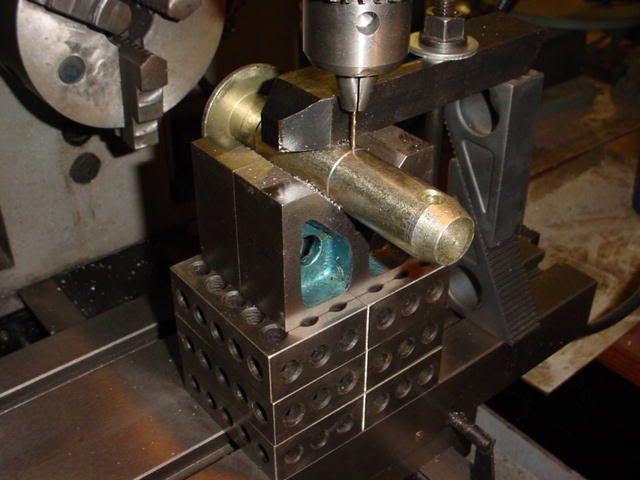
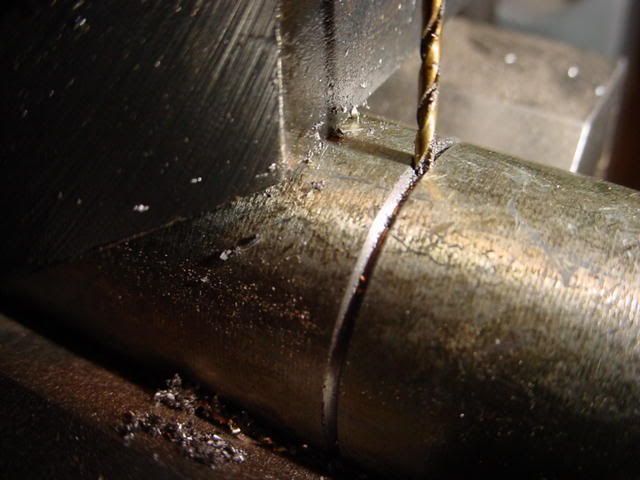
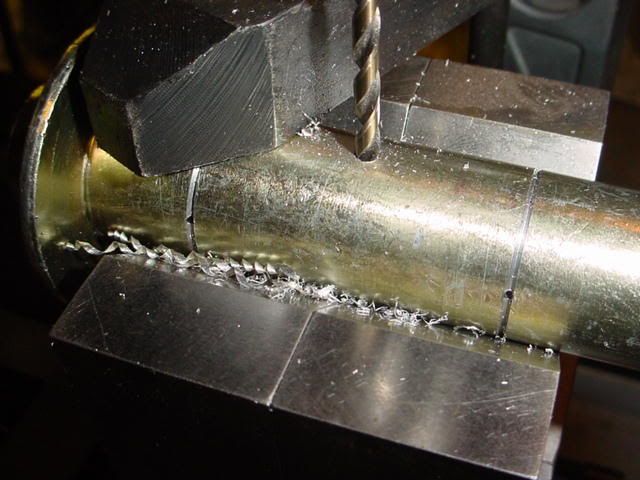
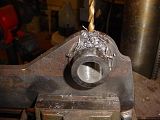
I wanted to add grease fittings to the pivot points for the grapple jaws, so I did. First was to drill through the jaw & seamless tubing:


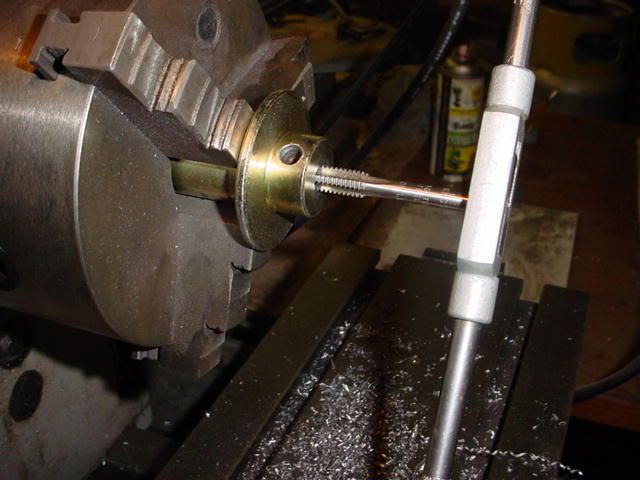
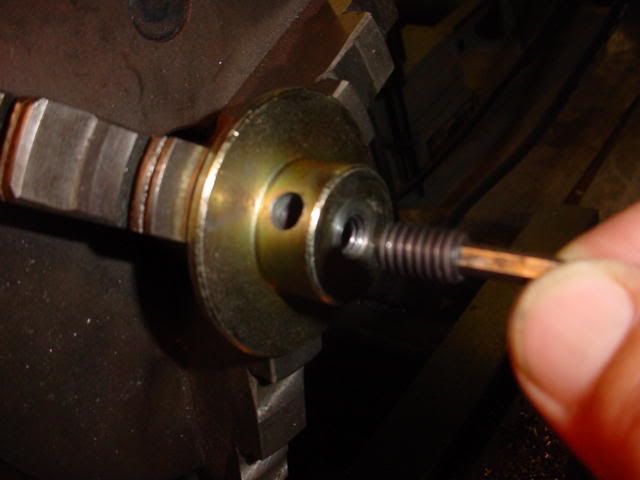
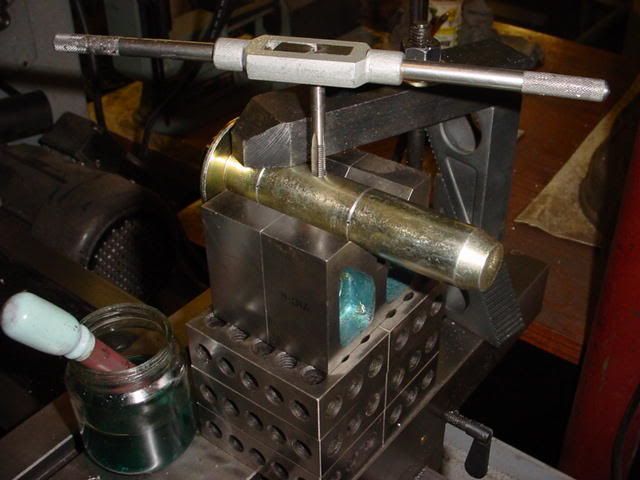
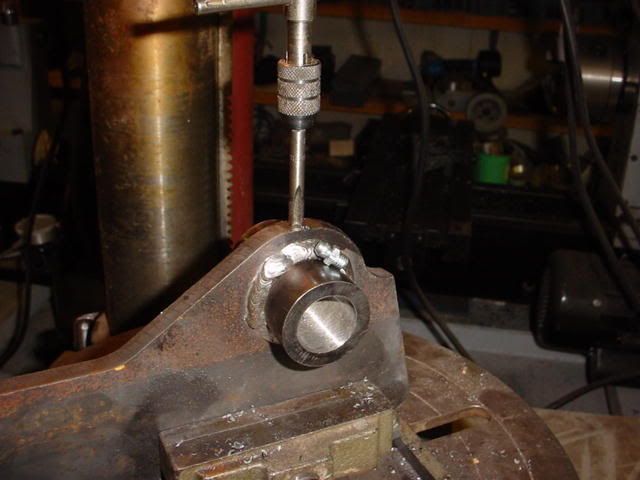
Then tap for a 1/4-28 grease fitting.


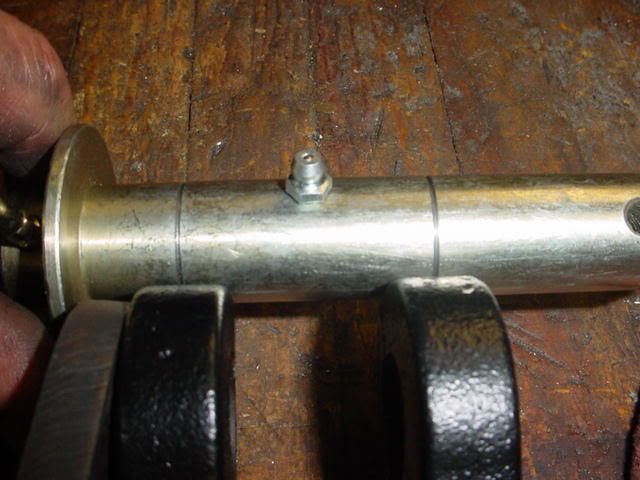
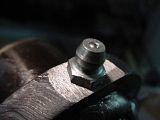
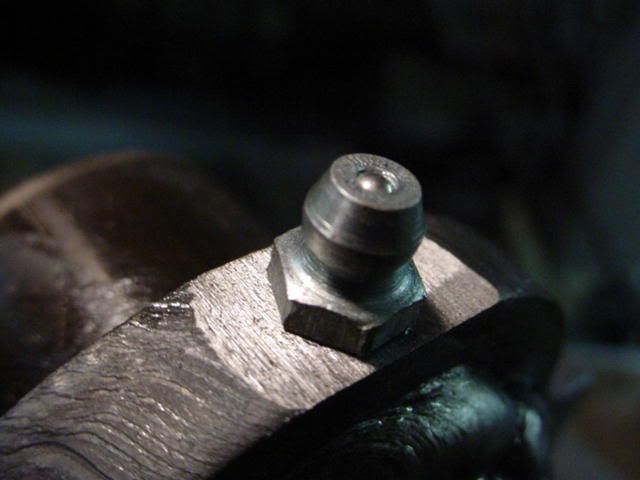
After taping the hole it was time to install the grease fitting:


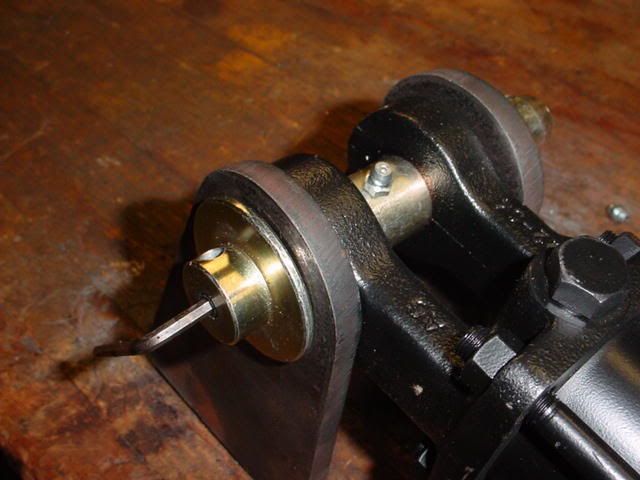
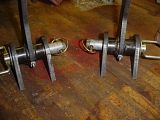
Both done, there is plenty of clearance from the tip of the fitting to the bottom of the bracket. To grease them, the jaws will need to be in the open position -


Larry
 
   / FEL Grapple from Scratch W/ Lots-O-Pics
  • Thread Starter
#22  
Time to switch gears a little. I figured I better get the hydraulics ready before any more work on the mechanical part of the grapple. So I started to mount the Hydraulic solenoid & Sub-plate.

First was to locate a position where the solenoid would fit, be protected yet be close to where it needed to be connected to the existing tractor hydraulics.

I settled on the FEL support post upright. Using a transfer punch to locate the holes for mounting:


Drilled and taped for 1/4-20 SHCS -


With the holes taped & the sub-plate mounted, time to install some hydraulic fittings. I have a bunch of fittings left over from previous projects. Not all the fittings I have are the ones I need, However, with a little creativity, I got most of the connections made with the use of some adapters I had.

In the upper left of the photo you may notice that grey gizmo with the black knob at the end of a handle - that thing is an adjustable hydraulic divider. With that I can adjust the flow of fluid going to the grapple cylinder to control it's speed. Not only that, the grapple will be a true "third function" meaning I can operate the bucket up / down, bucket retract/dump & operate the grapple all at the same time without feathering any of the valves.


After all the connections were made, it was time to install the solenoid valve onto the sub plate -


The valve is now installed, I think it looks pretty good in this location, is well protected & easy to make the connections -


Larry
 
   / FEL Grapple from Scratch W/ Lots-O-Pics
  • Thread Starter
#23  
After Rob saw that I added grease fittings to the jaw pivots, he suggested I modify the pins for the hydraulic cylinder clevis to add grease fittings there as well. So here is the Pin modification to add grease fittings:
First was to mark the pins where the clevis ears are so that a V grove can be cut into the center of the clevis metal -

Crude but effective -

Then pull off the pin handles so the pin will turn in the lathe without those handles flopping around off balance -

Then chuck up the pin and use a center drill -

Larry
 
   / FEL Grapple from Scratch W/ Lots-O-Pics
  • Thread Starter
#24  
Next was to drill three and a half inches deep into the center of the pin with a letter "F" drill to tap the hole 5/16-18 thread.

Got the drill buried 3.5" into the hardened pin -

Next - tap 1/2" deep -

Test fit set screw -

The set screw fits just right, it bottoms out & seals against the end of the internal tapped threads -


Next was to cut a 60* V grove into the pin where it rides in the center of the cylinder clevis ears, this will allow a channel for grease to completely surround the pin for maximum lubrication -


Now it's time to drill .050 holes into the center of the V grove to meet the hole that goes through the center of the pin. I drilled 3 holes around the circumference 120* apart. 6 holes per pin, 12 holes total. Lucky me did not break the drill, I ran the spindle at 2800 RPM.

A closer look -


Larry
 
   / FEL Grapple from Scratch W/ Lots-O-Pics
  • Thread Starter
#25  
After all that, a hole for the grease fitting is next. I used a 7/32 bit

Then tapped for a 1/4-28 grease fitting -

Looks Good -

Of course now it wont insert through the bracket or the clevis :confused:

Larry

This is how the V grove lines up to the center of the clevis ears-


Here are the two sets of pins -

After removing the grease fitting, I was able to install the pin, then re-install the Zerk fitting - this will work.


Rob is this what you meant? I sure hope so.

Larry
 
   / FEL Grapple from Scratch W/ Lots-O-Pics #26  
Larry,
What a great thread!
Yeah, that's exactly what I meant. Now just squirt some grease in there and try it out. I just got home from camp and came across your thread tonight. You sure did a great job Larry....and didn't waste any time getting on it. Looks like it's coming together perfectly.

Scott and gmlf,
lol ... When am I supposed to fly out to your place? I would love to meet you guys! I'm ready to go, but it looks like Larry still need to finish his grapple first.:)
 
   / FEL Grapple from Scratch W/ Lots-O-Pics
  • Thread Starter
#27  
Larry,
What a great thread!
Yeah, that's exactly what I meant. Now just squirt some grease in there and try it out. I just got home from camp and came across your thread tonight. You sure did a great job Larry....and didn't waste any time getting on it. Looks like it's coming together perfectly.

Whew! I sure am glad that's how those pins were supposed to come out.
Thank's Rob.

I drove down to my remote mailbox and guess what? I got my joystick handle, the cool one with two buttons.
The first thing I did was to install a connector onto the end of the cable. I am planning on making a small junction box to plug everything into.


I like the new handle -


The handle comes standard with two feet of wire. I installed a 6 pin connector onto the end of the cable:


Then made up this junction box that everything will plug into. (Two Solenoid cables, The Joystick cable connector, and the + power and ground):


Here is the junction box completed & all the cables & connectors plugged it:


Whenever a switch is used to operate a solenoid, or any type of inductive load (coils of wire wrapped around a ferris metal core) with DC (Direct Current) install a diode across the solenoid to protect the switch contacts from arcing. A diode will short out the resultant reverse current generated by the coil when the switch is opened, (It prevents arcing across the switch contacts extending switch life). So here is the Diode that was added to the solenoid connector. One diode per solenoid coil. Make sure the polarity is correct! - The white band on the diode is connected to the + side of the coil. A 2.5 amp 1000 volt diode (NTE125) was used.


Larry
 
   / FEL Grapple from Scratch W/ Lots-O-Pics
  • Thread Starter
#28  
I ordered the handle with a 10 mm X 1.5 mm thread pitch bushing so it would screw right onto my existing FEL valve joystick lever -


Here is the front view:


And a side view, man is this thing ever comfortable!


Next is to............ well what is next :confused: I'm stalling, waiting for you all to jump in here with some last minute cool ideas before I start welding metal together.


That's it for tonight -

Larry
 
   / FEL Grapple from Scratch W/ Lots-O-Pics #29  
Larry,
A question from a guy on the outside looking in. Is there a reason you couldn't put the zerk in the end of the pin, where the set screw went? I would think that would keep you from having to remove it any time you wanted to pull the pin.

Larry or Rob,
Is there a decent milling machine available that runs on 220 single phase, that is not terribly big, that would be a good "home owner" machine? Maybe something where a guy could keep his eyes open for a used one?

Scott
 
   / FEL Grapple from Scratch W/ Lots-O-Pics #30  
Nice Job. I like the tubing drilled through the arm at the FEL connection. That should give some added stability to the whole thing.
 

Tractor & Equipment Auctions

2020 John Deere 35G Mini Excavator (A49461)
2020 John Deere...
1982 TANDEM AXLE CEMENT MIXING TRAILER (A50854)
1982 TANDEM AXLE...
Miller and Smith PNR-1000 Pull-Behind Proof Roller Trailer (A49461)
Miller and Smith...
John Deere 4655 Tractor (A50860)
John Deere 4655...
2016 GENIE GTH1056 TELESCOPIC FORKLIFT (A51242)
2016 GENIE GTH1056...
2021 John Deere R4038 Self Propelled Sprayer (A50657)
2021 John Deere...
 
Top