You are using an out of date browser. It may not display this or other websites correctly.
You should upgrade or use an alternative browser.
You should upgrade or use an alternative browser.
Geothermal Heat Pump Project
- Thread starter techman
- Start date
- Views: 21286
More options
Who Replied?
/ Geothermal Heat Pump Project
#41

Chapter 12
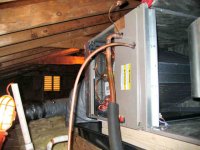
With the attic finished, the 2nd floor compressor was installed. Mounted the same as the other unit, electrical, freon and water connections were made. The freon lines were triple evacuated and charged with the required amount of freon. The second unit was flushed in the same manner as before, and the loop valved to both units. The unit was started and performed as expected. The only real difference was that the long (60') freon line runs make it slower to get full heat output on the second floor unit as compared to the first floor system.
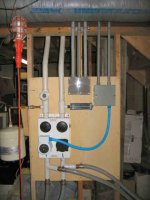
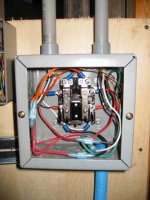
As stated earlier, I installed a 240 volt power relay for the circulator pump. Each geo unit has a power out to the circulator, which energizes when the unit runs. Since there is only one circulator for two units, the relay is used to operate the circulator when either unit runs. ClimateMaster makes a module to handle this task, but the relay was 1/3 of the price and simple to implement.
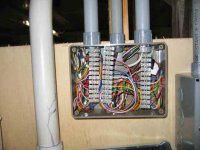
I also deviated from the trade norm which is to have the thermostat and compressor wiring all connect together at the airhandler. Since the airhandler was in the attic, in a not so easy to get to spot, I decided to bring all low voltage wiring to a central J-Box in the basement. This was If I added or changed anything in the low voltage wiring, I could do it in comfort, standing up.
More on Chapter 13
paul
With the attic finished, the 2nd floor compressor was installed. Mounted the same as the other unit, electrical, freon and water connections were made. The freon lines were triple evacuated and charged with the required amount of freon. The second unit was flushed in the same manner as before, and the loop valved to both units. The unit was started and performed as expected. The only real difference was that the long (60') freon line runs make it slower to get full heat output on the second floor unit as compared to the first floor system.
As stated earlier, I installed a 240 volt power relay for the circulator pump. Each geo unit has a power out to the circulator, which energizes when the unit runs. Since there is only one circulator for two units, the relay is used to operate the circulator when either unit runs. ClimateMaster makes a module to handle this task, but the relay was 1/3 of the price and simple to implement.
I also deviated from the trade norm which is to have the thermostat and compressor wiring all connect together at the airhandler. Since the airhandler was in the attic, in a not so easy to get to spot, I decided to bring all low voltage wiring to a central J-Box in the basement. This was If I added or changed anything in the low voltage wiring, I could do it in comfort, standing up.
More on Chapter 13
paul
Attachments
Chapter 13
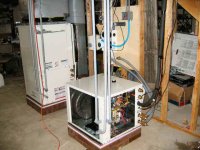
The final phase of the project was the connection of the desuperheaters. As described earlier, each unit has a small heat exchanger that removes compression heat during heating and cooling operation. This option includes the heat exchanger, a small circulator and a thermostat limit switch. The desuperheater can put 1000-1500 BTUH per unit into the domestic hot water. While it can be connected directly to the existing hot water heater, the capacity of this recovered heat can be lowered. This is because the water in the HWH can be 120 or 130 degrees, which is near the desuperheat temperature, so with little temp difference, heat transfer can be reduced.
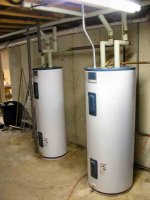
The better (but costlier) method is to install a second HWH that is used to store the recovered heat and act as a preheat tank for the main HWH. I chose this method. I installed a non-powered 50 gallon tank. The inlet is from the water supply, and the outlet feeds the normal powered HWH. The desuperheater system circulates water from the added tank, warms it and pumps it back into that tank. With the two geo units, check valves are added to each desuperheater water loop to isolate the flows and prevent cross circulation.
Beside the required piping, I added shut off valves and connections to each tank. This allows me to run the normal HWH as before or have it fed by the preheat tank. I can also use the preheat tank as the only HWH. In this mode I could hook up the power to the tank in the event of a failure on the normal tank.
In operation, depending on the run time of the geo units and out hot water usage, the preheat tank runs between 80-95 degrees. This warm water feeds the main HWH, instead of 50 deg well water. This is direct KWH savings for hot water. A very good feature that should always be included, in my opinion.
More in Conclusion
paul
The final phase of the project was the connection of the desuperheaters. As described earlier, each unit has a small heat exchanger that removes compression heat during heating and cooling operation. This option includes the heat exchanger, a small circulator and a thermostat limit switch. The desuperheater can put 1000-1500 BTUH per unit into the domestic hot water. While it can be connected directly to the existing hot water heater, the capacity of this recovered heat can be lowered. This is because the water in the HWH can be 120 or 130 degrees, which is near the desuperheat temperature, so with little temp difference, heat transfer can be reduced.
The better (but costlier) method is to install a second HWH that is used to store the recovered heat and act as a preheat tank for the main HWH. I chose this method. I installed a non-powered 50 gallon tank. The inlet is from the water supply, and the outlet feeds the normal powered HWH. The desuperheater system circulates water from the added tank, warms it and pumps it back into that tank. With the two geo units, check valves are added to each desuperheater water loop to isolate the flows and prevent cross circulation.
Beside the required piping, I added shut off valves and connections to each tank. This allows me to run the normal HWH as before or have it fed by the preheat tank. I can also use the preheat tank as the only HWH. In this mode I could hook up the power to the tank in the event of a failure on the normal tank.
In operation, depending on the run time of the geo units and out hot water usage, the preheat tank runs between 80-95 degrees. This warm water feeds the main HWH, instead of 50 deg well water. This is direct KWH savings for hot water. A very good feature that should always be included, in my opinion.
More in Conclusion
paul
Attachments

Conclusion
One overall comment describes the project - a lot of work. I did it without the benefit of any helpers, except for about 8 hours during trench layering backfill. I took it a bit slower as a result. I could have had helpers at times, but the schedule was too unknown, and I never felt (at the time) too stressed to ask for help.
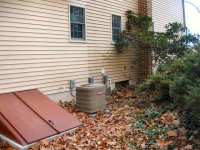
General comments are that the house's level of comfort is much greater as compared to the older air source units. Warmer discharge air, no defrost cycles and greater capacity make up the majority of the difference. Another noted difference is quieter operation. There is no outdoor noise from the compressor/fans which could be heard near certain windows.
While the old units would run 24/7 in the coldest outdoor temps, the geo units rarely run more that 20 minutes at a time. Despite some very cold periods (single digits), the backup heat has not been on at all (after I tested them). The utility bills have reduced for sure. It is hard to make a real comparison yet, due to weather variations, comparing to the last 3 years I seem to be running about 1000-1500 KWH/month lower in the coldest months. Cooling savings should be even better. A year or two of data will really tell the difference.
The loop temperature (incoming water) started out at 50 degrees when I first started up, now at the end of the season it is about 38 degrees. The discharge water is below freezing and ice forms from condensate on exposed fittings. As I mentioned all of the loop piping is insulated due to condensation in the basement. No other problems have occurred.
As for cost, I can not mention too much detail on cost, since I am involved in the trade and buy at wholesale costs. What I can say is that the geo units themselves are about 2 times the cost of a modern high SEER heatpump of comparable size. Since the job is very labor intensive in many aspects, there will be a much higher overall cost to install a geo system. While a lot of the grunt work could be done by a handy DIYer, it is the problem of finding an installer that is willing to work with you to split the job.
In considering the geo system, I evaluated the cost of replacing (or installing) a new high SEER air sourced unit and looked at the cost difference from that baseline. A geo system like I installed would run about $ 20K in my area. This compares to about $ 9-10K for upgrading to a 2 zone air sourced system. The difference is of course about $ 10K. On average this is a 10+ year payback. If a DIY split were done, you might get the difference down to $ 5-7K, a more reasonable payback. A single unit, single zone system of the same capacity can save $ 1-2K more. I will get a reasonable payback, but that is more due to my costs and labor.
I think that the factors of increased comfort and reliability (most estimates are that geo units should have a 20+ year life due to fewer moving parts and not be located in the outdoor environment) should be factored in. Additionally the cost of energy will not go lower in the future, so energy savings may increase in the future. I think as geo becomes more popular, increase in installers and greater production quantities may lower prices somewhat as well.
I am a firm believer in geo heating and would highly recommend it to anyone who can afford it. I have a couple of new jobs already lined up this summer, and expect the interest to continue.
Thanks for reading and let me know if there are any more questions or facts.
paul
One overall comment describes the project - a lot of work. I did it without the benefit of any helpers, except for about 8 hours during trench layering backfill. I took it a bit slower as a result. I could have had helpers at times, but the schedule was too unknown, and I never felt (at the time) too stressed to ask for help.
General comments are that the house's level of comfort is much greater as compared to the older air source units. Warmer discharge air, no defrost cycles and greater capacity make up the majority of the difference. Another noted difference is quieter operation. There is no outdoor noise from the compressor/fans which could be heard near certain windows.
While the old units would run 24/7 in the coldest outdoor temps, the geo units rarely run more that 20 minutes at a time. Despite some very cold periods (single digits), the backup heat has not been on at all (after I tested them). The utility bills have reduced for sure. It is hard to make a real comparison yet, due to weather variations, comparing to the last 3 years I seem to be running about 1000-1500 KWH/month lower in the coldest months. Cooling savings should be even better. A year or two of data will really tell the difference.
The loop temperature (incoming water) started out at 50 degrees when I first started up, now at the end of the season it is about 38 degrees. The discharge water is below freezing and ice forms from condensate on exposed fittings. As I mentioned all of the loop piping is insulated due to condensation in the basement. No other problems have occurred.
As for cost, I can not mention too much detail on cost, since I am involved in the trade and buy at wholesale costs. What I can say is that the geo units themselves are about 2 times the cost of a modern high SEER heatpump of comparable size. Since the job is very labor intensive in many aspects, there will be a much higher overall cost to install a geo system. While a lot of the grunt work could be done by a handy DIYer, it is the problem of finding an installer that is willing to work with you to split the job.
In considering the geo system, I evaluated the cost of replacing (or installing) a new high SEER air sourced unit and looked at the cost difference from that baseline. A geo system like I installed would run about $ 20K in my area. This compares to about $ 9-10K for upgrading to a 2 zone air sourced system. The difference is of course about $ 10K. On average this is a 10+ year payback. If a DIY split were done, you might get the difference down to $ 5-7K, a more reasonable payback. A single unit, single zone system of the same capacity can save $ 1-2K more. I will get a reasonable payback, but that is more due to my costs and labor.
I think that the factors of increased comfort and reliability (most estimates are that geo units should have a 20+ year life due to fewer moving parts and not be located in the outdoor environment) should be factored in. Additionally the cost of energy will not go lower in the future, so energy savings may increase in the future. I think as geo becomes more popular, increase in installers and greater production quantities may lower prices somewhat as well.
I am a firm believer in geo heating and would highly recommend it to anyone who can afford it. I have a couple of new jobs already lined up this summer, and expect the interest to continue.
Thanks for reading and let me know if there are any more questions or facts.
paul
Line damage, while possible I think is unlikely. The wall of the tube is quite thick. Also having a 6"+ layer of screenings keeps the rocks from directly contacting the tubing. Also since the tubing is below the frost line, little movement would be expected in the surrounding soil.
paul
paul
</font><font color="blue" class="small">( Chapter 2
--[snipped]--
- Vertical loop: This uses vertical bore holes 200'-500' deep with a loop of tubing in the hole. Costly drilling is required and the hole with tubing needs to be grouted solid, from the bottom up, to thermally "couple" the tubing to the surrounding earth. The number of holes is determined by the unit sizing and other ground factors. A local firm would do the entire loop system, grouted and finished for $ 2K to $ 10K depending on the sizing, etc. This is an ideal choice for small lots, but since I have 11+ acres, it did not make sense for me.
- Horizontal loops: This like the vertical is a closed loop system (circulate water through a closed pipe loop) but uses pipes buried in a trench.
--[snipped]--
paul
)</font>
Having had a Heat Pump since 1992, I thought a few comments about my system would be appropriate.
1. I have a vertical loop. Cost to install was $2500 in 1992. It consists of four 110' wells (3tons). Yes the pipe is grouted in. 100% efficiency the first year and thereafter... Minimal destruction to the yard. Second year, nobody could tell where the loop was.
Note: current drilling prices are about .75 to $1 a foot. Depth of the wells is dependent on where they hit limestone/bedrock.
2. Horizontal loops. They take several years to reach peak performance. Because the soil need to compact around the tubing... Note that for the vertical well they grout the tubing in. So, almost everyone I know with a horizontal loop also has a soaker line on top of the horizontal loop.
The new way to do horizontal loops is to dig a big hole, then they use a horizontal boring machine to do the hole. Yes, this is the same type of machine that they drill under roads etc to put in phone/service lines in many areas. I haven't actually seen this done yet. But a friend of mine is getting this kind of ground loop... So I will soon know more.
Heating costs per month in Iowa were $40 -- $55 for 2-1/2 ton unit on a 3200 sq ft house. 600 sq ft has radiant heat.
-Dave
--[snipped]--
- Vertical loop: This uses vertical bore holes 200'-500' deep with a loop of tubing in the hole. Costly drilling is required and the hole with tubing needs to be grouted solid, from the bottom up, to thermally "couple" the tubing to the surrounding earth. The number of holes is determined by the unit sizing and other ground factors. A local firm would do the entire loop system, grouted and finished for $ 2K to $ 10K depending on the sizing, etc. This is an ideal choice for small lots, but since I have 11+ acres, it did not make sense for me.
- Horizontal loops: This like the vertical is a closed loop system (circulate water through a closed pipe loop) but uses pipes buried in a trench.
--[snipped]--
paul
)</font>
Having had a Heat Pump since 1992, I thought a few comments about my system would be appropriate.
1. I have a vertical loop. Cost to install was $2500 in 1992. It consists of four 110' wells (3tons). Yes the pipe is grouted in. 100% efficiency the first year and thereafter... Minimal destruction to the yard. Second year, nobody could tell where the loop was.
Note: current drilling prices are about .75 to $1 a foot. Depth of the wells is dependent on where they hit limestone/bedrock.
2. Horizontal loops. They take several years to reach peak performance. Because the soil need to compact around the tubing... Note that for the vertical well they grout the tubing in. So, almost everyone I know with a horizontal loop also has a soaker line on top of the horizontal loop.
The new way to do horizontal loops is to dig a big hole, then they use a horizontal boring machine to do the hole. Yes, this is the same type of machine that they drill under roads etc to put in phone/service lines in many areas. I haven't actually seen this done yet. But a friend of mine is getting this kind of ground loop... So I will soon know more.
Heating costs per month in Iowa were $40 -- $55 for 2-1/2 ton unit on a 3200 sq ft house. 600 sq ft has radiant heat.
-Dave
Just a quick update. Since the system was installed last fall, it was not until now that the air conditioning capability was run.
Performance in the winter was great and likewise cooling is also working very well. I checked the power draw in cooling mode this week: the 2 ton unit (24,000 BTU) is drawing about 1 KW, which is less that the average small window unit. Considering that the incoming loop water temperature is 59 deg., and the evap temp is nominally between 50 and 55 deg, the compressor does very little work beyond just pumping the freon.
Paul
Highbeam
Super Member
So just moving coolant through the ground would cool it enough to have a cold radiator. That's something I hadn't considered, you could just bury a long hose with a circulator and run the liquid through an old fashioned radiator with ground temps that cool.
Highbeam
Super Member
So just moving coolant through the ground would cool it enough to have a cold radiator. That's something I hadn't considered, you could just bury a long hose with a circulator and run the liquid through an old fashioned radiator with ground temps that cool.
czechsonofagun
Elite Member
Great information. I am lucky enough to have a pond 200 feet from the house, geothermal unit makes the most sense as a heat source for us and one day I will make it happen.
dirtworksequip
Veteran Member
- Joined
- Jun 3, 2006
- Messages
- 1,463
- Location
- Wheeling, WV
- Tractor
- 2006 JD 3520 w/cab & 300CX loader. 1995 JD 870 w/440 loader & 8b backhoe.JD 455 w/54" mower deck.
I didn't have time to read thru all your post,but will when I have more time. I did view a couple of pics of your system. In the one pic you showed the tubing in the ditch. It would concern me that there was so much rock and shale in contact with the tubing. Over time the vibration of pushing a liquid thru the pipe will wear a hole in the tubing. I also noticed that you did your manifold outside under ground. What happens if you develope a leak in one of the runs in the dead of winter? Wouldn't it have been better to had the manifold inside your basement with values on each run so that if you did develope a leak you could isolate that run and still run the remaining system runs?
The picture of the tubing was not a finished shot. About of 1 foot of screenings were put in and the tubing was lifted and centered in the screenings, so there is no shale in direct contact with the tubing. Also the tubing is 200 PSI rated with nearly 1/4" wall, tough to cut through even with a sharp knife. I feel very comfortable with the screenings protecting the tubing, and also providing a thermal coupling.
As far as the manifolds, the joints are thermally fused, as good as solid pipe. Depending on the install, couplings in the run may be needed (not in my case) and they are always thermal fused, same process as buried plastic gas line. Again no concern with the joints leaking. The area with the manifolds was filled with screenings as well to minimize settling, etc.
In the second heating season and it is working even better than last year. Soil settling, etc has provided better soil coupling. Now in the second week of a real cold stretch (overnight single digits) the incoming water is still at 45 deg F. No problem maintaining 70 deg in the house at 0 deg outside, with no auxiliary heat.
paul