Homemade Articulated Mechanical Thumb

   / Homemade Articulated Mechanical Thumb
  • Thread Starter
#11  
BobRip said:
I think I would like to see the pictures. Did they not get attached?
Bob,
They are attached as clickable thumbnails...as a matter of fact, your "quote" reply had some on them.
Is anyone else not seeing them?

63DHB,
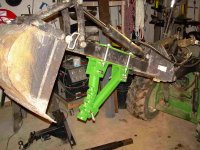
I have "curled" the bucket on the CAD to see how the thumb moves in relationship to the bucket. I'm wondering why it would not grab if they are approaching each other?

Eddie,
No doubt the stationary thumbs are easier to make. I just wanted to try out this mechanical thumb to see if it would work. If it fails, I can always turn it into a stationary one.

Thanks for the replies guys. I'll post more when I can.
 
   / Homemade Articulated Mechanical Thumb
  • Thread Starter
#12  
I'm going to fasten the 2 jaws together with ¼ x 4" plates to create rigidity between them. There is a "storage" place for the jaws. I won't use clips though, because I have to take out the shoulder bolts that connect the linkage to the backhoe kidney actuator. So I'll use the same shoulder bolts to screw into a spot on the dipper stick that will hold it all back and stored...and not lose the bolts.

I have recessed the shoulder bolts into the steel so not only the thread is in, but about ½" of shoulder is buried in the steel too, making it that much harder to shear off or bend. I did think about hydraulics but that would mean another valve on the backhoe and the rear remotes on my tractor are too much out of the way. I also thought about a cam system but most of those require the jaws to have the same pivot as the bucket. Mine will not, so the articulated linkage was the next best thing.
 
   / Homemade Articulated Mechanical Thumb
  • Thread Starter
#13  
This is how cold it got and it was already 9:00 AM. It's still only 26° and the rain water in my bucket was frozen solid. So much for warm Winters in Sunny southern California.


Wes was skating in the bucket.


It was freezing (actually below freezing and never got over 36° degrees all day. I even tried to warm up the tractor with a propane heater.


I got the dimensions I needed to finish up the pivot anchors that will be welded to the backhoe. As a matter of fact, I can weld up the jaws too, now that I've confirmed the over all width. I can paint them too. Then when I go back up in a couple weeks, I only have to mount everything to the backhoe after I clamp on the pivots to be sure they will give me the range of motion.
 
   / Homemade Articulated Mechanical Thumb
  • Thread Starter
#14  
Well, when we got home the heater in the house was broken. I still got a chance to do some more work on the thumb today. Loretta went to Home Depot and bought a couple of electric heaters while we are waiting to get the heater repaired. They were "On Sale". She put one in her office and brought one into the garage for me.
It's a teeny weenie little thing and I looked at her and said "No wonder they were on sale." ???

Anyway, I plugged it in and turned it on and blew a breaker right off the bat. Jeez...now back to the project.

I told you I still had to make the standoff pivot blocks (rounds in this case) that will be welded to the backhoe dipper stick. I had some Ø2" H-13 tool steel that I made them out of.
Turning down diameter in lathe to save weight.


I had to mill them down to size so the fit between the linkage after they are welded on. they have to be pretty close because I'm using the shoulder bolts as pins for the pivots.


You can see they are being held in a big homemade "V" block that is clamped in my homemade milling vise.
 
   / Homemade Articulated Mechanical Thumb
  • Thread Starter
#15  
Then, after drilling a 17/32" hole (tap drill for 5/8-11 thread) all the way through each one, I had to counter bore them with a Ø.750 endmill. This is so the stress is taken by the shoulder and not just the threads, making a stronger connection.


Those counter bores had to be right on, or if they were too deep, the linkage could be pinched instead of pivoting freely when the bolts are tightened. So I decided to gage block them to make sure there was enough room for the linkages and the hardened washers between the linkage bars and also on each side. I got them within .001" of the dimension.


This is probably overkill since this time I included .030" as clearance. I learned this from my last project where I tried to hold everything to .001" Hahaha, what a joke!
 
   / Homemade Articulated Mechanical Thumb
  • Thread Starter
#16  
I have a "storage position" designed for the thumb. This will be when I unbolt the linkage from the kidney shaped actuator bar and bolt that link to the backhoe. Since the width of the linkage is wider than the dipper stick, I had to make "storage nuts" to weld on. I made them from some hex stock and they came out beautiful. They are also counter bored to fit the same length shoulder bolt.


So here are all the stand-off pieces that need to be welded to the backhoe. You can see how the counter bores accept the shoulder of the shoulder bolts, not just the threads.


I've also fixtured the jaws to weld the stabilizing plates in between them. I used Ø3/4" rods to line up the holes and then clamped it all together. I checked to be sure the rods still slid freely through both jaws. Tomorrow I will make all the welds on it and maybe paint it.


My plan is to take the finished thumb and linkages up to the property and clamp everything in place to see the range of motion. Then I will tack it all on and try it out. Then weld everything with 6011 rod for root passes and finish pass with 7018.
 
   / Homemade Articulated Mechanical Thumb #17  
3RRL said:
Bob,
They are attached as clickable thumbnails...as a matter of fact, your "quote" reply had some on them.
Is anyone else not seeing them?


Thanks for the replies guys. I'll post more when I can.

I see them on my home computer. It could be the office computer filtered them out. Sorry for the confusion.

I have attached some pictures of the thumb I built for my PT422. There are a few more pictures on the Power Trac section. The red picture is not mine, but it does demonstrate how the thumb folds.
 

Attachments

  • thumb 003.JPG
    thumb 003.JPG
    174.5 KB · Views: 1,601
  • thumb 001.JPG
    thumb 001.JPG
    147.2 KB · Views: 1,489
  • Thumb folded.jpg
    Thumb folded.jpg
    99.9 KB · Views: 1,527
   / Homemade Articulated Mechanical Thumb
  • Thread Starter
#18  
Bob,
Thanks for sharing those photos.
I see that the one you made is a "stationary" thumb with adjustable positions for working and a neat fold away position. Is that right?
 
   / Homemade Articulated Mechanical Thumb #19  
I am completely impressed with your entire project!! It makes me sort of humbled that I had to go out and by one for my machine!

Ken
 
   / Homemade Articulated Mechanical Thumb #20  
Rob,

It's very impressive to see how skilled you!!!! In my next life, I wanna be just like you. Seriosly, I'm very impressed with people who can make things that fit together perfecty!!!!!

I'm in the bigger hammer catagory. I can always make it fit with enough pounding, but know that if I was a little smarter, I'd get it together without having to use two differnt hammers, and sometimes a backhoe. hahahaha

Are you going to be able to grease it?

Thanks,
Eddie
 

Tractor & Equipment Auctions

1998 CATERPILLAR TH103 TELESCOPIC FORKLIFT (A51242)
1998 CATERPILLAR...
2015 FORD F-150XL SINGLE CAB TRUCK (A51406)
2015 FORD F-150XL...
2017 Mack GU713 Granite Tri-Axle Dump Truck (A49461)
2017 Mack GU713...
74in FEL HD Round Back Bucket (A51039)
74in FEL HD Round...
Informational Lot - Shipping (A51039)
Informational Lot...
Toyota 6FGU25 Forklift  5,000 lb Capacity (A51039)
Toyota 6FGU25...
 
Top