John Deere 4300 complete rebuild

   / John Deere 4300 complete rebuild #181  
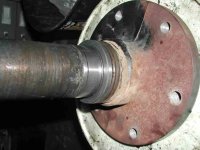
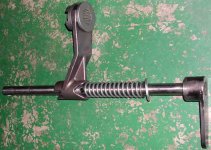
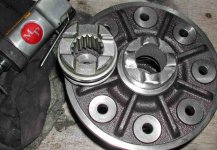
Wow, getting those brake levers off was tough!


Why were my levers so much harder than Kyle's to remove? I can see that
the lever tubing has rusted just a bit inside.

.

Good Evenin Dave,
My best guess is that they were using brand new reamers at the factory when they were manufacturing Kyles' levers, by the time they got to your tractor they were worn, resulting a smaller bore size ! Just a guess, but probablly not far from the truth !

Keep up the great work ! :)
 
   / John Deere 4300 complete rebuild
  • Thread Starter
#182  
My best guess is that they were using brand new reamers at the factory when they were manufacturing Kyles' levers, by the time they got to your tractor they were worn, resulting a smaller bore size !

Scotty, the tubing has a pretty tight clearance. The tiny bit of rust I had
was enough to jam it on TIGHT. Ten seconds with a small drum sander
in a screwgun and it spins fine. I think that Kyle's tractor gets to sleep
inside at night and is younger with much less hours, too.

Thx for your support!
 
   / John Deere 4300 complete rebuild
  • Thread Starter
#183  
At last here are the rear axles.

Dirt gets around the seal securing bracket, and into the seal itself. I agree
with Kyle that the space between the bracket and the seal, and the space
between the bracket and housing should be sealed up to keep mud from
getting in there and causing all this corrosion. The first 2 pix are exactly
what I saw when I removed the axle. In the second, you can see dirt
lodged between the two rubber lips of the seal. Not good. But the seals
do not leak, so I am not changing them. The only way to avoid getting dirt
in there is to not drive in mud up to the hubs. The Russian bearing in there
is also still good.

In the third photo, the housings are both out and ready to go to my welder.
The closer one has been cleaned up with a wire brush; the other one
has been cleaned, the seal cleaned, and the end and seal painted. It will
all be painted when the welding is done.
 

Attachments

  • raxle_hub.JPG
    raxle_hub.JPG
    50.6 KB · Views: 529
  • raxle_seal.JPG
    raxle_seal.JPG
    40.8 KB · Views: 507
  • raxle_pu.JPG
    raxle_pu.JPG
    85.1 KB · Views: 629
   / John Deere 4300 complete rebuild #184  
G'day really enjoying your thread have not had a read for a while but it seems like you are getting down to the nitty gritty of it now you mentioned earlier about not replaceing head bolts the only time you need replace is if they are corroded/damaged or are what is called "torque to yeild" i.e. when you pull down to a tension then plus an amount of degrees as this stretches the bolts a certain amount and therefor they should be replaced. I think i should show some of my customers your thread next time they come in and complain about their bill and say " but it couldn't take that long it's not that big a tractor":D. Keep up the good work :)


Jon
 
   / John Deere 4300 complete rebuild #185  
A very great and interesting read. The knowledge and skills shared are invaluable :D
Those rear axle seals are a cause for alittle concern tho, if only that they encounter the elements and are so deeply encased.
 
   / John Deere 4300 complete rebuild
  • Thread Starter
#186  
I think i should show some of my customers your thread next time they come in and complain about their bill and say " but it couldn't take that long it's not that big a tractor...

Of course you risk boring some of them silly....

It is a very important point....how much to spend?....when do I say enough
is enough? I am nearing the final stages of disassembly/analysis and I have
re-assembled the engine and part of the final drive. I pick up the axle
housings from the welder today. I have yet to take apart the rockshaft
valve and cylinder assemblies. The only assemblies I will NOT take apart are
the front axle pivot, and the steering valve.

The point is that I am approaching $4000 for parts and the two outside
labor jobs I needed. I feel the need to economize a bit with some of the
"optional" replacements (some seals, water pump, HST valve plates, etc.).
If I were doing this for a paying customer, I would lean toward replacing
all those items. This is clearly NOT a job that makes any sense financially.

Anyway, next will be the differential lock mechanism. Stay tuned, and
thanks for watching!
 
   / John Deere 4300 complete rebuild
  • Thread Starter
#187  
As I opened up the differential locking mechanism, I can see that it is not
in very good shape.

In the first photo, you see the moving collar, and the shift fork that moves
it. This is right behind the wet brakes on the right side of the tractor. The
dirty oil sediment is quite visible....everything will have to be taken apart and
cleaned well.

In the second photo I have removed the shift fork, rod, spring, and bellcrank
(lever). This lever did not want to come off, like the brake levers. Rather
than resorting to surgery, I extracted everything out the left side of the
gear case, and I will press it off later. Note that there are no O-ring seal
grooves in the shaft. That's good, or the shaft would probably be broken.
I did have to remove all paint from the right end of the shaft first, before
I could pull it thru the fork.

And here is my problem (photo 3). The moving collar that engages its 4
teeth with the 4 slots on the differential is in fine shape, but the latter
slots are worn by at least a millimeter. They are rounded off and somewhat
"mushroomed". The engineers chose to use a very soft cast steel for the
differential to engage with the hardened collar. Big mistake, IMO.

But first, I have to remove the 2 differential bearings (photo 4). If you
don't have one of these bearing removers, this bearing is not coming off.
Both of these bearings will be replaced.
 

Attachments

  • dlock4.JPG
    dlock4.JPG
    67.7 KB · Views: 547
  • dlock3.JPG
    dlock3.JPG
    85.7 KB · Views: 656
  • dlock2.JPG
    dlock2.JPG
    58.2 KB · Views: 436
  • dlock1.JPG
    dlock1.JPG
    60.6 KB · Views: 511
   / John Deere 4300 complete rebuild
  • Thread Starter
#188  
With the bearings off the differential casting, you can see in the first
2 pix what has happened. Quite a bit of the cast steel has been worn
away, making it so the diff lock pedal had to be constantly held down
to lock up the rear wheels. This put a bunch of steel fragments into
the oil...not good.

Rather than replace the diff casting, I decided to grind off the displaced
metal, and re-contour the pawls (teeth) on the diff. A bit of work with
the air grinder (photo 3) and I am good to go. Now the two parts grab
much better. I was carefull not to remove too much material, however.
The photo does not show the new contour very well. Since I introduced
abrasives into the diff, I will need to take it all apart and wash thoroughly
with soap and water (next).
 

Attachments

  • dlock5.JPG
    dlock5.JPG
    54 KB · Views: 540
  • dlock6.JPG
    dlock6.JPG
    64 KB · Views: 524
  • dlock7a.JPG
    dlock7a.JPG
    80 KB · Views: 579
   / John Deere 4300 complete rebuild
  • Thread Starter
#189  
This is what the differential looks like, all apart.

Just to give a comparison, the Kubota ring gear I removed last year is on
the left.

The 2nd photo shows the spider gears. They are small cast teeth that
do have some wear (more than any other gear in this tractor), but are
reusable. My new bearings are waiting to be installed.
 

Attachments

  • differential1.JPG
    differential1.JPG
    75.7 KB · Views: 511
  • differential2.JPG
    differential2.JPG
    56.2 KB · Views: 510
   / John Deere 4300 complete rebuild #190  
Wow, have you been busy or what?

I don't think my brake levers were quite as rusty as yours. Mine spent the night outside for the first 5 years of its life. I did sand them and clean them up.

Sand had apparently gotten into my right side axle seal cover to cause it to fail. If you take off the covers periodically, (maybe every oil change) and wipe off or lightly rinse the debris away, you could save yourself this headache. I'm still worried about your seals just due to the age of the rubber.

Lastly, I think the locking differential is meant to disengage if you take your foot off. Especially if the torque is relieved on the axle. I guess I'm trying to say that you should keep your foot down on the lever until you are sure you don't need both wheels driving. I wish you could see what a new one looks like to compare. I'm worried that your locking won't hold up or last. I'm also guessing the part is high dollar.

Still enjoying the teardown and photos. You've got more stamina (and parts money) than me!
 

Tractor & Equipment Auctions

Barn Wood Planter Box (A50515)
Barn Wood Planter...
Generac SD36/87810 (A47384)
Generac SD36/87810...
2012 Chevrolet Malibu Sedan (A50324)
2012 Chevrolet...
2010 Ford Edge SE SUV (A51694)
2010 Ford Edge SE...
2011 TRAIL KING LOWBOY TRAILER (A51243)
2011 TRAIL KING...
John Deere 443 4 Row Corn Head (A50774)
John Deere 443 4...
 
Top