John Deere 4300 complete rebuild

   / John Deere 4300 complete rebuild #431  
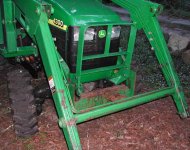
That looks freakin' AWESOME man!!! I'd say you did a superDave job on that 4300! I can only wish I was as talented a mechanic as you and some of the other folks here on the forum. How many hours do you guess you have on it now since you've gotten it back running again?

I guess you've let the folks at the rental shop see it by now?? I can only imagine their reactions.
 
   / John Deere 4300 complete rebuild #432  
Dave-Kebo said it well! 'Ditto' to his comments! Nice work, looks great! ~Scotty
 
   / John Deere 4300 complete rebuild #433  
That 4300 looks awsome!
 
   / John Deere 4300 complete rebuild #434  
Great work Dave! Will you post a link here to your sub-frame build? I'm looking forward to seeing what you built for your 4300.
 
   / John Deere 4300 complete rebuild
  • Thread Starter
#435  
Thanks, guys.

I am starting the backhoe subframe thread shortly, and I will link here. If
you are wondering, the hoe in the previous photo is without dipper, cuz that
has been off to weld on my thumb brackets.

Here I am positioning the 420 loader subframe for mounting. The subframe
and boom were quite a hassle to remove from the tractor when there was
no hydraulic power. Hence, they were separated. Since it was such a
hassle, I didn't want to attempt re-mounting until I had a better way to
lift and position them. I certainly did not want to damage my new green
plastics!

My hydraulic scale indicates the subframe weighs about 150 pounds. I
suppose the 430 FEL might have a heftier subframe.
 

Attachments

  • FEL_420_subframe_a.jpg
    FEL_420_subframe_a.jpg
    93.3 KB · Views: 495
   / John Deere 4300 complete rebuild
  • Thread Starter
#436  
How many hours do you guess you have on it now since you've gotten it back running again?

My new electric/mechanical hour meter is at 2hr, mostly running the
tractor for positioning in the workshop. This 2000 model sure stinks, too.
The exhaust coming out of my later EPA tractors is much cleaner.
 
   / John Deere 4300 complete rebuild
  • Thread Starter
#437  
The subframe is now mounted. It was quite tight, securing the front
hinged plate that holds it on. That was due to the material I added
a while ago to compensate for wear. There is no looseness now, that's
for sure. I have also bolted the plate closed, as the rental yard did. This
keeps the FEL from being quickly dismounted, which is no problem for me.

If your 420 or 430 FEL is loose, I recommend this easy fix.
 

Attachments

  • FEL_subframe_mntd.jpg
    FEL_subframe_mntd.jpg
    116.5 KB · Views: 586
  • FEL_sub_frt.jpg
    FEL_sub_frt.jpg
    57.3 KB · Views: 455
  • wear.JPG
    wear.JPG
    39.2 KB · Views: 480
  • weld.JPG
    weld.JPG
    43.9 KB · Views: 443
   / John Deere 4300 complete rebuild #438  
I bet it was hard to remove the loader without hydrailics. Great job on your project! Can't wait to see the finished product!
 
   / John Deere 4300 complete rebuild
  • Thread Starter
#439  
If you ever need to remove a loader, and you have a dead tractor,
don't do it unless you have an overhead crane, a forklift with extended
reach, or a boom pole on another tractor.

Then if you DO remove a dead FEL, the boom and subframe may not
be stable if the cylinders move. The cyls may not be full of oil and will
not likely be capped off, so they WILL move. Bad. BTDT

Anyway, here I am installing my FEL boom. It is surprising that it only
weighs about 130#. You can make a very strong structure with 3/16"
box sections apparently.

Next I wanted to replace the massive hood armor that I got with the
tractor with the commmon OEM grille guard that you usually see on the
420 or 430 FELs. Go back to Page 1 if you want to see the hood armor.
JD was nice enough to provide green 3/8" shims to install the guard
brackets at the correct width.

And photo 4 shows the result.
 

Attachments

  • FEL_installed_3.jpg
    FEL_installed_3.jpg
    73.2 KB · Views: 459
  • grille-guard.jpg
    grille-guard.jpg
    70.8 KB · Views: 443
  • FEL_boom2.jpg
    FEL_boom2.jpg
    62.8 KB · Views: 314
  • FEL_boom.jpg
    FEL_boom.jpg
    83.2 KB · Views: 432
   / John Deere 4300 complete rebuild
  • Thread Starter
#440  
Well, I am quite disappointed with the construction of the JD 420
loader's quick-attach bucket mechanism. It seems they used no wear
bushings to secure one side of the pins, so there is significant wear
in the thin 1/4" retaining holes. You can see in the first 2 photos that
bushings are used on one side to keep them from rotating. Clearly they
should have used bushings on the other side, too. You can see in the
third and 4th photos how much wear I have. I can't leave it that way.

If I weld bushings onto the places where none exist, I will need all new
pins, because they are not long enough. Not a big problem, normally, but
the upper pin is a 1" rod that spans the width of the loader boom.
At least JD uses mild steel pins (unlike Kubota, who uses hard pins), so
wear is shared fairly evenly between the holes and the pins. Another
solution would be to cut the worn holes out to 1.5" and weld in half inch
thick 1.000" DOM tubing. Or I could build up the hole with a weld bead,
and drill it out to 1.0". Decisions, decisions.......
 

Attachments

  • FEL_QA_2.jpg
    FEL_QA_2.jpg
    60.8 KB · Views: 475
  • FEL_QA_3.jpg
    FEL_QA_3.jpg
    60.6 KB · Views: 328
  • FEL_QA_4.jpg
    FEL_QA_4.jpg
    34.9 KB · Views: 314
  • FEL_QA_5.jpg
    FEL_QA_5.jpg
    33.3 KB · Views: 320

Tractor & Equipment Auctions

1998 Kenworth Tandem Grain Truck (A50514)
1998 Kenworth...
Year: 2015 Make: Ford Model: Fusion Vehicle Type: Passenger Car Mileage: 96,291 Plate: Body Type: 4 (A50324)
Year: 2015 Make...
Skid Steer Plate Attachment (A50322)
Skid Steer Plate...
2012 Freightliner M2 106 Asphalt Pothole Patcher Truck (A51692)
2012 Freightliner...
2019 Ford F-350 XL (A50120)
2019 Ford F-350 XL...
UNUSED TOPCAT QUICK ATTACH STUMP GRINDER (A51244)
UNUSED TOPCAT...
 
Top