L3400 CCM hydraulic top link length

   / L3400 CCM hydraulic top link length
  • Thread Starter
#61  
StrangeRanger. Looking forward to seeing your pictures. I imagine that all the plumbing went well?

My lovely valve is sitting on my work desk waiting for a mount. Called the guy who was going to make me a mount - haven't heard back from him! Boy I hate depending on other people to get stuff done :-(.
 
   / L3400 CCM hydraulic top link length
  • Thread Starter
#62  
SR - if your mount is ready, I'd appreciate some pictures of it too. I might have to come up with an alternate plan if the guy I hired to do the bracket for me does not come through.
 
   / L3400 CCM hydraulic top link length #63  
If this is what it takes to install a Hydraulic Three Point top link I think I will just keep climbing off my tractor and manually turn the top link.
 
   / L3400 CCM hydraulic top link length #64  
Canoe,

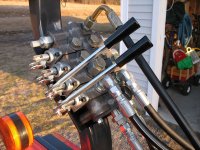
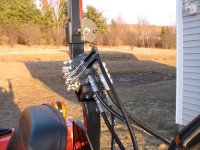
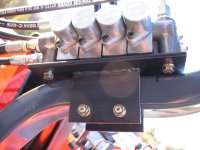
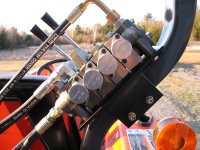
I'll take some pics tonight when I get home. My bracket is very simple, 3 small pieces of 1/4" steel welded together and bolted to the ROPS. The steel cost me $11 (cut to size) and a tin of Skoal to get my buddy to weld it. Literally took him less than 5 min to weld it. The hardest part was drilling the holes so they lined up right w/ the valve assy as my final dimensions were a tad off from what the spec sheet shows. I think that's due to everyone tightening down the valve assy a little differently.

If you don't hear from your guy and like the way mine looks I can send you some drawings and you'll see how simple it is.

The plumbing all went great. The only issue I had was on my "final inspection" before firing up the tractor was I didn't snug down my PBY hose. It didn't leak at first, but then when I had the tractor running and started wiggling the hoses to check everything a little drop seeped out. No problem, snugged down the nut and it was golden.

Leon,

You have to understand we're two complete hydraulic noobs just prattling on. I know myself I was very excited for the project and it was nice to share the experience w/ someone like Canoe. So we've been chatting back and forth like a couple of hens.

Really, now that I've done it the whole process is actually very easy. And if someone has the $$$ burning a hole in their pocket I'd highly recommend at least doing the top link to anyone.

My stumbling point was that I was leery of just how to tap into the factory hydraulic system. And in the hours of reading and research I did before moving ahead no one mentioned the one thing I didn't grasp until the end. Tapping into the factory hydraulics is literally a simple matter of replacing 1 single line. 1 single line!! OMG if I had figured that out ages ago I would have done this last year.

My favorite part is that my set up cost a LOT less than using Kubotas valves and I now have 2 extra remotes that I would have not gotten if I went w/ my dealer's "recommended" set up.

So if there are any other hydraulic noobs out there wondering about this project I'll be happy to answer questions. It really is very easy to do.

**EDIT** Ooohhh!! Now I get to change my toy list in my signature LOL
 
   / L3400 CCM hydraulic top link length
  • Thread Starter
#65  
SR is right. If we didn't think that this discussion might be useful to other noobs, we would have kept it in PMs. While I haven't finished the process yet unlike SR - still waiting for my mount to be made, I have to agree that it is pretty simple once you've got all the right information.

What sort of welding does your buddy do - stick, mig btw?
 
   / L3400 CCM hydraulic top link length #66  
canoetrpr said:
What sort of welding does your buddy do - stick, mig btw?

Uhhmm... I have no idea. It's bright and very hot when done :) But he's done lots of stuff over the years for me. Worst case scenario I could have him do one for you like mine. Might make drilling the holes a little more challenging, but it could still be done no problem.
 
   / L3400 CCM hydraulic top link length #67  
Finally got a chance to snap some pics last night. I know, my hoses are a little long, but I was afraid of getting them too short and then being screwed.

If you look at the valve assy you'll see a set of "risers" next to where the top link goes in. That's where the 90's will go for the side link when I get that back from CCM.

Now I gotta see if I can add a cylinder for my rear blade angle :)
 

Attachments

  • Installed1.jpg
    Installed1.jpg
    137 KB · Views: 454
  • Installed2.jpg
    Installed2.jpg
    133.1 KB · Views: 369
  • Installed3.jpg
    Installed3.jpg
    255.3 KB · Views: 476
  • Installed4.jpg
    Installed4.jpg
    99.2 KB · Views: 362
  • Installed5.jpg
    Installed5.jpg
    124.9 KB · Views: 346
   / L3400 CCM hydraulic top link length #68  
Canoe,

Per your request here's the mounting plates. As I said before, I used the KISS method. Very basic.

The 2 side plates were simply welded to the base plate, I believe they were 78mm apart. Then I used 2 3/8" x 4" bolts w/ lock washers and nuts to secure it to the ROPS.

The long hole spacing distance on the base plate is the "tricky" one. According to Prince's drawings this distance when you have 4 work ports should be 7.187" between the mounting holes. Well, mine wasn't or I didn't drill exactly right :) I had to fudge one of the holes a little bit. Oh, and I used 1/4" plate steel so 1" x 3/8" bolts w/ lock washers worked great for mounting the valve assy to the base plate.

Let me know what you think.
 

Attachments

  • base_plate.pdf
    7.8 KB · Views: 333
  • side_plates.pdf
    6.8 KB · Views: 281
   / L3400 CCM hydraulic top link length #69  
**** I keep posting... but I forgot one other little piece of advice my local hydraulics shop gave me. The fittings on the top and side link according to them weren't ideal. They said because the cylinders will be moving and the hosing moving and twisting that the copper/brass washers that were used will leak. Plus on mine one set of the fittings was an odd size of "British" fittings. You may want to swap yours out when you get them.
 
   / L3400 CCM hydraulic top link length
  • Thread Starter
#70  
SR:

Really appreciate the photos. You've got me all juiced up now.

Irritated that my mounting plate is taking so long. In hindsight I should have bought a chopsaw and some steel, cut it to size myself and drilled holes myself using my neighbours drill press and then taken it someplace to have it welded.

I like the mount location. Another one I thought about was on the angled part of the ROPS but rotated 90 degrees so that the work ports are along the rear of the tractor. This can be done with your mounting plate as is just by rotating. You will have to move around your handles again so that they are accessible if you do that.

I imagine that whatever my mont plate ends up being, I can get it to fit on that angled part of the ROPS instead of where I had originally planned it (the location of the factory valve).

One thing my mount guy is doing differently from yours is that it is two pieces welded together and the third piece is loose but secured with the pressure of two bolts when mounted on the ROPS - as is the case with the factory one. But no real difference as both work just fine.
 

Tractor & Equipment Auctions

2022 Peterbilt 337 Single Axle Dump Truck (A45336)
2022 Peterbilt 337...
2005 Cummins DGBB 43.7 kVA 3-Phase Diesel Generator (A46683)
2005 Cummins DGBB...
John Deere WHP36A (A47307)
John Deere WHP36A...
Bracket For Toll Box (A43476)
Bracket For Toll...
2016 Chevrolet Tahoe SUV (A45336)
2016 Chevrolet...
2018 Toro Grounds Master 7200 72in Zero Turn Commercial Mower (A46684)
2018 Toro Grounds...
 
Top