Land Pride grading scraper

/ Land Pride grading scraper #221  
Last thing, Brian and I have talked about using these in reverse, both of us do. I have contemplated putting a hitch on the back end and then dragging it. Easy to drive forwards and safer for the hitch components too. Debating whether to do this or add the flip over tailgate with stops.

Yeah, that's one thing to clarify: Tractors don't seem to be intended to do any serious pushing in reverse. I broke mine doing that (http://www.tractorbynet.com/forums/owning-operating/204404-ok-push-trees-over-box.html). It seems they can handle some light pushing of loose material, but anything more & you risk breaking your 3 point hitch.
 
/ Land Pride grading scraper #222  
My blades are about 24 inches apart, I can check in the morning and post.

Last thing, Brian and I have talked about using these in reverse, both of us do. I have contemplated putting a hitch on the back end and then dragging it. Easy to drive forwards and safer for the hitch components too. Debating whether to do this or add the flip over tailgate with stops.

I believe that my blades are either 22" or 24" apart also.

I too have considered putting a tail gate on my grader blades. My problem is that with 24" sides on my big blade it would hold over 4 yards of material and I don't think that my tractor would move that much very well.:( I figure that I am able to move between 2 1/2 & 3 yards now without the tail gate. It sure does work well when there is a low area that needs to be filled in. :thumbsup:

I am sort of surprised that more people have not talked about using these blades in reverse. They sure do work well in that manor although the lighter units may not be quite so good and of course there is the 3pt working in reverse is not as strong thing to contend with.

I am curious if other people really have an issue with the material migrating over to the side because of the blades being angled. I know that some of the implement dealers say that it does, but does it really move over to the side? It sure does not with either of my grader blades and in the video from Road Boss, it sure looks to me that for the most part the earth is cut and flows up and over the blades with very little movement to either side. I think that the idea is there for it to do so, but in reality it simply does not most of the time.

Just my observations, so now you have my :2cents:.
 
/ Land Pride grading scraper #223  
Yeah, that's one thing to clarify: Tractors don't seem to be intended to do any serious pushing in reverse. I broke mine doing that (http://www.tractorbynet.com/forums/owning-operating/204404-ok-push-trees-over-box.html). It seems they can handle some light pushing of loose material, but anything more & you risk breaking your 3 point hitch.

A LOT has to do with the size of the tractor. I have had zero problems with mine and that is going in reverse in virgin soil.
 

Attachments

  • P4290016.JPG
    P4290016.JPG
    141.2 KB · Views: 355
  • P4290017.JPG
    P4290017.JPG
    115.7 KB · Views: 324
/ Land Pride grading scraper #224  
jenkinsph said:
My blades are about 24 inches apart, I can check in the morning and post.

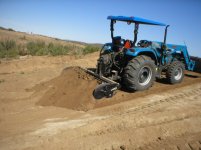
About the straight set blades, I felt for most of my work which is planing landscapes that the straight set blades were the best deal. I don't wan't the dirt to drift to one side or the other. I also have the blades set to 0 with the bottom wear strips. Since the plane is heavy it will still cut aggresively with a slight shortening of the top link. I can go a short distance and easily have dirt piled up under the tractor behind the rear wheels. That isn't the purpose of the landplane for my use though, if the ground is flat and smooth I want to move very little dirt. My thought is to cut off the mounds and fill in the depressions. I also have wider skids to reduce the gouging. Overall I am very satisfied with it for land planing in small to larger lawn areas.

For primarily road and driveway work angled blades would be preferred since you can tilt up the rear slightly and build a crown. I use a rearblade with topntilt to build a crown and recover material from the edges. I have had good success using the two implements together for roadwork. I do have the topntilt which allows me to raise one side of the plane slightly to help with sloping when needed. For roadwork I can see having the blades set lower to better mix the gravel and fines.

About the washboard areas, so far these seem to be dealt with easily and haven't noticed any issues or experienced any problems removing them.

About the DIY side of this project, if you think having adjustable depth is a real concern then an easy work around to address this problem would be to build the plane with the blades 1 inch below the skids. You could have pin on wear strips that would protrude upwards thru the flanges and use a hairpin clip to hold them in place. Have a set of thin wear strips 3/16 to 1/4 inch which would allow a net 3/4" setting below the skids and a 3/4 inch spacer wood strip to sandwich between when wanting to finish plane at the zero setting.

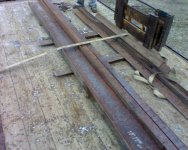
If you want to test this using flatbar in lieu of grader blades I would strongly recommend you drill the holes needed for the grader blades prior to assembly. It would be very difficult to drill these holes afterwards. Frankly I think all of us that have these implements will tell you to simply go for the grader blades to start with.

Last thing, Brian and I have talked about using these in reverse, both of us do. I have contemplated putting a hitch on the back end and then dragging it. Easy to drive forwards and safer for the hitch components too. Debating whether to do this or add the flip over tailgate with stops.

This was a lot of help here! To make it faster is adjustable skids, as in trailer jacks or two hydraulic cylinders on the sides. But then I got to change up how I make my sides. I think now I'm just going to start building it and design it as I go. I may go get the steel and bring it home to work on this week. As for the flatbar I still want to use that until I know how well it works! local bota dealer sells cutting edges and wanted close to $250 a piece. I'm still pondering the tailgate idea. But that can easily be added later. But away we go, you guys are all a great help in this. And I will defiantly get stumped somewhere and ask here!!!
 
/ Land Pride grading scraper #225  
Have you looked at using a steel edge from a snow plow?

Cutting Edges

These are harden steel and can be flipped to use the other edge if needed. I never got around to building one last year. I came to the conclusion for road work 5' is a good length for the skids since I have turns and some inclines I have to go over. If I was going to use it for leveling a yard I would go longer.
 
/ Land Pride grading scraper #226  
I am curious if other people really have an issue with the material migrating over to the side because of the blades being angled. I know that some of the implement dealers say that it does, but does it really move over to the side? It sure does not with either of my grader blades and in the video from Road Boss, it sure looks to me that for the most part the earth is cut and flows up and over the blades with very little movement to either side. I think that the idea is there for it to do so, but in reality it simply does not most of the time.

My experience is that sometimes the materials definitely does move to the left, & sometimes not. I've graded sand, clay, sandy clay, sandy clay full of vegetation, & some has moved left, & some not, with no real pattern.

But I also think the angled blades are superior for helping mitigate or delay washboard, or lessening its effects. Washboard is worst when the ridges are perpendicular to the line of travel so that your tires hit the ridges at exactly the same time, whereas any dips/ ridges/ imperfections that remain after using an angled blade grader are at least not perpendicular to the line of travel.

If you've ever approached a speed bump & turned to go over it at an angle, & witnessed that the impact on your car/ truck is much less severe, you'll know what I mean.
 
/ Land Pride grading scraper #227  
I wonder how it would work if one blade was angled left and one to the right. It would have the better cutting of the angled blade, no dirt movement to the side when flat, and, maybe by raising the front or rear slightly, it could move dirt to either right or left when needed.

Bruce
 
/ Land Pride grading scraper #228  
Beppington
Understand your reasoning but with a heavy plane there aren't any ridges left it is flat. The skids more than make up for this washboarding effect. When using a rearblade without skids you do need to run at an angle.

bcp,
I thought long and hard about doing this with alternating blades and finally decided to set the blades straight.
 
/ Land Pride grading scraper #229  
Well this is going to be now my weekend project or a few more than one, we are now able to get into the fields to clean ditches and fence rows. but I will start doing some designs and planning at night. Going to go with adjustable skids.
putting a cylinder on each side but run off one outlet. And thanks for mentioning about plow egdes as I have a couple old western plow cutting edges to solve that issue. I'll be hoping to start this weekend on welding up the frame, thinking I can do this project under $200. Let the fun begin. :thumbsup:
 
/ Land Pride grading scraper #230  
I wonder how it would work if one blade was angled left and one to the right. It would have the better cutting of the angled blade, no dirt movement to the side when flat, and, maybe by raising the front or rear slightly, it could move dirt to either right or left when needed.

Bruce

If one is to the left, and one to the right, that basically gives you a vee shape, correct?
One drawback that comes to mind right away is the extra length you are incorporating in your sides in order to do that.
I have other "doubts", but those are just a gut feeling.
David from jax
 
/ Land Pride grading scraper #231  
I have been shopping for a grading scraper for a long time and today stumbled across new models from Woods..GS54S,GS60C,GS72C,GS84C
I like the adjustable and replaceable side skids on these WOODS models.
Scarfiers are standard equipment
And for a subcompact tractor Woods has a new grader !
It痴 a GS54S designated for SubCompact .
I am trying to decide between it and the GS60C . My tractor is a FORD 1520as I stated a few post back in this thread.
I like the fact that there is a blade to fill the gap between a 48in model and 60 inch model.I was quoted about $1100 for GS60C and $970 for the GS54S.
But my rear wheels are 24in and may be too tall for subcompact hitch.
Hope this helps someone.
JohnnyWalker
 
/ Land Pride grading scraper #232  
Years back we maintained our community gravel/dirt road with a homemade drag.
It was 8" long and 8" wide made with 5 ea 6" x6" oak.
2 served as 'stringers' with the others serving as blades.
The blades were faced with 3/8" X 3" flats that were lag screwed every 10"
The first blade was angled to the right, second blade angled to the left and 3rd to the right.
The 2nd blade was offset to the right by about 6-8" in order to catch the first blade's spillover and being right offset the second blade spilled over to the 3 blade.
Because the drag had 3 'blades' it scalped all the high spots and filled all the depressions and the angles assured that the scalping traveled from side to side while the 2nd blade offset caught the 1st ones excess and passed it down the line to the 3rd blade.
One pass and you would believe somebody had spent a week with a rake on our mostly dirt road.
Main challenge was removing fist sized stones that would be flipped up, that called for some stop-and-go driving.
All in all 3 seasonal outings over the 10 year period kept us in really good shape until the city took over our road.
 
/ Land Pride grading scraper #233  
Picked up some steel from my uncle!! It's going to turn out pretty good, about 13ft I-beam. 40ft of 3 in square tubing, 12ft of 1/2 think angle iron, flat steel, 4ft 3/8 angle iron, and C channel for the skids. I'm going to incorporate a little of everyone's landplane including the frame of Jenkinsph, then the hitch is going to be like the leinback with angle iron, and the blades are going to be like Mtviewranches, unless I come up with a quick adjustable skid type. But here's some pictures of the steel!!!
 

Attachments

  • image-677841809.jpg
    image-677841809.jpg
    231.3 KB · Views: 284
  • image-2199900906.jpg
    image-2199900906.jpg
    234.7 KB · Views: 277
/ Land Pride grading scraper #234  
My back hurts just looking at that. Unfortunately it reminds me of work that I need to get done. ;)
 
/ Land Pride grading scraper #235  
Regarding the size questions on small tractors: I was pointed to the 5' Frontier grader plane for my 1026R (w/ FEL and loaded tires) and it pulls great even fully loaded on my drive. I have a 30deg hill that's about 120ft worth of drive and the rest is almost 2000 ft of gentle hills and curves. I have loaded it fully with my drive's "crusher run" and not lost traction yet.

So given that size and use case, hopefully this is a useful reference point for some people...

Oh, and it's an amazing improvement for me over using BB, RB, or LR... I tried them all with varying degrees of dissatisfaction and disappointment. I know that a more skilled operator could do wonders with any of the above, but an unskilled newbie like me can have a perfectly smooth, hard, crowned gravel drive with this and a couple passes. For a single lane drive the 5' width is just about perfect too.
 
/ Land Pride grading scraper #236  
HunterWare, glad to see that your grader works so well for you. :cool: So far, everyone that has used one seems to be happy with them, big, small, heavy and light. Do you know the weight of your grader blade? If you do, would you please post it. The weight has a lot to do with these implements and makes a big difference with which implement can be used behind what tractor. ;) Oh, any pictures? We all like pictures. :thumbsup:
 
/ Land Pride grading scraper #237  
Glad you got the steel to get started.:thumbsup:

I just got back home with a new 6"X96"X5/8" double edged grader blade from the Deere dealer. Wasn't too bad $195+tax, will cut it into two 48" pieces for my small landplane build.

Going Monday to pick up some steel and see if I can find some rectangular tubing to use for the skids. Most of the stuff to pickup is for a fence job.
Hope I can find something in the drop pile, 2x8 heavy wall boxtubing would be ideal for this build. I am trying to build this 48" width+skids x48" depth for the skid length and a weight of about 350lbs. Will post some pics of the build in progress.
 
/ Land Pride grading scraper #239  
Glad you got the steel to get started.:thumbsup:

I just got back home with a new 6"X96"X5/8" double edged grader blade from the Deere dealer. Wasn't too bad $195+tax, will cut it into two 48" pieces for my small landplane build.

Going Monday to pick up some steel and see if I can find some rectangular tubing to use for the skids. Most of the stuff to pickup is for a fence job.
Hope I can find something in the drop pile, 2x8 heavy wall boxtubing would be ideal for this build. I am trying to build this 48" width+skids x48" depth for the skid length and a weight of about 350lbs. Will post some pics of the build in progress.

:thumbsup: going to look good. it's going to have a big brother :laughing: went to cut the I-beam and the tip for the torch went out, so ill just build the frame tomorrow since i can cut it all with the chop saw. but i will also have build pictures up tomorrow for the frame. also im going to end up building mine to 68in wide as that's what the one piece of angle iron was, and didn't want to go digging for more angle iron to 72in. what depth should i set my blades at? i will be working on hard packed gravel.
 
/ Land Pride grading scraper #240  
If your intention is to use it for gravel driveways I would set it 1" below the skids. If you want to finish grade you add 1/4" flatbar with a 3/4" wood spacer to the plane to have the 0 clearance. This can be easily done by drilling holes thru the bottom of the skid to accept studs welded to the top of the flatbar with the threads looking up. Raise the plane, slip the shim and flat bar up from underneath and run the nuts up on top of the skid runners. Just make the threads long enough to work with thick spacers.

If you wanted you could make an assortment of the wooden spacers to allow you to spread topdressing on lawns as well as applying a thin layer of washed rock to your roadway etc. You could have a thick spacer on one side and thin spacer on the other to aid you in crowning the drive too.

Let me know if this is clear enough.


Marketplace Items

TOOTHED BUCKET ATTACHMENT FOR MINI EXCAVATOR (A58214)
TOOTHED BUCKET...
Pallet of Miscellaneous Duplex Polyester Webbing Slings (A61567)
Pallet of...
2012 International Prostar (A63118)
2012 International...
Cast Iron Anvil (A61569)
Cast Iron Anvil...
Case 950 8 Row Air Planter (A63118)
Case 950 8 Row Air...
2006 INTERNATIONAL 4300 24FT NON CDL BOX TRUCK (A59575)
2006 INTERNATIONAL...
 
Top