Looking for info on how to pour a slab

   / Looking for info on how to pour a slab #11  
Time/life books has alot of info on this...can be found at Lowe's and home depot.

Ive been in const industry for over 30 years, and ill do my own footings, framing, etc...but i wont mess with concrete slab work.

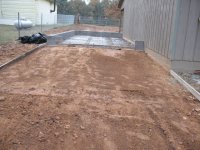
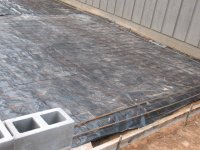
Ill do my own prep work, as its time consuming but not too hard. But the actual finish needs to be left to the pros....unless yo don't care what it looks like.

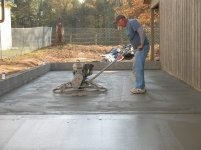
Its not any problem finding 2-3 guys to pour a slab for $0.50/SF for labor here in N. Idaho, with me paying for all material. For a 30x30 building i would only pay about $450 in labor. And i get a top notch looking job.

Unless you've actually put a finish on a large concrete slab, its NOT easy. These guys have all the necessary tampers, floats, jointer's, etc to get the job done.
 
   / Looking for info on how to pour a slab #12  
Just to add to what others have said, You will quickly find out that pouring concrete is labor and physically intensive, I am not an expert by any means but I have poured allot of concrete, do yourself a favor and make sure you split the job into separate pours, and have as much help as you can and have someone who has finished it before, it takes experience to get a smooth floor in a garage. Good Luck!
 
   / Looking for info on how to pour a slab #13  
my 50 x 50 pole barn and separate 12x16 slab went in this past September. I had pole barn up since 2002 & finally got enough $ to get floor done. I've done 2 slabs prior for small buildings and you cant do a barn that size by yourself. do all your planning ahead of time. get in all the wiring, plumbing, floor drains incoming power, incoming water, if you want in-floor radiant heating insulation ect all needs done prior to the actual pour.

If you are planning to build on the concrete stud & frame then you will need solid footers & non-settling floor. a nice wide footer is really needed for 2 story structure. I left my pour up to pros and dont regret that at all. I did all the prep work, leveled & compacted inside the barn landscaped outside for drainage. laid incoming & outgoing water and electrical lines. I also installed underground hot-water heating lines for a outside boiler (next years project.) I put down 1.5" of foam board with a radiant foil bubble material. I was put down in layers & sealed between layers, all time and money consuming as well as hard work. I paid my brother to help me get the work done in prep for the actual finishers to come in and do the flat work....

mine 18~30" of compacted sand & gravel & rocks, leveled and 2+" of compacted layer of course sand leveled by hand and compacted. 2 layers of poly 4 mil plastic vapor barrier, 3/4" white Styrofoam insulation that I taped the seams up for extra seal. laid down the foil bubble radiant insulation next and taped the seams up as well. then followed up with a 3/4" 250psi red Styrofoam board. then we laid down 10awg 6x6 re-mesh over the styrofoam. used rebar across doors and at several points where car/tractors will be coming in & out. ran 1/2" PEX-AL-PEX all throughout building for my later install for heat. (overkill for Texas maybe?) my pour was 60 yards ordered and we ended up with maybe 2.5~3 yards extra dumped out in front of my outside pad as a transition. that is 6 full trucks. was 6000psi w fiber reinforcing, first truck hit about 715 am, the final truck hit about 1030am. they were stacked up some as the crew was about 10 min late getting setup. all worked out they guys were final floating (very hard surface) wetting & smooth trowing from 1020 where they started pouring in back corner until about 1:30~2pm. I had 4 REAL finishers and 3 helpers with myself and my brother as support for the crew. no way would I think of doing something like that even in small pours as cost for crew was 2K concrete was 5K not worth the risk of having to tear up 5K in concrete which would cost 10K to get out...

anyhow have fun....

mark
 
   / Looking for info on how to pour a slab
  • Thread Starter
#14  
thanks guys. Lots to think about. I'm still thinking about it and will have to run the numbers when it comes time. If it isn't going to save me a ton of money, I will let a crew take this part from top to bottom. I'm planning to get power, water, and septic done first. Then we will start on the build.

I'm sure I will have questions later on the septic as well.
 
   / Looking for info on how to pour a slab #15  
If you do not have any access to equipment for preparing the slab base, digging trench for services or pouring concrete it might be a good idea to get some estmates.:thumbsup:
 
   / Looking for info on how to pour a slab #16  
This is a lot for a newby to do by himself.

As it has been said, once this is done, that's it -- changing anything is hard, very hard.

Spend a little bit up front on an engineer -- it is well worth it. Think about where you need drains (both for septic and gray water), under slab electrical, water service entrance. You need foundation bolts and they need to be on a specific pattern for your floor plan.

Think about the electrical panel. Where will it go? If it has extra capacity and is in the garage you can add an outlet for an electric car charger later at little cost.

Laundry? You probably want laundry facilities somewhere on the slab. Plan it out ahead.

I have seen a lot of guys just pour a slab and start building, and then be very limited on what they could build because they didn't have utilities under the slab.

A hefty perimeter footer is always a good idea, and stem walls on top of the footer make life easier afterwards. If you go with stem walls, you need to know the exact location of every door to the outside.

The real truth is that you need a plan for both upstairs and downstairs before you can properly design the slab.

A little thinking and planning ahead saves lots of time and money later on.
 
   / Looking for info on how to pour a slab #17  
When I had my house built, I did a rough layout of what I wanted then went to a local architect to draw it to scale. We sat down, looked at my prelims, discussed what we wanted and she did a rough copy. We looked at that, made some redline changes and she then made the final construction drawings which I gave to a building contractor for bid and building info. We dont need permits where I live for anything other than sewer. The architect charged me $200 to make a D size drawing. The contractor got copies made for free by the truss company that designed and built the roof trusses based on our design drawing.
Total of $200 is very cheap to plan out all the windows doors, bathrooms etc. for a 3 bedroom, 3 bath house. The foundation was not designed in, so that was done by the professional contractor, plumbing by a licensed plumber which is the only way to go on that. You dont want sewers stopping up and water lines breaking because the amateur put them in wrong. For the slab, you basically need a footer on the entire perimeter wall then any interior load bearing wall needs a grade beam (footer) that ties into the outside beam. Normally in the south these are 16-24" wide by 12" or more deep depending on the load which you really should consult an engineer or a very good, experiences building contractor on this to get the specifics for a two story structure. I have been doing quality control work for over 30 years and have watched hundreds if not thousands of slabs being constructed and there is absolutely no way I would attempt to put one in on my own with engineered drawings. I also would only do the prep work after getting the specifics for the grade beams etc. Doing the hand digging for the grade beams will save you a few bucks and also trenching for the plumbing. The plumbing needs to be embedded in sand, so it needs to be overdug a bit. You can usually work with a plumber who will let you do the digging and cut the price a bit since he would have to use laborers for that anyway.
Get the concrete poured by a professional crew after your plumbing and any other underground utilites are completed. For interior floors, you want a power trowelled finish (really smooth) and you need someone with all the equipment and several people to make it happen correctly.
I just yesterday poured a 14 wide by 48 long slab for addition on my shop. 14 x30 had power trowelled finish and 14x18 broomed finish. It took from 9am to 6pm to finish up the power trowelling due to the cool temps, the concrete took a long time to set up. I had a professional crew do it also.
 
   / Looking for info on how to pour a slab #18  
Attached some photos of yesterdays pour. As you can see, we had the grade beams already installed and 2 courses of CMU blocks on the perimeter.. The concrete blocks are to prevent water from coming in since it is built into a slope plus it allows me to hose down the inside without getting water on my walls.
 

Attachments

  • 001.JPG
    001.JPG
    157.8 KB · Views: 231
  • 002.JPG
    002.JPG
    159.7 KB · Views: 204
  • 005.jpg
    005.jpg
    802.3 KB · Views: 326
   / Looking for info on how to pour a slab #19  
The first thing we did was fill the CMU blocks with concrete, tamp it in and strike it off level then insert the anchor bolts for the wall plate then we poured the 14 x 30 slab and finished it off while waiting for the second truck to bring in the final 4 yards for the apron slab. Since everything is on a hill, the contractor elected to not use a 10 yard truck and split the load up to reduce the possibility of tip over and also deeply rutting up my yard.
 
   / Looking for info on how to pour a slab #20  
Several years ago, a fellow who worked for me, lived out in the country, and was about as good as I've seen at DIY. He and his sons built him a new house; really nice place, and did it all themselves. But before long, a part of the foundation settled which pulled the fireplace chimney away from the house about 4". He said he learned a valuable, and expensive, lesson. And that was to get a professional with insurance to pour a foundation, then build the rest yourself.

Even with the professional doing it, sometimes things go wrong, and it's a big job to fix it after a building is built on it. Last year in my neighborhood, I noticed a foundation repair crew less than 150 yards down the street digging under a house and spending a few days repairing the foundation.

So no matter how much your read, you can do it yourself and hope you get lucky, but you might save money in the long run by hiring that job done.
 

Tractor & Equipment Auctions

WEATHERFORD MP-10 TRIPLEX MUD PUMP POWERED BY A CATERPILLAR 3412 ENGINE (A50854)
WEATHERFORD MP-10...
2013 Mitsubishi Fuso FEC72S Landscape Sprayer Truck (A48081)
2013 Mitsubishi...
2025 K1220 UNUSED Single Garage Metal Shed (A50860)
2025 K1220 UNUSED...
2011 Ford Expedition XLT SUV (A48082)
2011 Ford...
2018 Chevrolet Bolt EV LT Hatchback (A48082)
2018 Chevrolet...
2016 Cadillac XTS Sedan (A48082)
2016 Cadillac XTS...
 
Top