Figure'd i'd add to this post so others can see instead of creating a whole new post.
Installed the creeper gear for the
m7060. I bought all my stuff last year from Messicks and finally got around to it this year. Need it for snowblowing. The turtle gear range was still too fast for me snowblowing large chunks. I saw this post on here which helped but i saw the pictures are gone now so I'll add my own.
and also a youtube video Ryan Lynch posted just a few months ago:
Ryan Lynch's Video on the install. It does a pretty good job. I'll add my suggestions and tips here and on facebook
Log into Facebook
My tractor is not the cab model but the ROPS so a little different on how tank has the rear spout instead of the front is about all.
I DID NOT HAVE to remove the tire. Thanks to tractorbynet user MBU for that. That is what I dreaded to most about this install and that saved a bunch of headache. I took a picture showing how much room you have to work with. The hardest part of the install was removing and putting back the fuel tank. There is a breather hose on top that has a clamp that is a pain to get too. Much easier with my 16yo son helping. Also the lower skid plate has to be removed. And the hoses at the bottom have the be removed. BE SURE TO label where the hoses go because they look similar when removing and both run along the side of the tank. The fuel level sensor connector was not easy to remove because dirt had harden in the connector pretty well.one of my guide pin holes on the tractor was rusted pretty good for some reason so i had to get some fine sand paper and clean that up.In Ryan's video he had to tap the guid pins into the plate. I did not have to. they slid in well. The instructions say to tap into the tractor but the way ryan does it by putting in the cover plate and then seat onto the tractor is best. I just tighten the bolts evenly focusing on the two bolts on either side of the guide pin a little more. The gasket maker is what Messicks recommended and came with the creeper gear kit. Overall the install took me about 6 hours. But I did a complete fluid change, hyd oil filters, oil and filter change and fuel filer change since I had the fuel drained. Tractor said I had a little over 3/4 fuel left but i drained out 15 gallons of fuel.
Drain fuel:
View attachment 01.JPG
View attachment 01.JPG
View attachment 02.JPG
View attachment 02.JPG
Remove the step. Also on the ROPS model there is bar going from the frame to the step. Keep that there but loose to help with the tank. I was able to use that to prop the tank partially down to get the connectors off.
View attachment 03.JPG
View attachment 03.JPG
On ROPS model disconnect the rear filler from tank
Matt over the tank has to come off. 4 push pins. Careful on removal so you can reuse them. I have a special tool to get them out.
View attachment 05.JPG
View attachment 05.JPG
Fuel level sensor. Was tough because of the dirt caked on there.
View attachment 06.JPG
View attachment 06.JPG
Back side of sensor plug
The skid plate has to be removed. The drain plug is apart of the skid plate. Be sure to label the hoses as they need to go back in the right order.
Breather hose connector at the top back of the tank. This was what I considered the hardest one to get to to take off and on.
Picture from the back showing the breather hose that connects to the barb seen in the photo above.
View attachment 11.JPG
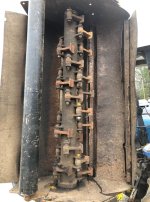
Picture showing how much room there is with the tank out of the way with the tire STILL ON. Plenty of room to work. See that guide pin hole. There was a lot of rust in there for me. Had to clean out well.
View attachment 14.JPG
The plate was secured on there well even after the bolts were off. I show here what I used to tap mine off. The plate had a little overhang on the bottom that i used a hammer and chisel to tap it off.
View attachment 21.JPG
View attachment 20.JPG
Gear with coverplate. Putting guide pins in. In Ryan's video he had to tap them in. On mine they just slid into place.
View attachment 17.JPG
View attachment 18.JPG
Messicks recommend this permatex. Working so far.
View attachment 22.JPG
Guide pins in the plate about to install.
View attachment 28.JPG
View attachment 30.JPG
View attachment 31.JPG
View attachment 32.JPG
View attachment 38.JPG
View attachment 41.JPG
Painted the bolts
On the other side of the tractor. Removing the gear lever stop
Putting the fuel tank back. This SOB to get back on
")