New Retaining Wall utilizing new JD 2305 TLB

   / New Retaining Wall utilizing new JD 2305 TLB #1  

jsygrovehpi

Bronze Member
Joined
Mar 22, 2010
Messages
68
Location
Central Connecticut
Tractor
John Deere 2305 & John Deere 425
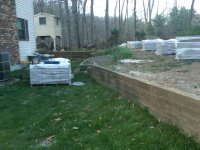
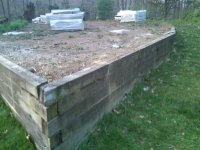
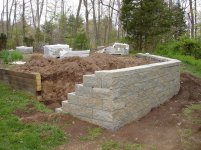
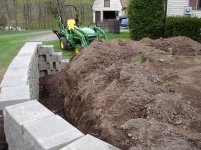
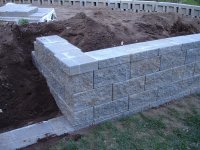
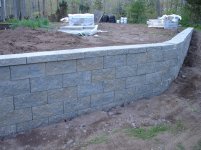
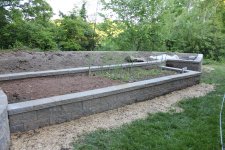
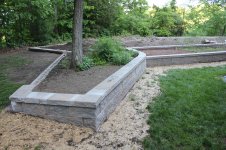
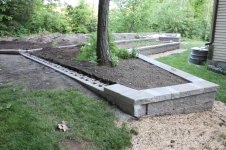
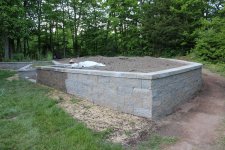
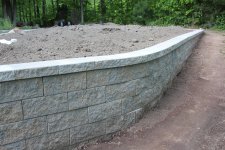
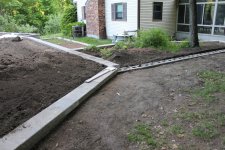
Well we started the destruction...I mean...construction last night. Below are 'Before' pictures. The only thing we did prior to when the pictures were taken was that we cut the #3 rebar that was inserted in the top of the wall every 8' that held up metal garden fencing. I dont know if you can tell but my father precut the wall with a circular saw every 4' (Picture 3). Even though the saw only got about halfway through the wall when the guy delivered the block with the piggyback forklift the weight of the machine near the edge of the inside of the garden wall was causing it to flex worrying my father of a possible premature failure.

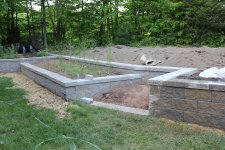
When I arrived at the house I took a sawzall and prededed to make the cuts approximately 2/3 of the way through the wall at the narrow point of the wall (foreground in pictures). Since we still felt this wasnt enough my father fired up the chainsaw and preceeded to cut nearly all the way through the wall until the chain was dull (approximately 3 cuts) because we somehow found 2 spikes and a bit of dirt.

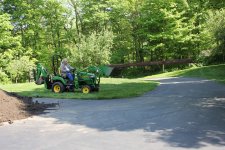
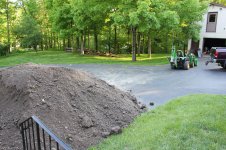
I then proceded to fire up the 2305 and head over to the point of the wall. Our plan is to remove the wall as neatly as possible then using the FEL scoop the dirt up and dump it further inside the garden to remove that fairly unusable part of the garden. Backing up I grabbed the point of the wall with the BH and began tugging. That little BH has some serious power for such a small machine! While tugging I was moving a good 12-15 feet of wall on either side of where I was working! Later I was able to carry a 16' 6x6 using the FEL like it was a large cigar by hooking the end of the timber under the top lip of the bucket. The wall, however, did fight back and progress was slower than i expected but we were able to remove 8 feet of the wall facing the house (left side of the point) and 12 feet of wall to the right side of the point by the time we quit at 8:15. It would have progressed faster if we spent more prep time cutting the timber. It was just too dark to work or take any pictures when we quit (sorry). Maybe I'll get some shots before starting work again.

Just before we quit for the evening the left joystick on the BH controls began to stick in all directions and would not return to the neutral position making it very dangerous for my father to be standing close to the rear of the 2305 to give me directions on how to grab the timber. Anyone have any ideas as what was causing this?

More details and pictures to follow!
 

Attachments

  • Wall 1.jpg
    Wall 1.jpg
    646.6 KB · Views: 1,413
  • Wall 2.jpg
    Wall 2.jpg
    653.9 KB · Views: 713
  • Wall 3.jpg
    Wall 3.jpg
    605.8 KB · Views: 848
   / New Retaining Wall utilizing new JD 2305 TLB #2  
try a little dry lube spray on the linkage there are a lot of moving parts in there. Make sure its a dry lube, you don't want to attract dirt. Mark
 
   / New Retaining Wall utilizing new JD 2305 TLB #3  
Unless, there is already stone in there, if you want your new wall to work correctly, then you need to fill in behind it with stone over a drain pipe. To do this, you are either going to have to come out a foot or so, or cut the bank back. Your wall isn't too high, but it will fail much sooner if you don't do this critical step.

Also, you are going to make it hard to set the stone if you don't have some cutback behind the wall while you are building it. It will be very aggrevating, if you don't. Most retaining wall block have a built-in backslope to them. This will fight against your forward-leaning bank too. You gotta break some eggs to make an omelet. No easy way around that fact.
 
   / New Retaining Wall utilizing new JD 2305 TLB
  • Thread Starter
#4  
Thanks Gasbag. I have some dry silicone spray lubricant. I will look into using some of that on the linkage.

Gittyup: The wall at the highest part will be approximately 4 feet tall. Supposedly anything over 3 feet has to be "engineered" by a professional. Pfff! We have built many retaining walls before and none of them have moved or failed. This is most likely due to the fact that they are all pinned together. We would never dream of building one that retained that much dirt without some form of system to keep the wall together. This wall does not step back at all and is held together with nylon pins and concrete adhesive on the corner blocks and cap. We did cut the dirt back at the corner because the path around the side of the garden is only about 5 feet wide. Since we have the new tractor we wanted the ability to get a 62" MMM around the garden if we were to get one. We did not put any drainage pipe or gravel behind the wall because it is the highest part of the yard and the previous retaining wall had no water related issues. We havent backfilled yet so there is still time to do it if we decide that we need to do something about it. I did give my father what was left of my roll of filter fabric from when I built my retaining wall last year. (See attached photo from when my wall was nearly complete last fall)

I havent had a chance to take pictures from the progress we have made so far, but I plan on going down there tomorrow afternoon to help my father so hopefully I will be able to get some pictures then. So far we have installed about 25-30 LF of wall and have made 1-90 degree corner and 1 slight-angled turn.
 

Attachments

  • Retaining Wall.jpg
    Retaining Wall.jpg
    765.8 KB · Views: 524
   / New Retaining Wall utilizing new JD 2305 TLB
  • Thread Starter
#5  
Sorry for not posting recently. Its been hectic and I havent remembered to take pictures everyday or by the time I was done working it was too dark to take them.

Day 11: The first 5 pictures below were taken at the end of the day Sunday. As you can see approximately 25% of the high wall has been completed. We have not attached the cap block yet so dont send me messages saying that the top is all messed up. we just placed them up there to get an idea as to how many we needed and to get an idea as to how high the wall is going to be. :thumbsup:

Day 12: The second 5 pictures were taken at the end of the day Monday. We finished another 20-25 feet plus the turn in for the staircase (or ramp...havent decided which way to go yet)

I am doing a poll. Should I keep the cap flush with the rest of the wall or have it stick out 3/4" to 1" to give it some character?
 

Attachments

  • DSC01435.jpg
    DSC01435.jpg
    1,004.9 KB · Views: 274
  • DSC01439.jpg
    DSC01439.jpg
    1,008.9 KB · Views: 219
  • DSC01438.jpg
    DSC01438.jpg
    1,006.9 KB · Views: 256
  • DSC01437.jpg
    DSC01437.jpg
    1,007.7 KB · Views: 178
  • DSC01436.jpg
    DSC01436.jpg
    997.5 KB · Views: 206
  • DSC01444.jpg
    DSC01444.jpg
    974.6 KB · Views: 238
  • DSC01443.jpg
    DSC01443.jpg
    968.8 KB · Views: 216
  • DSC01442.jpg
    DSC01442.jpg
    984.6 KB · Views: 190
  • DSC01441.jpg
    DSC01441.jpg
    907.8 KB · Views: 209
  • DSC01445.jpg
    DSC01445.jpg
    908.7 KB · Views: 428
   / New Retaining Wall utilizing new JD 2305 TLB #6  
What is to keep this wall from pushing over from freezing/thawing cycle like the previous wood timber wall?

Are there ties back into the bank to hold it straight?

Looking good now.
 
   / New Retaining Wall utilizing new JD 2305 TLB #7  
I like the inch over-hang myself.

There, got this poll started for ya.:thumbsup:
 
   / New Retaining Wall utilizing new JD 2305 TLB #8  
What is to keep this wall from pushing over from freezing/thawing cycle like the previous wood timber wall?

Are there ties back into the bank to hold it straight?

Looking good now.

Nice looking wall. But, no drainage or gravel backfill. Asking for trouble 10-15 years down the road. That earth will put a lot of pressure on that wall over time. Add some water... add freezing/thawing....pins and tabs aren't going to stop it. The higher the wall the more likely you'll have a problem too. There is a reason manufacturer's specify that it be built a certain way..

BTW my vote is slight overhang. Should reduce chances of staining from rain/runoff.
 
   / New Retaining Wall utilizing new JD 2305 TLB #9  
jsygrovehpi,
I don't get the purpose of the old wall or the new wall. Nice work though.
 
   / New Retaining Wall utilizing new JD 2305 TLB
  • Thread Starter
#10  
Nice looking wall. But, no drainage or gravel backfill. Asking for trouble 10-15 years down the road. That earth will put a lot of pressure on that wall over time. Add some water... add freezing/thawing....pins and tabs aren't going to stop it. The higher the wall the more likely you'll have a problem too. There is a reason manufacturer's specify that it be built a certain way..

BTW my vote is slight overhang. Should reduce chances of staining from rain/runoff.

Under most circumstances I would say that gravel and a drainage system would be necessary but the soil is very rocky with soil that is sandy in nature and allows water to pass through it rather quckly. Plus the house was blasted and the sewer line was blasted nearby in order to be placed properly. The house is at the top of a hill which with the soil conditions I talked about would allow the water to pass through the soil under the wall and down the hill in the same trench that was blasted for the sewer line. The only reason why we removed the old wooden wall was because it was rotting and the possability of the old arsinic-treated timber seeping chemicals into the vegetables in the garden made us concerned.

We still need to decide what we are going to do for a fence. My father is leaning towards the cheap side so its looking like vinyl coated chain link which might look ok if he goes with brown or black. Any suggestions?

So far I have 2 for the overhang vs none for having the straight look.
 
   / New Retaining Wall utilizing new JD 2305 TLB #12  
Overhang:thumbsup:
 
   / New Retaining Wall utilizing new JD 2305 TLB #13  
split rail with vinyl coated wire fencing stapled to it is cheaper and way better looking that chain link.
 
   / New Retaining Wall utilizing new JD 2305 TLB
  • Thread Starter
#14  
split rail with vinyl coated wire fencing stapled to it is cheaper and way better looking that chain link.

How would I attach the split rail fence to the top of the wall?
 
   / New Retaining Wall utilizing new JD 2305 TLB #15  
If you are using hollow block, you simply leave the blocks where the posts would go empty. The when you put the fence posts into the blocks you would have to fill those blocks with concrete.

Some post styles may not fit, like the one's I've seen at Lowe's. But, the type I have from a fencing company (locust) would fit.

Or you could set the fence just behind the wall. You'd only be losing about 6" of garden space.
 
   / New Retaining Wall utilizing new JD 2305 TLB
  • Thread Starter
#16  
If you are using hollow block, you simply leave the blocks where the posts would go empty. The when you put the fence posts into the blocks you would have to fill those blocks with concrete.

Some post styles may not fit, like the one's I've seen at Lowe's. But, the type I have from a fencing company (locust) would fit.

Or you could set the fence just behind the wall. You'd only be losing about 6" of garden space.

I don't know. It sounds too much like work to search around for something that fits.

If it comes down to it i would probably just drill holes in the cap and glue rebar into the holes and put up some garden fencing like we had before, but it would be nice to do something that isnt as unsightly and not loads of cash.
 
   / New Retaining Wall utilizing new JD 2305 TLB
  • Thread Starter
#17  
Sorry to take so long to post on the progress. Pictures will make it worth the wait!

The wall is nearly complete. Only short 16 cap. Infilled with approx 27 the 36 yards of topsoil that was delivered on the 7th. Rented a wet saw over last weekend and got all the cuts made to make the cap look like one solid unit. We went with the overhang. Thanks to everone that voiced their opinion on the matter.

Left to do: Get 16 more cap where we are short. Figure out what we are doing for the stairs. Glue the cap and install fencing on main part of the garden to keep the critters out.

Sidenote: Renting dumpster this weekend to get rid of 3 tons of rotting pressure treated lumber.

Any comments or suggestions regarding the fencing would be appreciated!!!
 

Attachments

  • IMG_0441.jpg
    IMG_0441.jpg
    1.2 MB · Views: 168
  • IMG_0449.jpg
    IMG_0449.jpg
    1.2 MB · Views: 161
  • IMG_0450.jpg
    IMG_0450.jpg
    1.1 MB · Views: 151
  • IMG_0597.jpg
    IMG_0597.jpg
    1.1 MB · Views: 169
  • IMG_0596.jpg
    IMG_0596.jpg
    1.2 MB · Views: 164
  • IMG_0595.jpg
    IMG_0595.jpg
    1.1 MB · Views: 172
  • IMG_0594.jpg
    IMG_0594.jpg
    1.1 MB · Views: 161
  • IMG_0590.jpg
    IMG_0590.jpg
    1.1 MB · Views: 173
  • IMG_0591.jpg
    IMG_0591.jpg
    1.1 MB · Views: 163
  • IMG_0592.jpg
    IMG_0592.jpg
    1.1 MB · Views: 146
  • IMG_0593.jpg
    IMG_0593.jpg
    1.1 MB · Views: 155
   / New Retaining Wall utilizing new JD 2305 TLB #18  
It is looking great! Will look forward to the pics of the fence. But have no ideas. :)
 
   / New Retaining Wall utilizing new JD 2305 TLB
  • Thread Starter
#19  
Well I got a price on vinyl coated chain link fence yesterday and it was astronomically stupid. They wanted $15-16 per LF plus $25 extra per post because of being bolted or cored into the wall and then $250-350 per gate (and I wanted 3 gates. 1 for a main entrance and a double in the back for getting equipment in and out)

If I wanted the smaller openings of a "pool" style chain link (1 1/4" openings instead of 2" openings) it was an additional $1 per LF. But it might keep out the smaller critters better.

I think this company is nuts because vinyl coated should be around $8-9 installed.
 

Tractor & Equipment Auctions

20FT X 30FT ALL STEEL CARPORT (A58214)
20FT X 30FT ALL...
2020 MACK P164T (A58214)
2020 MACK P164T...
500 BBL FRAC TANK (A58214)
500 BBL FRAC TANK...
159119 (A60430)
159119 (A60430)
2021 CAT 289D3 (A60462)
2021 CAT 289D3...
Teak Wood Dining Table (A59231)
Teak Wood Dining...
 
Top