NEW ROLLER & SHEEPS FOOT - ON THE WAY

   / NEW ROLLER & SHEEPS FOOT - ON THE WAY
  • Thread Starter
#61  
Progress is slow - But some progress is better than none.
Some of these posts are a little boring, Sorry. Main reason for the reports is to help some of you that may be thinking of building something similar. When all done with the projects a Do & Don't Do will be posted at the end.

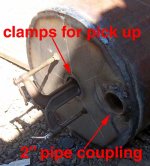
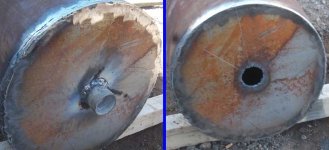
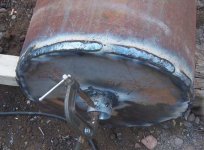
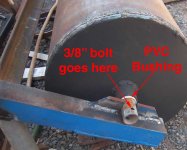
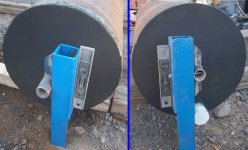
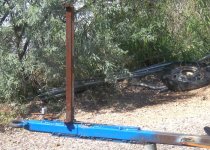
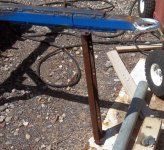
Used the torch to clean up the 2 holes for axle & water fill port. Ground all the zinc off the pipe coupling, had a nice snug fit. Just a little hammering and in it went. Welding went pretty well, a little build up where the welds overlapped.

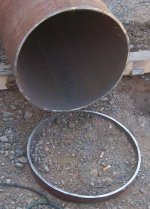
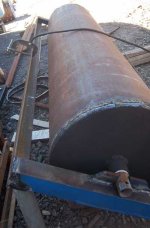
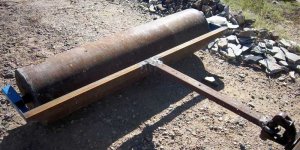
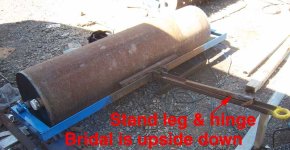
Once a fairly square and straight line was made, time to cut. Just as I was getting the torch out, a thought came to me. Why not try the angle grinder with a slitting disk. A lot slower than the torch, but a nice clean cut that does not need to be ground down. That worked out pretty well, slow, clean cut and almost no grinding. Wanting a good angle on the end spent quite a while grinding that. Sure did make me want a 7" grinder. :)

Cutting the end off the pipe took 2 slitting disks. HF cheepies. Grinding was 1, 24 grit sanding disk and it is still useable. The sanding disk is a lot faster than a grinding wheel and lasts almost as long.

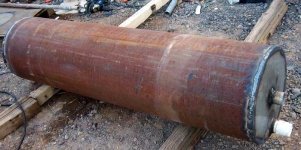
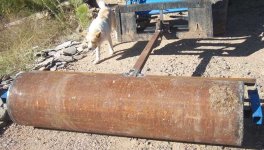
A little more on Weight. My crummy math has come up with 434 pounds of pipe weight and 27 pounds for the end plates. AM I CLOSE??? :confused:
 

Attachments

  • end 1.jpg
    end 1.jpg
    72.1 KB · Views: 188
  • cut off.jpg
    cut off.jpg
    66.9 KB · Views: 169
  • champher.jpg
    champher.jpg
    80.8 KB · Views: 166
   / NEW ROLLER & SHEEPS FOOT - ON THE WAY
  • Thread Starter
#62  
A few small steps today. Most everything just takes more time than 1 would think. ( A better welding person would spend a lot less time grinding. :thumbsup: )

End #2 got its hole burned and fit to 2" center pipe that runs all the way through the roller. Used a small pipe to guide the tight fitting 2" center out the far end. 1 End of center pipe is welded.

Have to go to town tomorrow. While there will pick up some bolts and paint. (Got to make this thing Pretty. :laughing: )

Some dummy didn't think. While the forge was fired up and rod hot. He only made 1 ring for the pintle hitch. That guy is in trouble if I can find out who didn't do it. :D
 

Attachments

  • guide.jpg
    guide.jpg
    84.3 KB · Views: 166
  • end 2.jpg
    end 2.jpg
    64.1 KB · Views: 154
   / NEW ROLLER & SHEEPS FOOT - ON THE WAY #63  
Ran some quick numbers , getting 424# for pipe, 27# for end plates, and about 654# for water for a total of about 1105#. Those are all rounded . decimals won't really matter here.

Ray
 
   / NEW ROLLER & SHEEPS FOOT - ON THE WAY
  • Thread Starter
#64  
Ray - Thanks for the numbers.

This "Little" project is starting to feel like work. And that is against my better judgement.

Yesterday. Welded in the center pipe, Second pass around one end. Filled it with water, Had a small leak around the center pipe. A first for me, welding something wet. First tried to weld it with the pipe plugged, bad idea, steam blew through the weld. Dump a little water out and remove plug. 2 More passes and got it done. Could not get a steel 2" pipe plug at "Lowe"s". Just to keep moving got a PVC plug. Will have to put a steel plug in later.

Today - Had a little breeze and it was almost cool, so I fired up the Forge to make the Pintle Ring (Lunnette) that should have been made the first time. Of course the breeze was blowing the heat & smoke right at the crank. Managed to burn my thumb a little past blistering. Keeps a person busy, cranking, banking the fire, keeping the iron in the fire, then doing the bending. Some day I will hook up blower to the forge.

Put 1 of the " Mag Wheels" on the sheep's foot. :laughing: Threw a little paint at things. Since the pipe (Guess its a "Tank now.) did not leak, painted the ends, a little more on the sheep's foot & a hint of blue on the bridle.

Got started on the bridle for the roller. Picture pretty well tells that story. Boxed in about 10" on the ends of the "L" angle iron. The 2 wedge shaped blocks hold the axle from moving under load, 3/8" bolt just holds the bridle in place.
 

Attachments

  • ends.jpg
    ends.jpg
    68.1 KB · Views: 156
  • cheap paint.jpg
    cheap paint.jpg
    54.1 KB · Views: 140
  • no leaks.jpg
    no leaks.jpg
    77.1 KB · Views: 177
  • last weld.jpg
    last weld.jpg
    76.4 KB · Views: 165
  • mag wheel `.jpg
    mag wheel `.jpg
    91.4 KB · Views: 174
  • paint 1.jpg
    paint 1.jpg
    63.3 KB · Views: 186
  • wedges 3.jpg
    wedges 3.jpg
    68.5 KB · Views: 180
   / NEW ROLLER & SHEEPS FOOT - ON THE WAY
  • Thread Starter
#65  
Hopefully tomorrow I can start dragging this thing around. Give it some abuse and see if anything breaks or it springs a leak.

There are 3 PCV bushing on the axle, 1 each end & 1 in center. With the 2 bridle ends over 6' apart the 2 end pieces were leveled up in order to drill aligned holes on each end of the axle.

Left to do - improve corner welds on bridle, make & attach tongue & ring. Cut PVC plug short enough to clear bridle.

If there are no real problems, I'll throw some more paint at it. Need to do the same with the sheep's foot. Find weak spots, fix and paint.
 

Attachments

  • bridl start.jpg
    bridl start.jpg
    58.9 KB · Views: 173
  • bushing.jpg
    bushing.jpg
    87.9 KB · Views: 225
  • level 1.jpg
    level 1.jpg
    80.2 KB · Views: 217
   / NEW ROLLER & SHEEPS FOOT - ON THE WAY
  • Thread Starter
#66  
At last it Rolls. - :thumbsup::thumbsup:

Not saying it is finished, but the real work is done and it can be used. A few little things to do, plus Paint. :laughing:

Pushed & pulled it around the yard for 2 Beers :licking: and I was just sipping. Only a few hundred yards. Good things, nothing leaked or bent. and its rolls pretty easy.

May have a little flex in the front center cross bar. Will add something to it, just in case. Need to get a steel 2" pipe plug and replace the PCV plug. PCV will snap off on the first big rock. Rest of the work on it and the sheep's foot is mostly ginger bread type of stuff :thumbsup:
 

Attachments

  • roller 3 E.jpg
    roller 3 E.jpg
    121.7 KB · Views: 172
  • roller 2 E.jpg
    roller 2 E.jpg
    114 KB · Views: 158
  • roller E.jpg
    roller E.jpg
    116.2 KB · Views: 164
   / NEW ROLLER & SHEEPS FOOT - ON THE WAY
  • Thread Starter
#67  
Too Little Progress and Way too much Thinking.

I want simple "Drop down stands" on the tongues. They don't need to hold much weight, just the tongue. They need to stand fairly high, so the rings are easy to see when hooking up. Only gave the roller ring about 1/4" of clearance, 1/2" would have been better for hooking up.

Plan on Over Center springs to hold them up and down. Then a clip of some type for positive lock. You can see the one on the sheep's foot, folded and down. Have to see what kind of springs and clips they have at the hardware store.

Am thinking maybe put a scraper on the roller. It can take what looks like a dry dog dropping and make it as large as a cow pie. Of course it sticks to the roller.:mad:

Touched up a few welds and added the braces to sheep's foot tongue. That's about it as far as real work goes. Both are usable as is, so the tongue stands and a little more ginger bread type work is about it.:thumbsup:
 

Attachments

  • stand up.jpg
    stand up.jpg
    124.9 KB · Views: 133
  • stand down.jpg
    stand down.jpg
    119.2 KB · Views: 126
  • scraper 1.jpg
    scraper 1.jpg
    83.1 KB · Views: 133
  • clips 1.jpg
    clips 1.jpg
    115.3 KB · Views: 139
  • braces 1.jpg
    braces 1.jpg
    90.4 KB · Views: 136
   / NEW ROLLER & SHEEPS FOOT - ON THE WAY
  • Thread Starter
#68  
The end is in sight - At Last - :) Building these guys has turned into a career. At least both of them could be taken to a job site if need be. :D

If I had the springs for the tongue stands, most everything would be done. Need to stiffen the front cross bar on the roller & a small foot on roller stand. Keep looking at my junk pile and just can't see anything that looks right for the stiffener. Once the springs are installed, its mostly a little grinding and paint.

I'm working on a list of the does, don't does, could have or should have done. How to make the build better, faster & easier.
 

Attachments

  • Flip hinge 1.jpg
    Flip hinge 1.jpg
    107.4 KB · Views: 154
  • roller stand 1.jpg
    roller stand 1.jpg
    87.3 KB · Views: 125
  • pin lock 2.jpg
    pin lock 2.jpg
    112.8 KB · Views: 128
  • pin lock.jpg
    pin lock.jpg
    106.6 KB · Views: 165
  • stand down latch.jpg
    stand down latch.jpg
    102.7 KB · Views: 127
  • sheeps foot.jpg
    sheeps foot.jpg
    109.5 KB · Views: 146
  • sheep n roller.jpg
    sheep n roller.jpg
    83.9 KB · Views: 139
   / NEW ROLLER & SHEEPS FOOT - ON THE WAY #69  
The end is in sight - At Last - :) Building these guys has turned into a career. At least both of them could be taken to a job site if need be. :D

If I had the springs for the tongue stands, most everything would be done. Need to stiffen the front cross bar on the roller & a small foot on roller stand. Keep looking at my junk pile and just can't see anything that looks right for the stiffener. Once the springs are installed, its mostly a little grinding and paint.

I'm working on a list of the does, don't does, could have or should have done. How to make the build better, faster & easier.

Dang Jim. Those look store bought.:thumbsup:
hugs, Brandi
 
   / NEW ROLLER & SHEEPS FOOT - ON THE WAY
  • Thread Starter
#70  
Dang Jim. Those look store bought.:thumbsup:
hugs, Brandi

Brandi, Thanks for the flowers. Would look better were it not for my Red Neck ways. Keep throwing paint on it here and there. Sure makes the bad spots show up.

Moving right along. Got the folding stand pretty well done today. It does work, may move the front spring point for a little better tension when folded up,

Boxed the center of front cross piece, should be a little stiffer now.

Stand took too much time, lots of fiddling around to make it work. More sanding, grinding, painting & maybe some welding. Want these 2 guys parked where I can't see them for a few days. :):confused2:
 

Attachments

  • folded stand 1.jpg
    folded stand 1.jpg
    69 KB · Views: 126
  • stand down 2.jpg
    stand down 2.jpg
    609.7 KB · Views: 156
  • stiffener 1.jpg
    stiffener 1.jpg
    70 KB · Views: 122

Tractor & Equipment Auctions

2006 Isuzu NPR 16ft Box Truck (A50323)
2006 Isuzu NPR...
P.T. Canal Pump (A50121)
P.T. Canal Pump...
JCT 84" Rock Grapple (A50121)
JCT 84" Rock...
Vicon RV1601 Round Baler (A50774)
Vicon RV1601 Round...
2018 JLG 3246ES 32ft Electric Scissor Lift (A50322)
2018 JLG 3246ES...
9' Root Rake (A50120)
 
Top