Partial overhaul on Yanmar 3TNE88

   / Partial overhaul on Yanmar 3TNE88
  • Thread Starter
#51  
Progress:

Lifters installed
Camshaft installed
Pistons installed on rods
Pistons/Rods installed in block
Oil pump installed
Idler gear installed

Got the oil filter adapter and oil cooler cleaned up and ready to install when I noticed that the oil filter adapter gasket that I have is not the right one. If used the gasket that I have, it would allow an internal bypass around the filter... not a good thing.
 
   / Partial overhaul on Yanmar 3TNE88
  • Thread Starter
#53  
No pic's? We like pics. :)

You're welcome to come take some. :laughing:

If you've ever assembled an engine before, you know that's it's an inherently messy process. Hands always seem to be covered in either oil or assembly lube. I'm not grabbing my camera under those conditions and if I stopped to clean my hands to snap a bunch of pics, I'd never get anything done.
 
   / Partial overhaul on Yanmar 3TNE88 #54  
You're welcome to come take some. :laughing:

If you've ever assembled an engine before, you know that's it's an inherently messy process. Hands always seem to be covered in either oil or assembly lube. I'm not grabbing my camera under those conditions and if I stopped to clean my hands to snap a bunch of pics, I'd never get anything done.

But but but... Oh find! :p
 
   / Partial overhaul on Yanmar 3TNE88 #55  
Maybe you could post some oil stained type abstract art........
 
   / Partial overhaul on Yanmar 3TNE88
  • Thread Starter
#56  
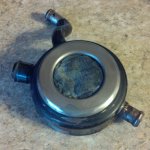
Bolted more parts on... blah, blah, blah. Started to put the oil cooler on and noticed a slight dent on the oil filter sealing surface right inline with where the oil filter gasket rides. That would explain the annoying little oil drip I had from the oil filter area. So I took a break from assembly to address that problem. My first thought was to build up the dented area with some weld, but I was afraid that the heat may un-solder some of the joints in the cooler. I ended up filling the dent with JB Weld and letting it cure.

Once the JB Weld had cured, I chucked the oil cooler up in the lathe to cut down the extra height of the built-up area. The dial indicator showed that the oil filter gasket surface was not true. It had a couple of waves in it... nothing much just a couple thousandths. After cutting down the extra height of the JB Weld, I took another light cut across the entire surface... just enough to true the surface. Then I polished the surface by lapping it with 220 and 400 grit paper on a hunk of marble I use for a lapping surface.

oilcooler.jpg

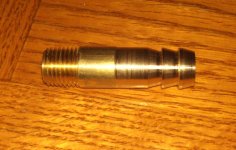
I also needed a 1/4" NPT x 1/2" hose barb fitting and couldn't find one in town. Since I was at the lathe, I went ahead and turned one out of a 1/4" NPT brass nipple. I haven't made up my mind yet, but I may bore out a brass nut and silver-solder it onto the hose barb for wrench flats.

hosebarb.jpg

When I test fit the hose on the barb, I dang near couldn't get the hose back off. I'd say it's the perfect size.
 
   / Partial overhaul on Yanmar 3TNE88
  • Thread Starter
#57  
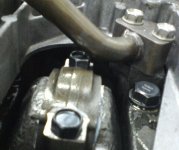
Ran into an interesting glitch last night. Put the crankcase extension, oil pickup and oil pan on and flipped the engine over. After mounting the head, waterpump and valve train, I set the valve lash. When I turned the engine over by hand to adjust the last two valves, I felt something in the rotating assembly lightly hit something else and "rub" past. So, I had to flip the engine back over and pull the oil pan to investigate. Turns out that one of the rod bolts and oil pickup tube were competing to occupy the same space. I replaced the rod bolts for new ones and for some reason, the head on the new bolts are a little bit taller than the old ones.

p_00315sm.jpg
 
   / Partial overhaul on Yanmar 3TNE88 #58  
Ran into an interesting glitch last night. Put the crankcase extension, oil pickup and oil pan on and flipped the engine over. After mounting the head, waterpump and valve train, I set the valve lash. When I turned the engine over by hand to adjust the last two valves, I felt something in the rotating assembly lightly hit something else and "rub" past. So, I had to flip the engine back over and pull the oil pan to investigate. Turns out that one of the rod bolts and oil pickup tube were competing to occupy the same space. I replaced the rod bolts for new ones and for some reason, the head on the new bolts are a little bit taller than the old ones.


View attachment 301833

Put it in your lathe and turn down the ridge. Unless you can only stretch the bolt once. then, turn the motor back over and file on it upside down.
 
   / Partial overhaul on Yanmar 3TNE88
  • Thread Starter
#59  
Couldn't believe how bowed the intake manifold was. It took a good 30 minutes on the lapping table to true the surface. Anyway, the engine is ready to come off the stand and set back into the tractor. Then there are a few more tid bits to bolt back on after it's in tractor before putting the tractor back together... raditor, core support, firewall, fuel tank, hood.......
 
   / Partial overhaul on Yanmar 3TNE88
  • Thread Starter
#60  
That's a wrap!!

Today was a good day. I started out by setting the engine into the tractor and bolting it down. Installed the alternator, starter, fan and fuel filter assembly. Next was the exhaust manifold and exhaust pipe. Hooked up the flywheel to transmission driveshaft and slipped in the firewall and fuel tank. Then I set the radiator in place and secured it by installing the core support. Connected the oil lines, installed new radiator hoses and landed all the loose hoses and wires. Filled the radiator with fresh coolant, filled the engine with oil and filled the fuel tank before installing the battery.

After priming the fuel filter, it was time to prime the injection pump and the injector lines. So, I cracked the injector lines and hit the key to crank the engine over until I got fuel to the injectors. The engine immediately popped once as soon as I hit the key... probably some residual oil in the cylinders from installing the pistons. I took this as good sign... at least I know it's building compression. Tightened down the injector lines and drew a deep breath... Moment of truth.

I put a fresh clean sheet of cardboard on the floor under the tractor, turned the key and it immediately fired off before it turned a full revolution. It sputtered for about a second as it cleared the remaining air out of the injectors and purred smoothly. I spent the next twenty minutes varying the throttle and looking for leaks. After the twenty minutes were up, I shut it off with not a single leak found. Spent another half-hour or so fiddling with this and that and still not a drip or drop of anything showing on the sheet of cardboard. And, not even so much as a whisp or puff of smoke from the vent tube the whole time... at any RPM.

Now to finish putting on some body panels and the hood and it'll be ready to go!
 
Last edited:

Tractor & Equipment Auctions

2003 PETERBILT 330 CARGO TRUCK (A50854)
2003 PETERBILT 330...
2018 INTERNATIONAL 4300 24FT NON CDL BOX TRUCK (A51222)
2018 INTERNATIONAL...
2019 Kubota F3990 72 in. Commercial Mower (A50324)
2019 Kubota F3990...
2015 KENWORTH T800 MID-ROOF SLEEPER (A50854)
2015 KENWORTH T800...
New/Unused 20ft Farm Iron Gate (A48837)
New/Unused 20ft...
2013 Acura ILX Sedan (A50324)
2013 Acura ILX...
 
Top