Portable Sawmill

   / Portable Sawmill #61  
k
 
   / Portable Sawmill #62  
Ok, here are some photo's of my progress.
 

Attachments

  • 337295-DSCN0925 copy.jpg
    337295-DSCN0925 copy.jpg
    88.8 KB · Views: 1,279
   / Portable Sawmill #66  
Looks don't matter. Functionality does!! /forums/images/graemlins/grin.gif
I'm soon to have a bunch of cherry, maple and walnut logs to make lumber from. I've marked a dozen trees and cut three already. I don't have $3000 - $5000 for a "name brand". I'm looking for an "Egon"-type of sawmill that will save me some $$$. I only need the rough cut, I can finish cut them later.
 
   / Portable Sawmill #67  
Fivestring:

It'll take about a week and a half till some pictures are available. Don't have a Digital camera so have exposed film put on disk when it's developed.

Egon
 
   / Portable Sawmill #68  
Man, this is a great project. I will follow with great intrest. Hmmm. That slab built porch may be possible now. /forums/images/graemlins/grin.gif
 
   / Portable Sawmill #69  
I found the "Woodbug" quite interesting, and though I'm not gonna buy one, I'd like to know how the guide for the nose of the chain saw bar works.
 
   / Portable Sawmill #70  
There's difinitely an interest in portable, low-cost sawmills.
Gmason's thread has had almost 4900 views! /forums/images/graemlins/blush.gif

Cha-ching! Ya hear that?
That could be Gmason making some change making some portable sawmills! /forums/images/graemlins/wink.gif
He could call them "The Hornet's Nest" based on earlier posts by him! /forums/images/graemlins/grin.gif /forums/images/graemlins/grin.gif
 
   / Portable Sawmill #71  
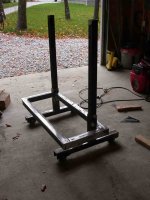
Well, sorry for the absence from this thread, bad weather and sick family has kept me from getting going, as well as a few "upgrades" to the saw. I added some fenders to the wheel as a little more protection and in order to add a mud flap to keep the saw dust from going everywhere. I also added a windshield reservoir and pump to it so that I can oil the blade automatically.

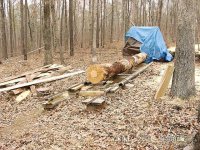
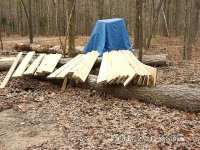
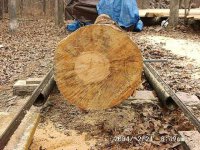
I went into a production mode over the weekend with some nice weather and a little help. We sawed 4 pine logs from 14' to 17'. I roughed them out to a lot of 2 by..

Here's some pics. Sorry no action pics this time.. maybe this coming weekend I'll remember the camera.

gary
 

Attachments

  • 381335-saw1.jpg
    381335-saw1.jpg
    94.3 KB · Views: 1,009
   / Portable Sawmill #72  
here's the milled pieces in there temparary location. I've got to sort and move them to my MIL place to air dry. We just don't have any place here that gets good sun and air movement to stack them.
The boards on the right side here are the 17'.
 

Attachments

  • 381336-saw2.jpg
    381336-saw2.jpg
    88.9 KB · Views: 905
   / Portable Sawmill #73  
here's the next log, 21' with a little curve to it. I'm going to try to get a nice 6x8-10 out of it.
g
 

Attachments

  • 381338-saw3.jpg
    381338-saw3.jpg
    90.7 KB · Views: 827
   / Portable Sawmill #74  
Hi Gmason et all:

Nice looking contraption!

the boss and I have looked into building our own. as we have excellent shop and build all kinds of stuff.

the basic principal behind the blade staying on the tires is a principal that I forget the name of but the tires have a CROWN when inflated to pressure. which is a shape that the blade will try to roll UP onto and stay on the highest spot. that means the blade will roll to the center of the tire, unless the tire wears off the peak then you will have to over inflate it some to maintain the donut shape. others use large sheels with a rubber band vulconized on them which has a built in crown rather than inflating the tires over pressure.

anyhow all in all a good job.

p.s. you should lay you're wood FLAT as soon as possable even if it is stacked on top of each other with out the air spaces. letting it set for a few hrs like the one photo shos is enough to put a twist that may never come out when it is dry.

use some spacers cut down so they are all the same thickness. and space each pile appart with air gaps so the log planks will dry evenly. there is also a lot of products that will help prevent checking and splitting and is only applyed to the ends of the freash cut boards. from what I'm told if you are prepping them for later use as finished lumber (planed to dim.) then the end coating is almost required to keep the good board feet up.

Mark M /forums/images/graemlins/smile.gif
 

Tractor & Equipment Auctions

2021 Chevrolet Silverado 1500 4x4 Crew Cab Pickup Truck (A59230)
2021 Chevrolet...
excavator trenching bucket- one bucket per lot (A56438)
excavator...
2014 Timpte Hopper Bottom (A56438)
2014 Timpte Hopper...
2015 MACK GU713 DUMP TRUCK (A59823)
2015 MACK GU713...
2016 Freightliner M2 106 Ambulance (A59230)
2016 Freightliner...
Unused 78" Bucket Attachment (A55272)
Unused 78" Bucket...
 
Top