SSQA fork build

   / SSQA fork build #101  
Looking real good! Always fun to whip out the 4 jaw. As for keeping it domestic: not everyone's got 10K for a lathe and mill either. Or the 5K in subsequent tooling to make them useful. ;) I live to make stuff. I don't want to buy it if I can build it.
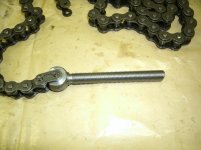
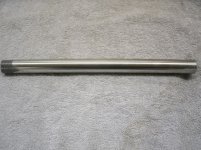
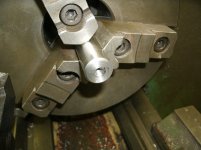
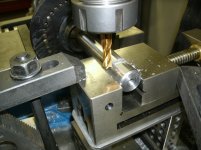
I almost always use my 4 jaw. My self 3 jaw is a piece of crap and runs about 15 thousands out of true. Besides I like to challenge myself and see how true I can get something to run in the 4 jaw.
 
   / SSQA fork build #102  
My 3 jaw runs out about .0015 to .002 and it still annoys me if I need to rechuck. :) I save the 4 jaw for stuff that really matters. Most of what I do manually doesn't need that level of precision.
 
   / SSQA fork build #103  
Very nice work! One question - why did you want the fit on the chromed bar to the retainer blocks to be so tight? Looser here would seem to make sense as it would be easier to slide. I realize you could get into binding issues, but there are ways to fix that. Just thinking that these are forks that may live outside, and get rusty or otherwise crudded up. Tight clearances could be trouble in the long run. But then I've never seen a chromed bar on a a set of forks...
----------.
Now you have seen another one. :D

Mine is a rod from a hydraulic cylinder.

P6190004.JPG


P6190005.JPG
 
   / SSQA fork build
  • Thread Starter
#104  
Very nice work! One question - why did you want the fit on the chromed bar to the retainer blocks to be so tight? Looser here would seem to make sense as it would be easier to slide. I realize you could get into binding issues, but there are ways to fix that. Just thinking that these are forks that may live outside, and get rusty or otherwise crudded up. Tight clearances could be trouble in the long run. But then I've never seen a chromed bar on a a set of forks...

Surprised you did not cut that chromed rod with an abrasive disc rather than a BS. That is pretty much what abrasive discs were made for. Hard stuff. And it doesn't look like you should care what the ends look like in this situation as they are covered.

Just going off the machinist book for sliding fit. I can always make it bigger if need be. The original plan was to store these outside but I think I've come up with a way to store them underneath my grapple inside the storage container.

An abrasive wheel would have been faster to cut the bar but I just simply hate using those things. Don't like the dust, sparks, and heat. Mostly hate the dust!
 
   / SSQA fork build #105  
Here is another job for a 4 jaw chuck, making an cam bushing. image-196695354.jpg image-1725524938.jpg
 
   / SSQA fork build
  • Thread Starter
#106  
Did you broach the keyway yourself?
 
   / SSQA fork build #107  
I for one would not store them outside OR even use them, I'd make a coffe table out of them as nice as they are looking. :)
 
   / SSQA fork build #108  
Last edited:
   / SSQA fork build
  • Thread Starter
#109  
Good stuff!

What is the best type of press for broaching? Tonnage?
 
   / SSQA fork build #110  
I've always done it in an arbor press. 2-3T is plenty.

You can do it in the lathe too, but that much force on my lead screw doesn't make me think it's very good on the machine.
 
   / SSQA fork build #111  
Good stuff! What is the best type of press for broaching? Tonnage?
I prefer a big arbor press. A hydraulic press doesn't have enough travel to do it without re setting up a couple times. My arbor press is 3.5 ton and it is a pretty hard to cut a wide keyway. I wouldn't mind having a 5 ton. I wouldn't try it on a lathe. I have a Jet 14x40 GH lathe. I'm pretty sure it couldn't push hard enough to do it. I have a bigger antique lathe that probably could, but I would hate to use it like that. A press is the right tool for the job. I can't imagine anyone would have a lathe, but not a relatively cheap press.
 
Last edited:
   / SSQA fork build
  • Thread Starter
#112  
I've got a hydraulic press that I made and tried broaching with it ONCE. Did not like the way it 'clunked' the broach through. Thought it was going to break it. The few times I've done it since, I used a brass hammer and tapped it through. Sounds worse than what it is.

Checked out some arbor presses and those ratcheting ones look pretty cool.
 
   / SSQA fork build
  • Thread Starter
#113  
I've got a hydraulic press that I made and tried broaching with it ONCE. Did not like the way it 'clunked' the broach through. Thought it was going to break it. The few times I've done it since, I used a brass hammer and tapped it through. Sounds worse than what it is.

Checked out some arbor presses and those ratcheting ones look pretty cool.
 
   / SSQA fork build
  • Thread Starter
#114  
Finishing up the chain anchors here. I'm using the spin fixture on the mill to save time. I first start by eyeballing the anchor end parallel to the table and then get the hole drilled. I next spot face the side with an end mill and then spin it 180 to face the other side. Next comes milling off the end for chain clearance and then touch up the edges on the disc sander.

Next up will be the sprocket shafts.
 

Attachments

  • SSQA 1-28-16 001.JPG
    SSQA 1-28-16 001.JPG
    232.2 KB · Views: 162
  • SSQA 1-28-16 002.JPG
    SSQA 1-28-16 002.JPG
    206.6 KB · Views: 147
  • SSQA 1-28-16 003.JPG
    SSQA 1-28-16 003.JPG
    215 KB · Views: 155
  • SSQA 1-28-16 004.JPG
    SSQA 1-28-16 004.JPG
    248.2 KB · Views: 161
  • SSQA 1-28-16 005.JPG
    SSQA 1-28-16 005.JPG
    214.9 KB · Views: 166
   / SSQA fork build
  • Thread Starter
#115  
Working on the sprocket shafts here. I got a piece of 4140 TGP (turned, ground, polished) for the material and started by drilling the grease passage and then tapping the end for the grease zerk. Set up on the mill to cut a flat for the lock bolt to hold the shaft in place plus keep it from rotating. Then drill the outlet passage and ball mill a slot to disperse the grease. Here is the finished parts. Anybody spot my mistake?
 

Attachments

  • SSQA 1-31-16 002.JPG
    SSQA 1-31-16 002.JPG
    313.3 KB · Views: 135
  • SSQA 1-31-16 006.JPG
    SSQA 1-31-16 006.JPG
    196.9 KB · Views: 136
  • SSQA 1-31-16 008.JPG
    SSQA 1-31-16 008.JPG
    241.8 KB · Views: 145
  • SSQA 1-31-16 011.JPG
    SSQA 1-31-16 011.JPG
    196.5 KB · Views: 145
  • SSQA 1-31-16 013.JPG
    SSQA 1-31-16 013.JPG
    292.8 KB · Views: 157
   / SSQA fork build
  • Thread Starter
#116  
Starting the chain assembly here. Sprockets and shafts all fit up nicely, but I found one issue. I allowed for an 1/8" thrust washer on the sides assuming this would provide enough clearance for the chain. Shame on me for assuming because the chain rubs the outer support. If I shim it further in, I will be pulling on an angle and that's not good! Going to have to do some head scratching here.
 

Attachments

  • SSQA 1-31-16 015.JPG
    SSQA 1-31-16 015.JPG
    184.9 KB · Views: 152
  • SSQA 1-31-16 016.JPG
    SSQA 1-31-16 016.JPG
    251.4 KB · Views: 150
  • SSQA 1-31-16 017.JPG
    SSQA 1-31-16 017.JPG
    269.6 KB · Views: 161
   / SSQA fork build #117  
Working on the sprocket shafts here. I got a piece of 4140 TGP (turned, ground, polished) for the material and started by drilling the grease passage and then tapping the end for the grease zerk. Set up on the mill to cut a flat for the lock bolt to hold the shaft in place plus keep it from rotating. Then drill the outlet passage and ball mill a slot to disperse the grease. Here is the finished parts. Anybody spot my mistake?
Yep, the flat for the lock bolt should be 45 degrees around from where it is, on the one that is inline, so the grease slot is not on the tension side of the sprocket.

I also think I can see a finger print on one. :eek: ----- :D
 
Last edited:
   / SSQA fork build #119  
Starting the chain assembly here. Sprockets and shafts all fit up nicely, but I found one issue. I allowed for an 1/8" thrust washer on the sides assuming this would provide enough clearance for the chain. Shame on me for assuming because the chain rubs the outer support. If I shim it further in, I will be pulling on an angle and that's not good! Going to have to do some head scratching here.
Is this where it is rubbing?

SSQA 1-31-16 017.JPG
 
   / SSQA fork build
  • Thread Starter
#120  
Yup, you got it. I assembled everything this afternoon and put both thrust washers on one side to provide clearance for the chain. Cycled it with air and thought I had dodged the bullet. There was enough forgiveness in everything that it worked just fine....except that I discovered that the left sprocket was a 1/4" too high. That traces back to a mistake that I made on CAD. So spent the afternoon cutting off the mounts and welding new ones back on. Will post pictures tomorrow.
 

Tractor & Equipment Auctions

Michelin CARGOXBIB High Floatation Tires (SET OF 6) (A56438)
Michelin CARGOXBIB...
MACK T/A DUMP TRUCK (A58375)
MACK T/A DUMP...
Bobcat T590 (A53317)
JLG 1255 Telehandler (A56438)
JLG 1255...
2021 Ver-Mac PCMS-3812 Solar S/A Towable Trailer Message Board (A55973)
2021 Ver-Mac...
2011 MULTIQUIP LIGHT PLANT/ FUEL TANK TRAILER (A58214)
2011 MULTIQUIP...
 
Top