Step by step photos of new garage

   / Step by step photos of new garage
  • Thread Starter
#321  
Gemini, thanks for thinking what the heck this is but I am in town and have city sewer. I just checked it again and same thing little bubbles and if you poke a whole in it the water collects in the whole, clear no order. I know it can not be other water lines becase I am the last on the city water line.

Would not a spring have more volume and would it not of been wet the last 20 years I have lived here. tough I nver dug down 10 inches in the yard before.

Come to think of it the hill I dug out had wet areas here and there.

Could it be just a natural path for top water run off.

Hum.

Roger
 
   / Step by step photos of new garage #322  
Roger I think you are on the right track. Although there are small springs that have a very small flow I would have thought that over time it would amount to some volume.

The best water I have ever tasted in my life was when I was a kid.
There was a road near a hay field that we hauled hay out of. When they cut the road they hit an underground stream. the water was underground came out on top of the road and then disapeared back underground on the other side. After hauling hay and getting the truck loaded we would stop before we crossed the spring and get a nice drink of Icy cold water from the stream. You might have something like that you just took enough dirt off for some of the water to bubble up and the rest is going about its natural path.
 
   / Step by step photos of new garage
  • Thread Starter
#323  
Gemini at this piont I think you are right. Maybe I can bottle it and sell it in the area. (smile)

Now the question is what to do with it when pouring the concrete over the top of it and will it cause a trouble down the road (drive) pun intended.

Thanks

Roger
 
   / Step by step photos of new garage #324  
Gemini,
OK this may sound strange but lets try to see the direction of the spring. You will need 2 pieces of wire coat hanger works cut the hanger about 18" long bend it straight. Now measure 4" +- and bend 90 deg. Now you should have 2 L shaped wires. Here what you need to do with them make 2 fists with your hands but have a hole that the 4" wires will slip into That should leave the 14" ride on the top of your fist.
Next you need to hold your hands close to your chest about 6" apart with the 14" wires parallel with to ground, the rods/wire should point forward.
Now start walking slowly keeping the rods loose in your fist and parallel with the ground.
Walking back and forth the rods will move and will cross each other or point to one side or the other. Once you get the feel for this walk around the wet spot and note what the rods are doing if you walk enough you will soon know witch way the spring is crossing the wet spot. This info will help.
If you don't understand what I described please PM me and I will make a Video to show you how.
Phil
 
   / Step by step photos of new garage
  • Thread Starter
#325  
Phil: Is what you are describing called witching for water. I know of a lot of folks in this area that do that. Should be helpfull. I would guess if it leads up hlll its a stream and not any where it could be who knows what.

I ll try it. I have seen people do this before had not thought of it.

Thanks

Roger
 
   / Step by step photos of new garage #326  
roermo,
I don't know if it's called witching but I do believe it has to do with the earths magnetics. I use this method for alot of things sometimes at work we dig in parking lots to install wayfinding sign. Parking lots have alot of different electrical path to lights, sign and building this show me where they are but not how deep. I found my well water the same way.
Phil
 
   / Step by step photos of new garage #327  
Phil roger is right for this part of the country it is called witching. I have tried it and I am unable to do it. I do know people that swear by it.
 
   / Step by step photos of new garage #328  
roermo said:
Gemini at this piont I think you are right. Maybe I can bottle it and sell it in the area. (smile)

Now the question is what to do with it when pouring the concrete over the top of it and will it cause a trouble down the road (drive) pun intended.

Thanks

Roger
Roger just build your yard back up by 10 inches to its original depth and it probably wont be a problem :)
 
   / Step by step photos of new garage
  • Thread Starter
#329  
Gemini: Realy can not do that becuase then I would have 5 inches or so and 5 1/2 inches of concrete on top of the 10 inches and would be above the garage floor. I am shooting for a 1 or so above the yard once the concrete is down on top of the gravel.

Maybe I should put a french drain along the wet spot. (joke)

Roger
 
   / Step by step photos of new garage
  • Thread Starter
#330  
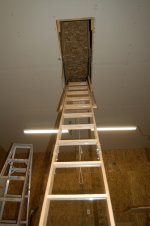
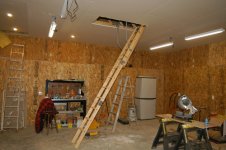
Well today got the attic ladder in, 1st 3 photos,

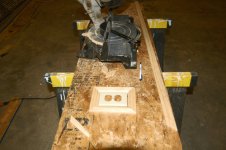
4th picture is a project I have going to cover up a mistake.

Ok how many of you out there have made a boo boo and then found a fix.

here is mine. I cut the 4x8 osb to fit and then cut out the outlites wholes, well there of them were a 1/4 to 1/2 off at the top. Tried over size plates but they missed a bit. So I have mitered up a fix to cover the gap.

I also tilled up the area where all the spoils had sat for 4 months.

Roger
 

Attachments

  • 1.jpg
    1.jpg
    101.5 KB · Views: 259
  • 2.jpg
    2.jpg
    123.4 KB · Views: 206
  • 3.jpg
    3.jpg
    85.5 KB · Views: 222
  • 4.jpg
    4.jpg
    96.3 KB · Views: 247

Tractor & Equipment Auctions

2000 Ford F-550 Altec AT35-G 35ft Bucket Truck (A53422)
2000 Ford F-550...
2015 Ford F-150 Ext. Cab Pickup Truck (A53422)
2015 Ford F-150...
2014 FREIGHTLINER CASCADIA SLEEPER (A54313)
2014 FREIGHTLINER...
2001 Freightliner FL80 E-One Pumper Fire Truck (A52377)
2001 Freightliner...
2016 Nissan Pathfinder SUV (A53424)
2016 Nissan...
2008 Ford F-450 Crew Cab Service Truck (A52377)
2008 Ford F-450...
 
Top