You are using an out of date browser. It may not display this or other websites correctly.
You should upgrade or use an alternative browser.
You should upgrade or use an alternative browser.
Step by step photos of new garage
- Thread starter roermo
- Start date
- Views: 91084
/ Step by step photos of new garage
#361


finished grading, and now some clean up of some brick from a room addition and brick from the front of the garage. Starting siding this week. then prep of the yard for more grass seed. Then getting ready to put the tractor in its new clean garage ready for the next project.
roger
roger
Attachments


patrick_g
Elite Member
Roger, More pix, in general, please, especially with siding. Love your nice trees.
Pat
Pat
RichM96067
Member
ehchvac said:if it was mine to build,...
big doors tall and wide.
max ceiling height.
pitch the floor out not to a drain.
either trusses or a steel beam so there would be no lally columns.
if trusses still some kind of heavy beam for lifting.
put radiant in the floor even if you cant afford to hook it up now.
large cement apron in front with more radiant, no shoveling in front of doors.
max electric service for welders, big compressor, a/c, etc.
piping for remote compressor air usage.
max outlets 110v and 220v.
lots and lots of lights, nothing is worse than too little light.
plumbing roughs for future hot and cold water, bathrooms, dog wash station, etc.
separate walk in door less heat loss than thru the overheads.
fire code sheet rock even if its not required, welding sparks etc.
if its going to have live water in it overhead sprinklers are real cheap.
secure locks, dead bolts.
no windows, not even on the doors.
thats just off the top of my head, seen to many regrets from homeowners after the fact.
woulda, coulda, shoulda, gets real expensive after the fact.
this list brought to by caffine,... and 30 plus years in new construction.
I like your style.
patrick_g
Elite Member
"...no windows, not even on the doors."
Is that a security consideration or a justification for the recommendation for oodles of lights?")
I like everything on the list except NO WINDOWS. If it is a security consideration put the windows up a little higher and smaller than normal for just a little better security and for more security put bars or security shutters on them or use a monitored alarm system (with fire sensors included.)
Most folks think leaving windows off is a big boost to security but it usually isn't. A chainsaw will make an impromptu door of truck size in about a minute in most buildings. Steel building? No sweat, you can buy a gas operated saw at HF that will open up a truck sized hole is well under a minute. A sledge hammer will open most doors with expensive security locks in under 10 seconds.
If the concern is "out of sight out of mind", if the "bad guy" can't easily see your goodies through the windows he won't be motivated to break in then put the windows up higher out of the line of sight. You will still get ventilation and light. Higher is better protected from rain and you can have ventilation during a rain. Skylights in the form of translucent panels are a good thing if you really really don't want windows. I have plenty of lights in my shop but also a fair number of large windows and don't always need to switch on the lights. I really love having good daylight in the shop. Some of the windows (one on north side and one on south, in a door) can be left open during a rain because they are sheltered. It is terrific to have a breeze through a bug proof screen and not have to run the A/C when there are nice breezes available.
My shop shares the monitored alarm system with the rest of the house and when I trench electricity over to the site of the pole barn, that is in the works, I will extend the alarm wiring over there. There are wireless components but since I prefer to bury the electric run to the pole barn I might as well run the extension of the alarm via wire. By having alarm connectivity to the pole barn I can have light and ventilation without compromising security.
Pat
Is that a security consideration or a justification for the recommendation for oodles of lights?
I like everything on the list except NO WINDOWS. If it is a security consideration put the windows up a little higher and smaller than normal for just a little better security and for more security put bars or security shutters on them or use a monitored alarm system (with fire sensors included.)
Most folks think leaving windows off is a big boost to security but it usually isn't. A chainsaw will make an impromptu door of truck size in about a minute in most buildings. Steel building? No sweat, you can buy a gas operated saw at HF that will open up a truck sized hole is well under a minute. A sledge hammer will open most doors with expensive security locks in under 10 seconds.
If the concern is "out of sight out of mind", if the "bad guy" can't easily see your goodies through the windows he won't be motivated to break in then put the windows up higher out of the line of sight. You will still get ventilation and light. Higher is better protected from rain and you can have ventilation during a rain. Skylights in the form of translucent panels are a good thing if you really really don't want windows. I have plenty of lights in my shop but also a fair number of large windows and don't always need to switch on the lights. I really love having good daylight in the shop. Some of the windows (one on north side and one on south, in a door) can be left open during a rain because they are sheltered. It is terrific to have a breeze through a bug proof screen and not have to run the A/C when there are nice breezes available.
My shop shares the monitored alarm system with the rest of the house and when I trench electricity over to the site of the pole barn, that is in the works, I will extend the alarm wiring over there. There are wireless components but since I prefer to bury the electric run to the pole barn I might as well run the extension of the alarm via wire. By having alarm connectivity to the pole barn I can have light and ventilation without compromising security.
Pat
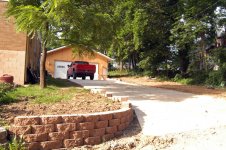
I think I am getting closer to finishing up my garage project. The 1st pitucre is of the well I set with the help of my tactor, leveling out the ground carrying the blocks and back filling.
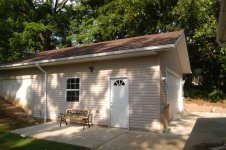
2nd picture is showing the garage and house siding I tried to macth with no luck.
3rd photo is the shot of the yard that had 10 foot mound of dirt just 4 months ago which mytractor dug out and stocked piled then removed. That was a lot of set time.
So the yard was leveled out and raked with my tractor and now seeded and starting to fill in.
As far as window go I have to have them. Got to have the natural light. The garage sets just feet from my house with motion lights and neigbors that watch the area all the time. Being in the city there is a lot more going on but I guess one could have promblems be we never have had yet in 150 years my family has been in the same block.
I am looking into the new door lock that works from a thumb scan instead of a key. Programble for up to 6 people. More of a gagdit than any thing.
We are to have up to 60 mile an hour winds today in Hannibal Mo. I will see if my siding and roof makes it and how well I installed them
Roger
Attachments


patrick_g
Elite Member
roermo, Lookin'n good, man. I nearly broke a sweat just looking at your retaining wall. I can't tell for sure from the pix but those retaining wall blocks look a lot like the ones I used. My wall is about 5 ft tall and 30 ft or so long. The block I used weighed 84 lbs each for the regular ones with two holes in each. The "top cap"course blocks were solid across the top and weighed more.
My little tractor (40HP) couldn't pick up a pallet of them off of the trailer so I had to offload 1/3 of the pallet by hand to be able to pick up the pallet. I parked the pallet on the FEL next to where I was stacking to reduce the effort required and still it was quite a job at 84lbs each.
My instruction sheet called for putting one course in the ground on compacted gravel as a base. I can't tell from your pix what you did or if the top course is solid on top or not but it sure looks good. Nice color. I used plain since it was near a natural color concrete porch slab and other concrete.
Congrats on a nice looking job.
Pat
Pat thanks for the commnets:
The blocks are smaller ones that you used about 25 pounds each with out the whole in the back: Used for walls less then 5 rows. They cant be as large as yours. The wall is only about 2 1/2 foot to 3 at the high side, if that.n I will us a top cap but I am working one on the siding.
My tractor is a 4110 Jd about 20 or 24 horse with bucket and blade. It did though dig out the foundation about 8foot in the back and out about 4ft on the east and and 20 ft on the west. A dirt pile resulted about 10 ft high and 10 wide and 15 long. It did the job and was fun.
Now I am trying to find the right finishing items to get done on the siding. I need 180 ft of j, when I got finish strip for the gable and a few other things.
I still have more blocks to install on the back yard but that job would be 50 ft long and one side 8 ft going to 0. My pocket book is almost bare from the garage.
Again thanks for checking the progress.
Roger
Sat. & Sun got the two largest side of the garage sided. Only the back and west side to do which the walls are 80% burried in the ground. No ladder work I can almost reach the peak in the back staning on the ground. Yeah.
The tractor is almost ready to go home. To much building supplies in it right now. This time next week I will be setting on a bench looking back at the project.
Roger
The tractor is almost ready to go home. To much building supplies in it right now. This time next week I will be setting on a bench looking back at the project.
Roger
Attachments

patrick_g
Elite Member
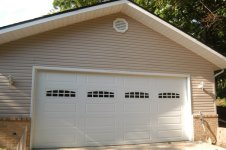
roermo, looking good! How wide is that garage door and what did you use for a header. I've seen metal flashing used between layers of wood to get stiffness for wide spans.
Pat
Pat
