Step by step photos of new garage

   / Step by step photos of new garage
  • Thread Starter
#371  
Pat lets see if I remember right about the build.

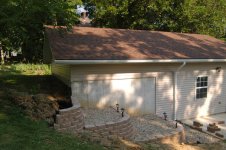
The door is 18 foot wide by 9 foot high. (so my tractor rmops will not hit the header as it did in the basement garage)

The header is a bit wider. made of (2) 2x10 20 ft long with 1/2 inch plywood betwin them screwed and glued, clamped for a week to dry.

I am not sure if that was not the hardest part of the job lefting that up 9 foot in the air and keeping it there until we got it set.

My tractor bucket was used trying to get it up to 9ft but would not reach up that high.

I now whish I went 20 ft door but cose and span kept it to 18. it works though.

Roger
 
   / Step by step photos of new garage #372  
Uh, roger that, Roger. (with apologies to the cast of "Airplane") The important part is you did it and it works. I have used and seen others use (I didn't invent the idea but copied it) a piece of thin steel (galvanized flashing) sandwiched in where your plywood went or in addition to plywood. The metal is tremendously resistant to bowing IF YOU CAN KEEP IT FLAT. To keep it flat you can bolt through the laminated beam with bolts with big washers. These can be counter sunk and holes filled for cosmetics, depending on location/end use.

In the case of an overhead garage door header it is easer to keep the beam from twisting because you can attach/brace to the rest of the structure if you want.

I've never used a glue lam for a header likke that but suppose it would be fine.

My tractor is a little short in the britches too and can just reach to 8'3" which makes it difficult to empty a bucket over the side of a 10 wheel dump. I'm thinking I will be making me a gin pole before I get started on the pole barn. I need to come up with some simple way to attach it to some FEL mounted implement, either pallet forks or bucket. Maybe a socket welded onto the top of the bucket to take the end of the pole and some eyes or hooks at the ends of the bucket to take lines to steady the pole and hold it straight out and an eye or a hook to take the top guy (goes over the spreader and out to the end.)

Pat
 
   / Step by step photos of new garage
  • Thread Starter
#373  
well all the siding is up:

the side shot shows I could all most drive my tractor up on the roof.

The back shot shows the floor of the garage is 8 foot down.

I still have to grade the side yard and build a wall to hold some soil on the east side so the tractor still has some work to do besides cutting grass.

roger
 

Attachments

  • 6 17 07 garage front done 1 small.jpg
    6 17 07 garage front done 1 small.jpg
    265.3 KB · Views: 355
  • 6 17 07 garage side done 1 small.jpg
    6 17 07 garage side done 1 small.jpg
    340.1 KB · Views: 334
  • 6 17 07 garage bake done small.jpg
    6 17 07 garage bake done small.jpg
    325.6 KB · Views: 331
   / Step by step photos of new garage #374  
Wow Roermo... that looks fantastic!!

Of all the pictures you have posted, I like the one with you on the tractor in front of the garage with the door open... way to go... and I mean it.
 
   / Step by step photos of new garage
  • Thread Starter
#375  
thanks ultrarunner, when the wife wanted to take a picture of the gargae and myself thats all I could think to do, woow and a sie of relief. It has taken me almost 7 months to build working on the week ends and evenings. It has been fun and a large learning experience and a lot of fun.

Thanks for viewing.

Roger
 
   / Step by step photos of new garage
  • Thread Starter
#376  
well on this fine sunday found yet another use for my tractor. Hauling the blocks and gravel to make my retaining walls on the east side of the garage.

Its fun to work on your project using your best tool.

Roger
 

Attachments

  • 1.jpg
    1.jpg
    316.1 KB · Views: 276
  • 2.jpg
    2.jpg
    270.7 KB · Views: 238
  • 3.jpg
    3.jpg
    278.8 KB · Views: 229
  • 4.jpg
    4.jpg
    267.7 KB · Views: 221
  • 5.jpg
    5.jpg
    306.5 KB · Views: 253
   / Step by step photos of new garage
  • Thread Starter
#378  
thanks mickman, I am trying to get this done before next week when we have 3 family members having one big birthday party in the back yard.

Only about 90 to 140 blocks to go.

Roger
 
   / Step by step photos of new garage #379  
Roger, Your blocks may be lighter than mine but they aren't THAT light. IT makes me sore thinking about it. Be careful with all that lifting and turning.

Pat
 
   / Step by step photos of new garage
  • Thread Starter
#380  
Ok folks; hope I can get yet again some good ideas like I have in the past on this project. ????????

I’ am just sprucing up around the new garage and house. I came across a problem with the grading of the yard. The drive has a few elevation issues. I thought I had it under control that was my 1st mistake. (see picture ground 2.) As you look from the street to the garage the left had side has a wall holding back the yard, which is higher than the drive. That works fine. The trouble is on the right side (see picture ground 1)the yard is level with the driveway and slopes to the drive and mud crosses it at an angel, then runs to the street. I want to try to get the water to stay in the yard and to the gutter not across the drive.

The way I see it is to remove 4 inches or so back to the right to the edge of my property, sloping it away from the dive. The only trouble is the street falls from right to left and has to leave some time. On the right side of the drive the neighbor ground is higher and there is a trough that diverts his water to the street. I cannot cut it out, so I would in a since have a berm there and my yard sloping to that berm. But I do not think I have enough height on the drive to does.

The other idea I have is to bring the block wall all the way down the drive. Which I can then back fill away from the drive.

Do any of you have any ideas? My tractor is game for more work

The 3rd and 4th pictures are of the almost finished terraces wall with out the capstone in place, which I am not sure I am going to spend the extra money for.

Once again thanks all for your ideas and viewing the project as I finishes up on this adventure.

Roger
 

Attachments

  • ground 2.jpg
    ground 2.jpg
    303.7 KB · Views: 229
  • ground 1.jpg
    ground 1.jpg
    394.5 KB · Views: 190
  • wall 1.jpg
    wall 1.jpg
    308.3 KB · Views: 252
  • wall 2.jpg
    wall 2.jpg
    326.1 KB · Views: 192
  • wall 3.jpg
    wall 3.jpg
    314.1 KB · Views: 194

Tractor & Equipment Auctions

2003 Walk-Behind Automatic Seed Spreader (A54811)
2003 Walk-Behind...
JOHN DEERE 9650 COMBINE (A51247)
JOHN DEERE 9650...
2017 POLARIS RANGER 570 4X4 PROSTAR UTV (A51406)
2017 POLARIS...
ALLISON TRANSMISSION (A53843)
ALLISON...
2010 Ford Edge SE SUV (A51694)
2010 Ford Edge SE...
2022 K-Z Sportsmen 260BHSE 28ft T/A Travel Trailer (A51694)
2022 K-Z Sportsmen...
 
Top