Step by step photos of new garage

   / Step by step photos of new garage #381  
Looks, to me, like it may be time to install a shallow ditch...
 
   / Step by step photos of new garage
  • Thread Starter
#382  
I have been thinking of a shallow cup in the yard oh maybe 6 inches from the drive. Not sure how to make it. My rear blade will angle to the left or right. But I am concerned that I will have wash out later, or would a good stand of grass stop that once planted and maybe some plastic lining the side of the drive and covered with dirt or some type of fabric.

Thanks for the feedback

Roger
 
   / Step by step photos of new garage #383  
I am not sure how it would look but what about that hard plastic lawn edging that comes in a roll. You can put it down along the concrete edge of the driveway and only let it stick up an inch or so. This way the water will have an edge to follow and it shouldn't interfere with your drive or yard. Might be a toe catcher though.

If money is not an object you can tile the yard and have a grate along that side of the driveway for the water to flow into. This would keep your yard level with the driveway and catch all the water (and leaves).
 
   / Step by step photos of new garage
  • Thread Starter
#384  
well got the back fill on the last terrace down. Now I am trying to lower the right side of the yard and use it for back fill in others places..

Note the tractor with the deck off. Love to have the space.

Roger
 

Attachments

  • 3.jpg
    3.jpg
    312.8 KB · Views: 382
  • 4.jpg
    4.jpg
    344.2 KB · Views: 349
  • 1.jpg
    1.jpg
    264.5 KB · Views: 349
   / Step by step photos of new garage #385  
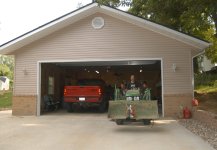
Roger, Lookin' good, man! Cap stones are not just an extra expense but without them you can plant strawberries in the hollows of the top course and let the plants creep into the flat areas as well as drape down the face of the wall. If you are allergic to strawberries there are lots of plants that would look good in those hollow blocks.

There are edging blocks that are made with an "L" shaped cross section. They are intended to be placed as borders around flower beds, trees, etc. The horizontal part is aimed toward the "outside" and set low enough to let you mow over the horizontal part. If you used those to edge your drive you would have a small dike (the vertical part of the edging blocks) to prevent water from crossing the drive from the high side next to the neighbor's property across to the low side.

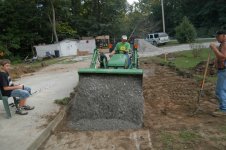
You could trench along side the drive (FEL will do it) and fill the trench with septic gravel or similar (you can top with river rock or ornamental stone if you don't like looks of gravel) This gives the water coming to the uphill edge of the drive a place to fall in and be conducted to the end of the drive. A filled ditch/dry well is not a hazard to navigation for anyones feet or an errant vehicle's wheel. Once in a while you will need to clear the debris from the top of the gravel.

If you want to get fancy you can bury a perforated drain pipe in the last few feet of trench at lower end. This connects to unperforated pipe which goes under the sidewalk and exits through a hole in the curb. You might need a permit. You will need to saw out a small section of the curb and replace it with a section with a hole in it. If you can't shoot a hole under the sidewalk you can saw a 4 1/2 inch wide slice out of it, bury your pipe and patch the hole with concrete. You would want to dowel into the existing sidewalk with rebar and continue the rebar through your little new section so it will never have relative movement.

Pat
 
   / Step by step photos of new garage #386  
Romero, you did a very good job on the garage and have kept a lot of members busy reading you posts for a year? Anway, when you get all done have you thought about putting up a website with all the pictures and explanations of how you went about the build. I know it will take a while,and winter will be here,but having one place to go to to see all this information and your process would be very nice.I'm sure some of us here will even help with the website,I will.:)
Thumbs up, Romero.
 
   / Step by step photos of new garage
  • Thread Starter
#387  
patrick_g Thanks for the info you gave me many good ideas for the end of the drive and how to control the water. Now I am going to have to hustle and work on it before the next rain. Which is tonight they say.

Bones 1: Thanks: uou have a good idea. I think I had a late night thought once of putting on this thread a few before and after pictures, but a site linked here would be cool. What format would be best and a site to host. I have used pbase which is a site like photo bucket. But not built for notes and threads. I have m/s powerpiont. I do host my own web site for my job through my brother so I have the bandwidth but not sure of what software to use. Any ideas.

Thanks


Roger
 
   / Step by step photos of new garage
  • Thread Starter
#388  
Well as you can see in the photo the garage is almost done, workbench installed, an 80 pound 60 year old ceiling fan from my grandfather’s warehouse up and running.

Another way you can tell the garage is 99% finished is now the projects begin. The first project was to come up with an idea that would make leaf blowing more easier. Take a look at the picture of the tractor blower prototype.

Thanks to all that have viewed this thread and gave help and ideas.

Roger
 

Attachments

  • 1.jpg
    1.jpg
    409.3 KB · Views: 281
  • 2.jpg
    2.jpg
    608.5 KB · Views: 249
  • 3.jpg
    3.jpg
    370.8 KB · Views: 245
  • 4.jpg
    4.jpg
    838.6 KB · Views: 268
   / Step by step photos of new garage
  • Thread Starter
#389  
An important update:

The wife approves of my now finished garage. Cable TV, phone, and wireless internet now up and running.

She made one comment that scares me, she said the only thing now missing is a bed and bathroom. Now I might have to do a real big honey do. I think I better behave myself too.

Roger
 

Attachments

  • 1.jpg
    1.jpg
    473.5 KB · Views: 234
   / Step by step photos of new garage
  • Thread Starter
#390  
Well it was bound to happen, the garage bug bit yet another person. My brother in-law (the contractor) that helped me build my garage is now helping our other brother in law build his garage.

Well he called in the favor to have me come down to brother in law 2's home to cut the sod off and dig down about 6 inches. Move the dirt over and spread the gravel for the base of the carport, then the base for the side walk.
And next week I get to go back and try and push over all his old outbuilds so he can demo them on the ground. (fun)

This time working on a garage/ carport I get to set and play on the tractor while others work and pay for the gararge / carpot.

I still get a kick out of what sub-compac tractors will do.

This week I am going to post a few last pictures of before and after shots of my garage. How does one post so that the photos show up with out clicking on a link, in other words they are just there in the post.

Roger
 

Attachments

  • 1.jpg
    1.jpg
    308.9 KB · Views: 201
  • 2.jpg
    2.jpg
    288.5 KB · Views: 190
  • 3.jpg
    3.jpg
    109.1 KB · Views: 200

Tractor & Equipment Auctions

3 - RIDGID THREADERS (A53843)
3 - RIDGID...
2005 CATERPILLAR 740 - 6X6 OFF ROAD WATER TRUCK (A52706)
2005 CATERPILLAR...
44029 (A51692)
44029 (A51692)
2007 JOHN DEERE 700J XLT CRAWLER DOZER (A52705)
2007 JOHN DEERE...
2014 International DuraStar 4300 4x4 Terex BT3063 63FT 15 Ton Crane Truck (A51692)
2014 International...
2011 FORD F750 XL SUPER DUTY DUMP TRUCK (A51406)
2011 FORD F750 XL...
 
Top