vmaxman
New member
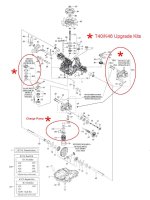
Here are some photos of what it takes to convert a K46 to a K57. I have not included ALL parts needed, just the center case and charge pump assembly. This will give you an idea of what is involved.
Here is a photo showing the main components. Center case up top. New input shaft in the middle. Charge spring is shown bottom left, next is a small plastic piece that is used to help install the charge pump case, charge pump case, outer rotor, inner rotor, roll pins, inner rotor drive pin.

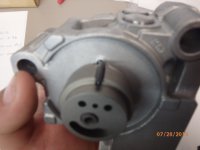
Here is a shot of the center case with new input shaft inserted, and inner rotor drive pin installed. NOTE: If you were putting this together, you would want to install the roll pins first

A different angle of the input shaft and rotor drive pin installed.

Inner rotor slides onto input shaft and over drive pin

Charge pump case. Note the two balls get installed before installing it on the input shaft

Charge pump case with outer rotor installed on top of balls

Install assembly on input shaft. Align inner rotor with outer rotor and end of input shaft with corresponding hole in charge pump case

Spring gets installed on charge pump

As noted, the roll pins should be installed in the center case before it is installed in the transmission. Due to the input shaft being offset where it enters the charge pump, it will only line up properly one way. Just spin the charge pump assembly to line up with the roll pins.

There are many more parts that tuff torq reccommends that you purchase to do a full K46 to K57 upgrade. I am only showing the parts pertaining to the charge pump.
I noticed that the inner rotor and outer rotor have a mark stamped in them on one side. I sent an inquiry to tuff torq asking if it matters which direction the marks face (ie. towards the center case/away from center case...) I have yet to receive a response.
Hopefully someone finds this info useful. I've searched around the net and have not been able to locate anything regarding this upgrade other than a parts list.
Mike
Here is a photo showing the main components. Center case up top. New input shaft in the middle. Charge spring is shown bottom left, next is a small plastic piece that is used to help install the charge pump case, charge pump case, outer rotor, inner rotor, roll pins, inner rotor drive pin.
Here is a shot of the center case with new input shaft inserted, and inner rotor drive pin installed. NOTE: If you were putting this together, you would want to install the roll pins first
A different angle of the input shaft and rotor drive pin installed.
Inner rotor slides onto input shaft and over drive pin
Charge pump case. Note the two balls get installed before installing it on the input shaft
Charge pump case with outer rotor installed on top of balls
Install assembly on input shaft. Align inner rotor with outer rotor and end of input shaft with corresponding hole in charge pump case
Spring gets installed on charge pump
As noted, the roll pins should be installed in the center case before it is installed in the transmission. Due to the input shaft being offset where it enters the charge pump, it will only line up properly one way. Just spin the charge pump assembly to line up with the roll pins.
There are many more parts that tuff torq reccommends that you purchase to do a full K46 to K57 upgrade. I am only showing the parts pertaining to the charge pump.
I noticed that the inner rotor and outer rotor have a mark stamped in them on one side. I sent an inquiry to tuff torq asking if it matters which direction the marks face (ie. towards the center case/away from center case...) I have yet to receive a response.
Hopefully someone finds this info useful. I've searched around the net and have not been able to locate anything regarding this upgrade other than a parts list.
Mike