How does one make a "proper vent" for the brake cover? Anything is better than dealing with this again....
Rick, I am impressed that you used a dead blow and some tricky work to get that thing apart without damage. So I sure don't mind putting some writing time into what to do now. A lot of this is going to be things a guy with your mechanical talent obviously already knows. But it might help someone.
Well, your rust is as bad as any I've seen. The first thing is to have the drum lathed to see if you can get all the pits out. I doubt that one will simply sand out. Typically you can increase the ID of the drum up to maybe a total of somewhat less than the thickness of new pads. But check the cam actuation first - Lathing is an art and removing that much metal to get the pits out, still has to leave you the ability to use half a pad thickness on each shoe. If you go any deeper than that lathing, you will need to find thicker shoes or a different actuating cam - or both. Today that's a problem....Although in the days when mechanics hand-riveted shoes onto pads it was easy to reach on the shelf and grab the next thicker pad material.
I recommend lathing the inside of the drum first, because sometimes the rust forms pits and you need to know what you are going to have for drums. It doesn't take much pitting to quickly eat up a set of new brake shoes. Even worse, the pad material that get imbedded into the pits in the drum causes the brakes to be very "grabby" and tears up the shoe quickly.
Yes, it is sometimes possible to groove the new pads so that they miss the worst of the pitting in the drum! If you can, then do it. ( Oldmechanictrick #whatever)
If you have a problem with the drum pitting or finding good shoes, find out who is doing vintage car and motorcycle brake system work in your area. The shop may be British oriented, or older US. He/she will want your old pads and drum. It is possible to fit riveted pads onto the existing shoes by grinding off the remnants of the old bonded pads and then drilling the aluminum shoes for rivets. Much easier than making new shoes. There are tricks for pitted drums as well. ANYTHING IS FIXABLE. Usually the actuating cam is OK, but sometimes the bore it fits into in the drum cover is wallowed out., Check that, more on that below
The good news is that if fixed properly it will not happen again. New pads every 20 years should be the extent of the problem.
Let me back up a second here... sure we can rebuild it. We can rebuild anything. But I would be strongly tempted to firs see what OEM parts Hoye Tractor has for that YM276D brake system. And go from there. I'd be tempted to replace whatever I could buy with new OEM parts. Those old USA Yanmars are simply that good.
BTW, the YM276D was not a gray market tractor. It was made specifically for the US market and sold here back when Yanmar had dealers in the USA (the first time) - and Kubota not yet competitive. So your YM276D probably never saw a rice paddy. It may be from a flood area though, lots of that these days... Back in the days of the YM276D....way back before Yanmar did that dishonorable, disasterous deal with John Deere....back then YM276D and the YM336D were the flagship tractors of the line. Very nice and very,very expensive. Pricy even by today's standards. There was all kinds of literature is available for both with excellent printing and beautiful illustrations.
OK....finally to venting.... or not. Yanmar couldn't make up their mind on whether to vent that brake cover or seal them up tight. I've seen them both ways on different models. At first on the smaller older models YM135/155/186s and the green painted models like the old 195 Yanmar decided to try to seal up that brake housing so that water wouldn't get in. In those, you will find no vent in the cover, a fairly thick and compressible cover gasket (use silicon seal properly), and the actuating cam had not one but two O rings that fit into a polished bore in the cover. The actuating cam was shimmed for minimal end play, and then held in place with a circlip. If you put that system together and everything is just right, then no moisture can get in. I've taken these apart and there was no water at all.. That's perfection if you can do it. Yanmar rarely got it that perfect. Part of the problem was that Yanmar tended to use a stamped steel cover, no silicon sealer, and not enough cover bolts. So it flexed.
Then on the larger models from about the YM187 on up and on later US models Yanmar went to a heavier cast cover. Yours looks like one of those. It was more rigid, and had more perimeter bolts. But then they had a brain fart, and decided that it needed a little straight thru vent hole - which they put up at the top of the cover....thereby insuring that water thrown by the tire coud get into the brake housing where it would stay forever. Immortal corrosion.
And just to make sure water could get in, they re-designed the actuating cam support so it only had one O ring and the cam actuator screwed into a funky threaded mounting system that just didn't make any sense to anyone.
That's no good. About the best you can do for that system is to improve it. Since it has a vent as well as poor sealing on the actuating cam shaft, you need to also add a drain. And both vent and drain should be of adequate size and shielded somehow so that water has a difficult time getting in but can exit easily. Bascially this means drilling a larger vent, adding a drain hole, (1/4 to 3/8" diameter is my choice) and then using some small gas or plumbing fittings along with some tubing or hose. Now moisture can't be forced in by the tire slinging water or snow, and anything that does get in crossing a creek can drain and dry out.
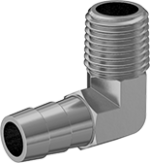
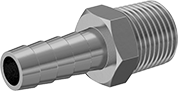
I'm sure you can do better than I did. I modified without much finesse, and rarely twice the same way. The only rule at the time was that everything had to be cheap, durable, available at the local hardware store, and take little time to do. I used to drill the cover both high and low, thread the holes, and put in a right angle brass gas fitting of the 3/8" NPT to barb type. To that, I would either hang a couple of inches of rubber fuel line. That worked.
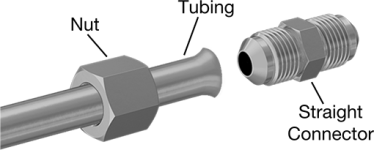
Sometimes if I felt artistic on a friend's tractor. Instead of a barb fitting I would instead use a right angle 3/8" NPT-to-copper flare fitting with a flare nut. Then instead of a few inches of rubber fuel line that could rot, both drain and vent would have a pice of soft copper flared and bent to fit.
Note that whether you use hose or tubing, the end of the fitting that goes into the hole you drill in the brake cover is usually a tapered thread. Get the right tap.
No, I don't think I have any photos. But here are some photos below of parts from an online hardware to give you an idea. Use your imagination.
And while you are at it, do the transmission vent under the seat as well - so vapor can exit the transmission housing but water can't go in. You don't need to add a drain to that system, just a better shielded vent.
Good luck,
rScotty