Domush
Platinum Member
Seeing as the theme of this thread is adding gauges, I figured I would share my recent gauge additions on my 1981 YM336D

I bought the sunpro triple gauge set and a cheapie driving lights kit from walmart.
Here is the final wiring diagram:
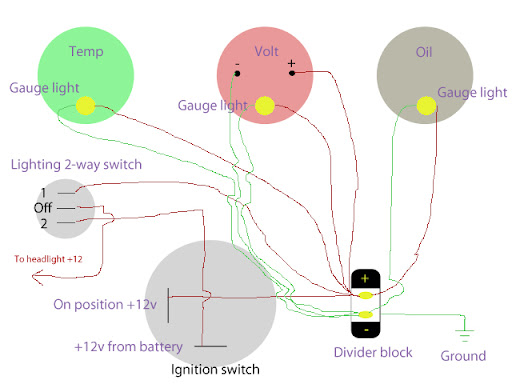
The main +12v going to the key switch is plenty fat enough to handle all of the lights. It is 6 or 8 gauge wire. The on position connection is labelled BR2, if I recall correctly. No idea what BR2 stands for, but that was it.
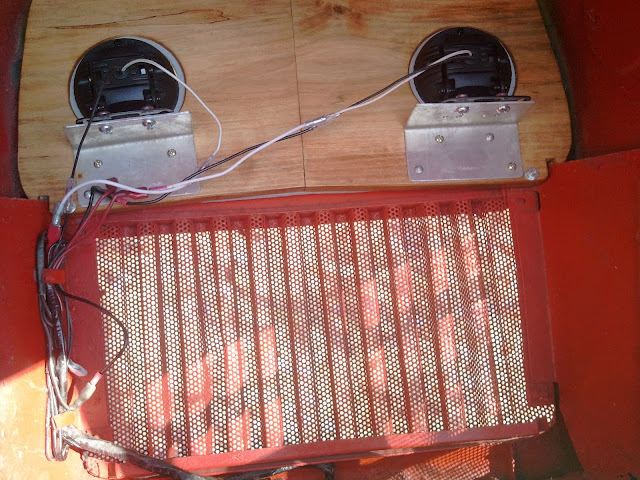
I used a divider block in order to put eye connecters on each wire individually instead of tying them all together in a massive glob of twists and tape. The divider block just floats inside the dash.
At the same time as the gauges, I added new headlights, so the wiring diagram shows how I did that, as well.
As for the oil pressure and temp gauges..
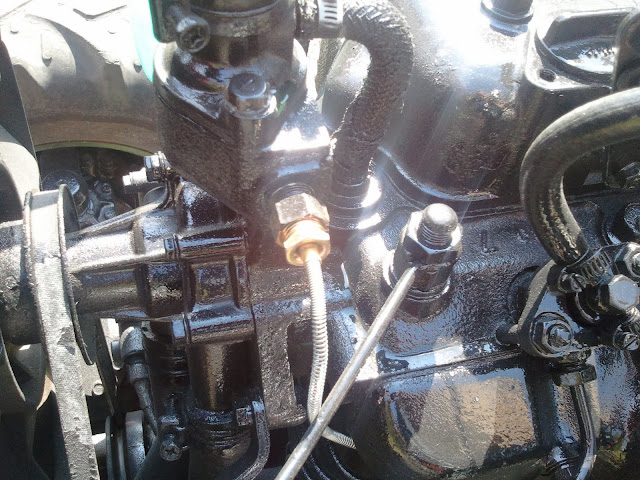
The Sunpro kit comes in SAE only, but they make an adapter kit for metric (which our tractors are). I opted against the metric adapters and simply used a tap and die set to hone the threads of the temp sender to SAE threads. It was simple to do and I don't plan to return to idiot lights.. ever, so going back to metric isn't needed.

At the same time I ordered the sunpro gauges, I also ordered 10 feet of 1/8" OD (outside diameter) copper tubing. The sunpro kit is nice but it includes cheesy plastic tubing for the oil pressure line, which increases the chance of getting cut and spraying you with hot oil (as happened to a member here). The copper tubing is a pain to run, but is doable and just takes some patience.
I didn't even need to re-tap the oil pressure hole, as the threads are so close the SAE fitting screwed in without issue. I used teflon tape on both fittings as a precaution.
As a side note about the copper tubing.. you don't need a bender, just use your fingers as it is easy to bend. Don't use pliers as you run the risk of kinking it which renders it useless.
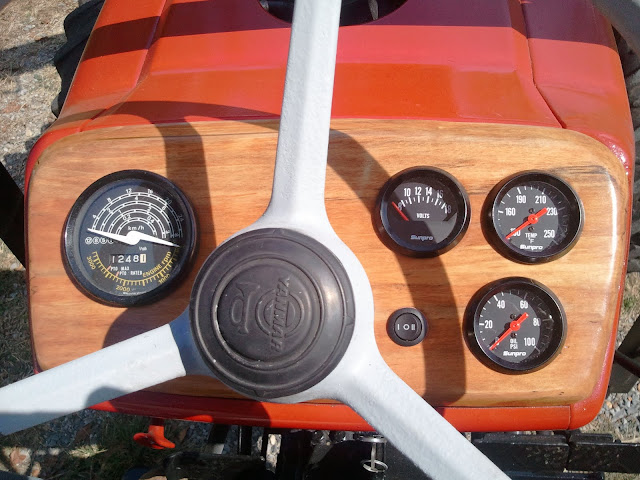
And the finished product, ready to warn me of impending doom at a moment's notice.
I bought the sunpro triple gauge set and a cheapie driving lights kit from walmart.
Here is the final wiring diagram:
The main +12v going to the key switch is plenty fat enough to handle all of the lights. It is 6 or 8 gauge wire. The on position connection is labelled BR2, if I recall correctly. No idea what BR2 stands for, but that was it.
I used a divider block in order to put eye connecters on each wire individually instead of tying them all together in a massive glob of twists and tape. The divider block just floats inside the dash.
At the same time as the gauges, I added new headlights, so the wiring diagram shows how I did that, as well.
As for the oil pressure and temp gauges..
The Sunpro kit comes in SAE only, but they make an adapter kit for metric (which our tractors are). I opted against the metric adapters and simply used a tap and die set to hone the threads of the temp sender to SAE threads. It was simple to do and I don't plan to return to idiot lights.. ever, so going back to metric isn't needed.
At the same time I ordered the sunpro gauges, I also ordered 10 feet of 1/8" OD (outside diameter) copper tubing. The sunpro kit is nice but it includes cheesy plastic tubing for the oil pressure line, which increases the chance of getting cut and spraying you with hot oil (as happened to a member here). The copper tubing is a pain to run, but is doable and just takes some patience.
I didn't even need to re-tap the oil pressure hole, as the threads are so close the SAE fitting screwed in without issue. I used teflon tape on both fittings as a precaution.
As a side note about the copper tubing.. you don't need a bender, just use your fingers as it is easy to bend. Don't use pliers as you run the risk of kinking it which renders it useless.
And the finished product, ready to warn me of impending doom at a moment's notice.
")

