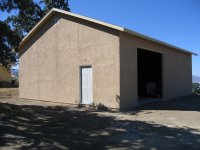
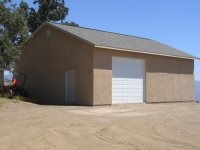
Close to starting my Workshop

   / Close to starting my Workshop #31  
I had one question. The breaker box that you are using appears to be set up to run a generator, or power from the grid. Are you going to have back up power, and what is the voltage gauge for on the panel. I have not seen one like this before, and I am going to be upgrading my house/garage, and I have to keep a generator for backup power here in the North East because we tend to lose power over the winter, sometimes for several weeks when we have a bad snow or ice storm. Thanks, and the project really looks great!
I think you are referring to the picture of my transfer switch that I posted above.

In general there are three (safe, i.e. to electrical code) ways to interconnect a generator to your household electrical system:

1) Whole-house (aka line side) transfer switch. This type of switch disconnects the power company service drop and substitutes the feed from the standby generator. This approach is generally only suitable and cost-effective for large, automated-transfer installations. The key advantage is that power is supplied to all branch circuits in the household. The generator must be sized to support the entire house power load. It also requires interaction with the power company, as the service drop will need to be disconnected and that typically means pulling the meter base.

2) Load side transfer switch. This is the type shown in my picture posted above. This style of transfer switch allows the generator to power pre-selected branch circuits within the house. Individual switches on the transfer panel select either utility power or generator power. These types of panels are generally inexpensive to purchase and install. The downside is that not every branch circuit will get power; so generally you select "important" branch circuits, like the refrigerator, furnace, and so on.

3) Interlock kit. Recently a new style of generator interconnect method has been introduced. Certain brands/types of main service panels accept a sliding plate mechanism called a "generator interlock". The generator feed directly connects inside the service panel on a two pole breaker at the topmost panel breaker cutout. The sliding plate mechanism allows EITHER the main breaker to be on, OR the generator feed breaker to be on, BUT not both. See attached picture. In essence this is a safe, UL-approved method of backfeeding the panel. The primary advantages of this method are that any branch circuit can receive power from the breaker, and of course purchase and installation cost are both low. The downside is that not every panel has an associated interlock kit, and moreover if the panel is currently full of breakers this also leads to complications. BUT if you are doing a new install, it makes sense to pick a service panel that has an optional generator interlock kit -- in the event that down the road you want to install a generator, it is then very straightforward.

Wrooster

ps:
see also
http://www.tractorbynet.com/forums/massey-ferguson-buying-pricing/226166-power-take-off-generator-4.html#post2593656
and
http://www.tractorbynet.com/forums/rural-living/225361-power-take-off-driven-generator-3.html#post2582804

homepgKit01.jpg
 
   / Close to starting my Workshop #32  
Yours looks my shops big brother. Mine is 24x30x10. Very similar in construction, with a few minor differences. I would liked to have gone bigger (bigger IS better) but funds were running low, as we had just completed building a new house. At 720sq ft, mine is well under, but this area of CA has fire codes that require built in fire suppression systems on anything over 1000sqft. As it was I spent about 15K for mine.

I wanted to go 12 high as well, but CA codes also require it to be engineered if over 10ft high. The fee for that was another $1500 I didn't have. I was planning on going 12ft with attic trusses with a knee wall. That would have allowed me to have a 6ft opening in the attic from one end to the other. I ended up with 10ft walls and no knee wall, so my attic opening is 4ftx7ftx30, but that gives me a LOT more storage.

It stuff like Christmas and holiday deco up off the ground and out of my way.

Yours looks like the perfect size workshop.
 
   / Close to starting my Workshop #33  
I think a good idea would be to put the epoxy coating on your floor when you're all done building, it helps keep oil from staining the concrete. Also it makes cleaning up messes a lot easier
 
   / Close to starting my Workshop #34  
I think you are referring to the picture of my transfer switch that I posted above.

In general there are three (safe, i.e. to electrical code) ways to interconnect a generator to your household electrical system:

1) Whole-house (aka line side) transfer switch. This type of switch disconnects the power company service drop and substitutes the feed from the standby generator. This approach is generally only suitable and cost-effective for large, automated-transfer installations. The key advantage is that power is supplied to all branch circuits in the household. The generator must be sized to support the entire house power load. It also requires interaction with the power company, as the service drop will need to be disconnected and that typically means pulling the meter base.

2) Load side transfer switch. This is the type shown in my picture posted above. This style of transfer switch allows the generator to power pre-selected branch circuits within the house. Individual switches on the transfer panel select either utility power or generator power. These types of panels are generally inexpensive to purchase and install. The downside is that not every branch circuit will get power; so generally you select "important" branch circuits, like the refrigerator, furnace, and so on.

3) Interlock kit. Recently a new style of generator interconnect method has been introduced. Certain brands/types of main service panels accept a sliding plate mechanism called a "generator interlock". The generator feed directly connects inside the service panel on a two pole breaker at the topmost panel breaker cutout. The sliding plate mechanism allows EITHER the main breaker to be on, OR the generator feed breaker to be on, BUT not both. See attached picture. In essence this is a safe, UL-approved method of backfeeding the panel. The primary advantages of this method are that any branch circuit can receive power from the breaker, and of course purchase and installation cost are both low. The downside is that not every panel has an associated interlock kit, and moreover if the panel is currently full of breakers this also leads to complications. BUT if you are doing a new install, it makes sense to pick a service panel that has an optional generator interlock kit -- in the event that down the road you want to install a generator, it is then very straightforward.

Wrooster

ps:
see also
http://www.tractorbynet.com/forums/massey-ferguson-buying-pricing/226166-power-take-off-generator-4.html#post2593656
and
http://www.tractorbynet.com/forums/rural-living/225361-power-take-off-driven-generator-3.html#post2582804
homepgKit01.jpg

Thanks so much for the advice, that will be extremely helpful. I only have a wire for my dryer plug, and I know that this is a very dangerous method for lineman, so I have not used it, even with the main breaker off, I have not wanted to take the chance. Thanks again, that is going to be my next project this summer!
 
   / Close to starting my Workshop #35  
Mitch, You must be confused with a picture someone else posted about his shop. The box i have is just a standard 125 amp service. AS far as one with a transfer switch, that's what I need on my house for power outages. It is a good Idea to have that setup on your place with your service problems. OH! they are roofing the shop as I ans. this post. I should go out and take a few photos.

Thank you, How did the roof come out? Hopefully you can get your window and doors in soon, and then you will be ready to start using it, minus paint, ot siding, and some finish work. It looks great so far!
 
   / Close to starting my Workshop
  • Thread Starter
#36  

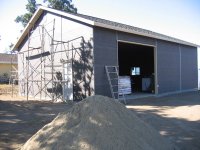
Well, Here it is 11 june and today the stucco guys showed up. They have started on the first coat. The electrical has been going slow since that is my job. Had to help my good friends wife with her move and that took up much of my time. Now that that's over I can work on the shop. Getting the wire through the attic will be hard and hot! Guess that is why I have avoided it,has to get done.The 12'x10'door should show up soon.See Photo of shop with wrap, ready for stucco. Have to go now much work to do.
 

Attachments

  • SEND-7.jpg
    SEND-7.jpg
    762.5 KB · Views: 225
   / Close to starting my Workshop #37  
...Getting the wire through the attic will be hard and hot! Guess that is why I have avoided it,has to get done...

Just think. If you can put it off for another few weeks it will be the middle of July. Then you'll really have some bragging rights for running wiring in the hot attic in the middle of July.
 
   / Close to starting my Workshop #38  
I think a good idea would be to put the epoxy coating on your floor when you're all done building, it helps keep oil from staining the concrete. Also it makes cleaning up messes a lot easier
Just note -- if the floor surface is going to be used to store implements, etc, I think you'll find that it is way too easy to damage the epoxy coating. An errant movement of the FEL bucket, etc, and you'll score the floor. There is no "easy" easy way to fix inadvertently damaged epoxy coat.

Wrooster
 
   / Close to starting my Workshop
  • Thread Starter
#39  
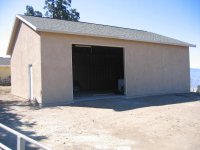
Update,The color coat went on sat the 23rd.The garage door should be installed this wed. WoW, Getting close to having the final inspection.Got the electrical through the attic. Waited for a cool day and it wasn't as bad as I thought. Only installed enough electrical to pass inspection, two outlets on each wall and 4 overhead lights and one exterior light over the walk in door. After the inspection I will install more before the insulation and wall coverings.AS for the floors, I believe I will not epoxy it. Like others have pointed out chipping is not easy to repair. The one last project to the final is to put in a concrete apron to the rear entrance to the back lot. Not quite sure if I'm up to it , so I may call my concrete man back.
 

Attachments

  • Finished Stucco 23 June 2012.jpg
    Finished Stucco 23 June 2012.jpg
    610.7 KB · Views: 172
  • Finished Stucco 23 June 2012 (2).jpg
    Finished Stucco 23 June 2012 (2).jpg
    636.2 KB · Views: 136
   / Close to starting my Workshop
  • Thread Starter
#40  
Hello All TBN people, How can I change the title of this post? Now I'm close to the finish.Today the garage door went in, yesterday It passed the final inspection. Still need to put in a apron in on the back entrance to my property.That may be a new post on cement work. I still have building projects on the inside of the shop. A 12 x 10 office and a storage loft ect.Thanks to all those that responded you all had great Ideas.
 

Attachments

  • Door 28 Jun 2012.jpg
    Door 28 Jun 2012.jpg
    594.9 KB · Views: 157

Tractor & Equipment Auctions

2018 FORD F-150 XL CREW CAB TRUCK (A51406)
2018 FORD F-150 XL...
2013 INTERNATIONAL WORKSTAR 7600 SBA 6X4 DUMP TRK (A51406)
2013 INTERNATIONAL...
2019 Cadillac XT5 SUV (A50324)
2019 Cadillac XT5...
NEW Wolverine Skid Steer Trencher (A53002)
NEW Wolverine Skid...
2010 Ford Edge SE SUV (A51694)
2010 Ford Edge SE...
1998 INTERNATIONAL 9400 (A52472)
1998 INTERNATIONAL...
 
Top