Welding my tractor hood

   / Welding my tractor hood #1  

1930

Platinum Member
Joined
Sep 9, 2018
Messages
933
Location
Brandon/Ocala Florida
Tractor
Kubota B6100E Kubota L 2501 Kubota T1460
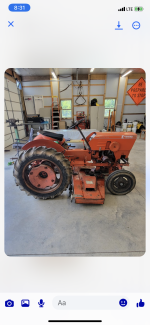
Looking for ideas
I welded autobody for over thirty years, as the years progressed the metal became thinner.
I can weld a soda can but it will distort the can badly.
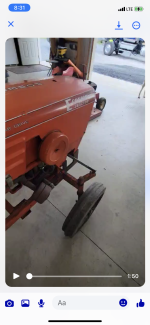
For some reason someone cut section out of my hood, I have another hood that is beat to hell but this area is fine.

I’ll need to cut out a patch, weld it and have the least amount of filler possible front AND back.

I never was a hack, always did good work within reason but working for insurance companies you can’t be Picasso, you rely on fillers that set up quick and sand easy.

Being around the louvers makes me think I should cut out a large section including louvers and replace it all.

I’ve worked with louvers and heat and then body fillers, it typically doesn’t look factory new.

Again I need it to look like it never happened both sides with grinding and possibly a little plastic for porosity holes.

Anyone here have this kind of experience?
 

Attachments

  • 3ADF9A0D-1947-407D-AE3B-038281950B2D.jpeg
    3ADF9A0D-1947-407D-AE3B-038281950B2D.jpeg
    3.6 MB · Views: 261
  • 238D4AB9-9DB9-4150-BA5E-FA36F8069C10.png
    238D4AB9-9DB9-4150-BA5E-FA36F8069C10.png
    4.3 MB · Views: 263
  • E671E1BD-0469-4D2B-9356-F59082E0B471.png
    E671E1BD-0469-4D2B-9356-F59082E0B471.png
    3.5 MB · Views: 267
   / Welding my tractor hood #2  
Can you tack it so it don't heat up then grind it smooth???

willy
 
   / Welding my tractor hood
  • Thread Starter
#3  
Can you tack it so it don't heat up then grind it smooth???

willy
Absolutely but it needs to be welded solid however at some point.
 
   / Welding my tractor hood #4  
Gee, I can weld together 2 aluminum soda cans, ehd to end with NO distortion or a butt weld a tape measure that has failed back together with no warpage...

I suspect you working in a body shop, you used some sort of resistance spot welder and filler or O/A and brazing rod and filler again...??

What you need to do is get proficient in TIG welding with low amperage pulsed TIG and Argon shielding gas. With correct pre prep yopu can weld in a patch and with careful after prep, you will never know you added something. I just did a Kubota hood where the hood had stress cracked through the mounting steel barcketry and progressed into the hood sheet metal itself. A new replacement, unpainted hood was close to a grand. I pre prepped, welded and post prepped this one and had the local bump shop paint it for me (I'm a rattle can person) for half that, all in.

With light light gage ferrous metal, or aluminum or for that matter, any light gage material, TIG welding is the only way to fly. Using the correct Tungsten, filler rod and shielding gas as well as mastering the technique is paramount. Anymore, I find myself using a TIG machine more than even a glue gun MIG for sticking stuff together. Nice thing about TIG welding ferrous materials (steels) is the filler material is inexpensive as well as the Tungsten electrodes and you don't need a fancy water cooled torch, unlike aluminum where to TIG aluminum, high amperage is required and along with high amperage comes specialized equipment like a water cooled torch and specialized Tungsten. The best tihing about TIG is there is really no spatter and no heat warpage if done correctly plus you can employ the filler rod as filler (multi-pass) and eliminate most if not all the filler meterial. I could go on for pages about TIG welding but suffice to say, if you can O/A weld and braze correctly, you are half way there as TIG welding is a 2 hand operation, the big difference is your torch is electrical, not gas and you must keep the filler rod in the shielding gas envelope at all times. TIG welding takes practice to master and I always say, the best primer to TIG welding is O/A welding and brazing.

Modern TIG machines have come a long way with the advent of IGBT machines and digital controls. Even the less expensive IGBT machines come with built in weld parameters so you can literally dial in a process parameter and weld with them and you can buy a cheap Oriential machine that will do everything you require for well under a grand. Of course you'll need inert shielding gas and a regulator as well as consumables like Tungsten, cups and gas lenses for the torch as well as an amperage controller but most of those acessories will come with a machine anyway. Of course the old 'stacking dimes' TIG weld beads come with practice. Nice thing about TIG machines is, if the material conducts electricity, you can weld it, control the heat and minimize the warpage. Besides, it's fun...
 
   / Welding my tractor hood #5  
Keeping mind I know nothing about welding but am into cars. Someone I know who restores cars and does his own bodywork says he just welds a short bead, then moves to another area, welds a short area, and so on. This keeps any one area from getting to hot. You probably already know this though.
 
   / Welding my tractor hood #6  
Looks to me like you can tack weld that thing in there, letting it cool as you go, and tack as you go, to fill it in, then grind it, and finish with a skim coat, sand, and paint.
 
   / Welding my tractor hood #7  
Keeping mind I know nothing about welding but am into cars. Someone I know who restores cars and does his own bodywork says he just welds a short bead, then moves to another area, welds a short area, and so on. This keeps any one area from getting to hot. You probably already know this though.
Of course the unanswered question is welds with what? in Reality, you have 5 distinct processes you can use. MIG, TIG, O/A, SMAW and fusion welding. All have pluses and minuses. Having said that, heat and resultant warpage will always be the issue on light gage materials and of course how much post weld prep prior to finishing, you want to do or feel comfortable with.

Sort of like using Bondo as filler versus lead. Anyone can slap on Bondo, not anyone can use lead as a filler.
 
   / Welding my tractor hood #8  
One thing I have a habit of doing when I look at a used anything is, I like to run a magnet over the sheet metal in areas I suspect were 'fixed', to see what lies under the paint job. A magnet much like a bore scope when buying a used firearm can make a liar out of the supposedly honest seller and adjust the price accordingly....lol
 
   / Welding my tractor hood
  • Thread Starter
#9  
Of course the unanswered question is welds with what? in Reality, you have 5 distinct processes you can use. MIG, TIG, O/A, SMAW and fusion welding. All have pluses and minuses. Having said that, heat and resultant warpage will always be the issue on light gage materials and of course how much post weld prep prior to finishing, you want to do or feel comfortable with.

Sort of like using Bondo as filler versus lead. Anyone can slap on Bondo, not anyone can use lead as a filler.
I am familiar with stick and have quite a bit of experience with resistance.
I’m only proficient in mig but the intricacies of the welder never mattered to me, I wasn’t paid to do perfect work, I was paid to do a job that oftentimes the manufacturer themselves did very poorly on.
It sounds like I would need a tig welder ( again) and quite a bit of experience to do a standup job so once again I will just do my best with what I have.
There are many things I’d like to make a career out of, welding is one of them and I wish that I had nine lives to do them all.
Thanks for your informative post
 
   / Welding my tractor hood
  • Thread Starter
#10  
Keeping mind I know nothing about welding but am into cars. Someone I know who restores cars and does his own bodywork says he just welds a short bead, then moves to another area, welds a short area, and so on. This keeps any one area from getting to hot. You probably already know this though.
At this point I don’t believe that your friend doesn’t have warpage issues, maybe he knows something I don’t though
Looks to me like you can tack weld that thing in there, letting it cool as you go, and tack as you go, to fill it in, then grind it, and finish with a skim coat, sand, and paint.
Dial the welder down and deal with a poor weak weld, turn it up and deal with it warping.
This has been my experience
Of course I’m sure that some really proficient welders could really dissect the welder and material I am using to weld with but I have no experience with this.
I’ve always used the rolls of mig wire I was handed.
Thanks
 
   / Welding my tractor hood #11  
I've butt-welded a lot of sheet metal in my time. The trick is to skip around and have a hammer and dolly to work the welds. Skip back and forth from the inside of a weld line out. Don't weld the ends first--Not even tacks or you'll trap the expansion and warp the panel. If the panel was large, I used a wet rag to cool down a weld before moving to the next. Welds shrink. Some hammer and dolly work will stretch it back out. Don't be in a hurry.

The pictures below show the hood on the Kenbota as stock and after I added about 13-14" to it (I forget exactly). Absolutely no, none, zero, zip, zilch body filler was used. It's all metal work.

Original auction photo.
Kubota-G3200.jpg


During the build.
Kenbota-1.jpg
 
   / Welding my tractor hood #12  
I am familiar with stick and have quite a bit of experience with resistance.
I’m only proficient in mig but the intricacies of the welder never mattered to me, I wasn’t paid to do perfect work, I was paid to do a job that oftentimes the manufacturer themselves did very poorly on.
It sounds like I would need a tig welder ( again) and quite a bit of experience to do a standup job so once again I will just do my best with what I have.
There are many things I’d like to make a career out of, welding is one of them and I wish that I had nine lives to do them all.
Thanks for your informative post
In reality, if you can gas weld and/or braze, you can Tig weld as well. Onky difference is, when TIG welding, you must keep the filler rod in the gas envelope, at all times and most if not all of the latest TIG welders have built in programs that make setup super easy, they are almost to the point where they can weld for you... And remember, a TIG welder will also run in SMAW mode as well with low hydrogen electrodes so you get a multi purpose machine, in fact, most TIG welders come with a stinger for welding rod.
 
   / Welding my tractor hood #13  
At this point I don’t believe that your friend doesn’t have warpage issues, maybe he knows something I don’t though

Dial the welder down and deal with a poor weak weld, turn it up and deal with it warping.
This has been my experience
Of course I’m sure that some really proficient welders could really dissect the welder and material I am using to weld with but I have no experience with this.
I’ve always used the rolls of mig wire I was handed.
Thanks
It would be a slow process to tack this intermittently and cool it down in between with cold rags and/or time until it is completely welded.

Having been a welder and limo builder in the past, it can be done without warpage, you just need to know your heat and metal, and take it slow. Minimum filler would be needed if done correctly.
 
   / Welding my tractor hood
  • Thread Starter
#14  
I've butt-welded a lot of sheet metal in my time. The trick is to skip around and have a hammer and dolly to work the welds. Skip back and forth from the inside of a weld line out. Don't weld the ends first--Not even tacks or you'll trap the expansion and warp the panel. If the panel was large, I used a wet rag to cool down a weld before moving to the next. Welds shrink. Some hammer and dolly work will stretch it back out. Don't be in a hurry.

The pictures below show the hood on the Kenbota as stock and after I added about 13-14" to it (I forget exactly). Absolutely no, none, zero, zip, zilch body filler was used. It's all metal work.

Original auction photo.
View attachment 3495838

During the build.
View attachment 3495839
Looks good, I will try this when I get to that point
 
   / Welding my tractor hood #15  
Every time TIG welding comes up in a discussion, I think of what a welding class instructor told me. I had drawn one of the "tig booths" as an assignment and went after it like I was on a mission. I got pretty good at it, and got itchy to want to try out one of those new-fangled "MIG Guns"! I carried my latest example of my TIG work over to the instructor (real nice job of welding, I might add) and asked if that was good. He complimented my work, so I asked him if he thought I could take a run at one of those MIG guns. He laid a hand on my shoulder, leaned in and whispered in my ear... "I can teach a monkey to run a MIG gun, so get your tail back into that TIG booth, that is where the money is at"! To this day, you can count one one hand the number of times I have had a MIG gun in my hands.
TIG is great, MIG is faster, and an old Lincoln Tombstone gets used around here more than anything!
David from jax
 
   / Welding my tractor hood #16  
Preface: I am a horrible welder. Full stop, bird poo esque boogers is how I do repairs.

Based on what I see, I'd be tempted to cut all the way back behind the louvers, and do all that as a replacement. That cut is so close to the louvers it's gonna be a helluva time trying to weld, sand, fill, etc. in there.

I've heard of guys clamping copper bars behind the butt weld on sheet metal; it absorbs the excess heat and helps keep the steel cool.

I would say a *thin* coat of body filler isn't anything to be afraid of- skim coatings of good quality material won't be an issue. They make heat resistant versions, flexible versions, whatever you want.

But... this is coming from somebody who is nowhere near a pro at this stuff.
 
   / Welding my tractor hood #17  
I've heard of guys clamping copper bars behind the butt weld on sheet metal; it absorbs the excess heat and helps keep the steel cool.
Yep, except I use copper sheet about 2mm thick. Somebody spilled the secret beans. :)
 
   / Welding my tractor hood #18  
Mig tacks with an unlike metal backing will get the job done. I'd put copper or aluminum, minimum 1/8" thick, behind the sheet metal to help with blow-through. If it is clamped tightly to the weld material it will help with heat dissipation also. Practice on similar sheet metal first, like your beat-up hood. The tacks will need to be spaced out far from each other so as to minimize the heat you put into the metal. You can cool with a wet rag or something else as you go, but patience to let it air cool works too. It would be better to have a step in the sheet metal and overlap the pieces a little, if that is possible. A lap weld will provide more heat dissipation than a butt weld.

Chris
 
   / Welding my tractor hood #19  
you don't need a backing bar, and you don't need a TIG, unless you want a reason to sell the other half on buying one lol.
Go on Youtube, search up Make It Custom, and watch a video called Mig welding with no warpage . Been doing Auto restoration for 40 years, started out doing patches like that with a double nought Oxy-Acetalene tipped torch,fusion welded with the tiniest bit of filler rod, and moved to a Mig for speed later on in life. Having a patch piece from another hood will help, but it looks like it's fairly flat , unless there is a dimple/relief behind the air cleaner..

3 things are most important. Fit must be perfect, spend time there and it will save you double finishing the patch later. It insures the movement warpage is as uniform as possible all the way around the patch.
Control the heat, Carl's trick of using the air nozzle works a treat, I usually just use patience. I've welded in 62 Impala rear quarter lowers in one pass, but the panels were fit so well light wouldn't pass the gap once fitted, and they were tacked every 1/2 inch, and the tacks ground flush prior to the last weld, to stop the panels from reacting differently where the tacks were located ( thicker shrinks up for a given heat as the weld sits on top lifting the weld up).
Practice on some butt joints, get your welder set so the weld penetrates the same amount on the backside and the top, the metal will shrink ever so slightly but not warp up or down, and use a series of tacks to form the bead. Doing a continuous weld sans warping is possible but even I don't do that anymore, as it isn't an everyday task these days, and I'd practice a bit before doing the weld that counts .

Anyways watching the Video will show you the quick and easy way, more easily than I can explain it to you.
 
   / Welding my tractor hood #20  
Absolutely but it needs to be welded solid however at some point.
Sounds like you have plenty of experience to do the job. I would guess as much and probably more experience than me. But that has seldom stopped me from expressing my opinion (like armpits, we all have them, they often stink).
As you know is an enemy anytime you weld. It is a larger enemy with thinner metal as you also know.
1) low heat setting on welder
2) small weld lengths (stitches) and move quick along the piece
3) weld as far from last weld as the piece allows
4) walk away and do something else
to let the piece cool down.
5) grind it smooth.
6) tractors vibrate a lot, in my experience filler easily cracks, consider using JB Weld or some type of epoxy as the filler.
7) do the prep work with sand paper and the paint starting with good primer. May need more filler and sanding after primer dries.
Good luck.
 

Marketplace Items

500BBL WHEELED FRAC TANK (A58214)
500BBL WHEELED...
1981 LINK BELT HSP 8028 (A58216)
1981 LINK BELT HSP...
PALLET OF (20) BOXES OF ARMSTRONG TILE FLOORING (A60432)
PALLET OF (20)...
DOOSAN G25KW GENERATOR (A58214)
DOOSAN G25KW...
2020 CATERPILLAR 299D3 XE SKID STEER (A60429)
2020 CATERPILLAR...
John Deere 7410 (A53317)
John Deere 7410...
 
Top