1969 JD 1020 diesel

   / 1969 JD 1020 diesel
  • Thread Starter
#41  
I think I may have answered my own question.

My block is old. Meaning it was originally machined to have a single o-ring placed in there. So there should only be one step, or o-ring seat (grove) machined into the block.

The reason I asked is due to the fact I am looking at other JD1020 blocks that have multiple grooves machined, and was telling myself "if your block is "supposed" to look like that, then there is no way you are going to be able to fix it".

But if all I need, due to my block being the older design, is one seating surface then I feel more confident I'll be able to fix mine.

See the link below.

This is an older block, with only one seat. Meaning all I need to do is repair mine to look like this? Get the new updated 3 o-ring liners and keep moving forward.

John Deere JD 3.152 Engine Block Good Used T26935 2 Cyl Diesel 1;), 3, 35
 
   / 1969 JD 1020 diesel
  • Thread Starter
#43  
I hope the excerpt below from "Yesterday's Tractors" is correct.

-------------------------------------------------------------------------------------

It's just about always the seals at the sleeve-bottoms. Easy to see once your oil pan is off.

You're lucky you didn't spin your main-bearings and sieze the engine. Often happens when the pan gets water in it. Once it sits, it separates from the oil. Start the engine and the oil pump picks up pure water and the engine is toast.

You won't know what's sleeves you have until you ID the engine block or pull it apart. Look for a casting # or engine serial # tag. You go by that, NOT the tractor serial #.

The early engines - 180 gas and 202 diesel only had one seal per sleeve when new. They were very leak prone once they got to a certain age - and when the leak began, it came like a tidal wave - not slow.

Deere came out with an upgrade kit to convert to a three-seal-per-sleeve system.

Later engines got extra seal grooves put into the block and came standard with three seals per sleeve.

Note that the early "upgrade" sleeves are totally different then the new ones. So, you have to know what you have.

The upgrade kit for older blocks has special sleeves with grooves ON the sleeves since the block has none.

The later engines have sleeves with no grooves since the o-ring seals install into block grooves.

Early block has NO o-ring grooves. Later block has two.

Also note that block pitting is common down in that seal area. Won't usually matter with a three-seal setup installed.
 
   / 1969 JD 1020 diesel
  • Thread Starter
#44  
I will be using "belzona 1111 supermetal" to perform the fix.

-------------------------------------------------------------------------------------

Belzona is fantastic stuff, when we rebuilt the tractor engine, the recesses in the block that the O-rings at the base of the liners sit in had rusted away, resulting in the water running straight into the oil.
We moulded and rebuilt the recesses out of belzona. TBH I was only half expecting it to last more than 5 minutes, but 6 years on its still fine!
 
   / 1969 JD 1020 diesel #45  
That's quite a project you've taken on there PNW. I was wondering if this is typical of the 1020/2020 tractors, the sleeves that is? My 2020 was made in maybe 67 (about when I got married) or so. I did use a 1020 once that a neighbor had and it worked fine, but didn't have the independent pto or the weight like my 2020, it certainly was the little brother to the 2020. I wouldn't mind a larger one, but I don't know why. The 2020 is plenty for what I do, now that I've fixed all the leaks. Good luck with your project and let us know how it works out. Reminds me of when I first rebuilt my Norton M/C back in the 70's.
 
   / 1969 JD 1020 diesel
  • Thread Starter
#46  
Thanks DogT. I appreciate your kind words and encouragement.

Ok everyone, I have gone about to the best of my abilities to patch/fix the cavitation that is located around the liner seats.

I have my new liners and will be trying to go about installing them this weekend.

I have three o-rings. Two black square cut, and one orange round cut. My liners do in fact have grooves on the liners themselves, so I know they are correct for my early style 1020 block.

Everyone states to use dish soap to lubricate the o-rings for installation? Not oil.

Also, I put blue shop rags over the crank while I was cleaning, applying the epoxy, sanding, wire brushing, sanding, etc. I am going to pull the rags off and I want to clean all the debris out that fell down onto the rags/crank etc.
Should install the liners first, then go from under and clean the crank? Or should I clean the crank before I install the liners?

Also what do I clean the crank/main bearings off with? Brake cleaner then compressed air?

Do I have to bring my new pistons to a machine shop to have my old rods installed?


I bought the in-frame rebuild kit from YD tractors (Liners, o-rings, pistons, rings, pins, retainers)
New rod bearings from "Washington Tractor"
Three new pencil injectors
Pan gasket
Valve cover gasket
Head Gasket
Oil and Filter
WP gasket
Coolant

I cleaned the head and will not be taking it in to a machine shop to be decked. The only thing is, is I cannot get the Coolant Temp Sender out of it. Any ideas? She is straight stuck in there.


Any information, tips, anything.
 
   / 1969 JD 1020 diesel
  • Thread Starter
#47  
I have gone about reinstalling the liners.

All three went in after proper installation of the 0-ring packing materials. I followed the install instructions to ensure I was placing the o-rings in the correct places.

Black
Red
Black

I used just basic hand soap as my lubricant.

I placed the liners in each cylinder, and hand pressed them in as far as them could go.

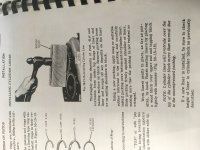
I then used a small piece of 2x4 with a mini sledge to tap/drive the liners all the way into the block.

I used just basic feeler gauges around the circumference of the liner to ensure the liner was seated, and exposed the proper height above the block deck per my JD manuals. It stated .004 as the measurement.

I took my old pistons, placed them in a bench vise and removed the rods from the pistons. I then replaced the rod bearings into the rods using a light coat of engine oil.

The problem is I didn't buy new rod bushings, and mine look beat up. Those will need to be ordered. My manual also states these rod bushings must be pressed in and out. So I will have to take them to a machine shop.

The one question I have is this: in the manual is states "after the rod bushing has been press installed it must be reamed out for a ""THUMB PRESS FIT"". What does that mean?????
 
   / 1969 JD 1020 diesel
  • Thread Starter
#48  
I have gone about ordering the proper rod bushings and have spoken with the local Deere dealer about what clearance I need for them around the wrist pin. The manual I guess means it needs enough clearance to be pushed into place "with your thumb".

I was also able to extract the coolant temp sensor after many days of PB blaster soaking and two of by buddies to help me, while using a 2' breaker bar. Thank god.

So I will get the new rod bushings installed and start the piston install process. I was/am going to be using this video as a good way to go about installing them. Installing a piston into a cylinder - YouTube

I will make sure the piston rings are aligned properly, as well as the oil wiper ring, use a band style piston ring compressor around the piston, and tap the piston down into the liners.

Any advice anyone? Crickets chirping....
 
   / 1969 JD 1020 diesel #49  
It sounds like you are on the right track. My only concern is your description of installing the liners. Did you test fit the liners before installing orings? The liner should fall into place all the way without orings. No pushing or tapping should be required. When orings are installed, just leaning on the liners with your hand pressure should make them slide through the orings.
 
   / 1969 JD 1020 diesel
  • Thread Starter
#50  
I dropped each liner into each hole without packing before final install. But I guess I should have paid more attention, and I misunderstood the manual to be honest.

As for the use of a hammer I thought it was permissible because of the manual. IMG_0123.JPG

Click on the photo, idk why but it always posts the orientation incorrectly, until you click on it to enlarge the image.
 

Tractor & Equipment Auctions

1995 Chevrolet K2500 Pickup Truck, VIN # 1GCGK29F2SE237154 (A51572)
1995 Chevrolet...
2012 John Deere Gator HPX 4x4 Utility Cart (A51691)
2012 John Deere...
2007 INTERNATIONAL 7400 DT466 SFA 4X4X CHASSIS TRK (A51406)
2007 INTERNATIONAL...
2015 International ProStar Truck, VIN # 3HSDJAPR0FN618550 (A51572)
2015 International...
2005 CATERPILLAR D3G LGP CRAWLER DOZER (A51246)
2005 CATERPILLAR...
3 PHASE SEPARATOR (A52472)
3 PHASE SEPARATOR...
 
Top