Snow Attachments Another FEL Attached Snow Plow Project

   / Another FEL Attached Snow Plow Project #1  

Kubota Tee

Gold Member
Joined
Dec 14, 2009
Messages
280
Location
Hudsonville, MI
Tractor
Kubota L5740 HSTC-3, Kubota L3540HST-3 (sold)
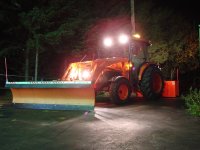
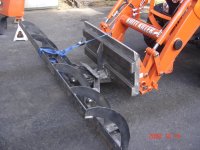
I'm going later this afternoon to pick up a 7.5' Meyer Snow Plow I am buying off of Craig's List that I will be adapting to my Kubota Grand L3540HST tractor. I am also expecting my quick attach plate to arrive later this afternoon after purchasing it earlier this week from ebay. This will be the 3rd QA plate I have purchased from these folks - top notch quality and a great price!

Going into this project I have been researching all the different FEL attached snow plow projects on TBN and I just want to start off by saying a big THANK YOU to all those who have contributed!! I hope I can give back even a small percentage of the knowledge that I gain from all of you.

After doing all my research, I have decided to follow (as close as possible) the FEL Attached Snow Plow project of 4SHORTS. For those of you who have seen his work, you know that it is definitely worth trying to emulate. Not that I will be able to come close to matching his work, but it certainly is a good goal to aim for.

Here is my logic for going with his design:

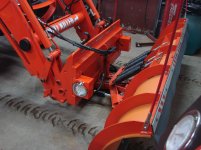
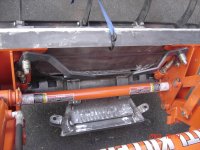
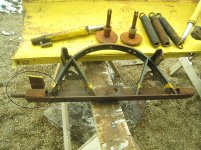
1. Quick Attach versus Frame Mount - after reading all the different arguments on this topic, I really need the versatility of moving the snow around with the bucket. Plus, I am not really worried about tweeking my FEL arms as I will only be plowing my own driveway / road so all the surroundings are well known. In addition, the plow will have the trip springs.

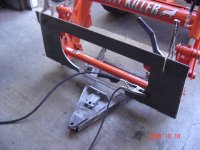
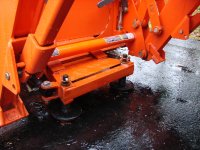
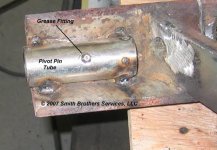
2. QA Mounting - seems like there are 2 schools of thought here. 1-utilize the existing truck mounts and modify your QA plate to accept them so that the plow can move back and forth between truck and tractor or 2-cut off the portion of the A-Frame with the truck tabs and weld it directly to the QA plate. I will be going with the 2nd option since I don't have a plow truck AND this will allow me to move the plow closer to the FEL arms for reducing the load on the FEL arms.

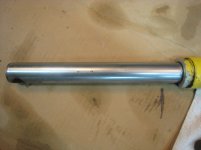
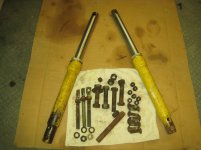
3. Add ons - well, we will have to see how things go. I have set a budget of $1000 for this project (I donate my time, so only materials and outside services) and I will have about $425 into it from the beginning ($300 for the plow and $125 for the QA plate). I will have to pay someone to do the welding for me and there is still a question mark on if I will use the existing hydraulic cylinders or have to purchase new ones. I'd love to add lights, but we will have to see how things go!

So . . stay tuned and I will do my best to document my version of a FEL Attached Snow Plow.
 
   / Another FEL Attached Snow Plow Project #2  
I was thinking of something similar. I am looking forward to seeing pictures.
 
   / Another FEL Attached Snow Plow Project #3  
Good luck. I was eyeing up a plow too but can't spring for another project right now. There's a good deal on a Meyers in Sussex NJ, if anybody is looking for one.
 
   / Another FEL Attached Snow Plow Project #4  
Cool! :cool: I can't wait to see how it turns out and I'm more than confident it will be second to none. If you have any questions you know where I am. Good luck :thumbsup:

Oh and thank you for your kind words on my work :eek:
 

Attachments

  • s5.jpg
    s5.jpg
    468.4 KB · Views: 1,801
  • p13.jpg
    p13.jpg
    275.3 KB · Views: 1,059
   / Another FEL Attached Snow Plow Project #5  
Ya good luck with your project,I did mine about two years ago with an 8ft.curtis on my L4240.You are right keeping as short as you can,mine works but is a little long for tight areas.Can't go wrong copying 4 Shorts design.I would advise to use new cylinders,don't want to crap up your system with old fluid.
 
   / Another FEL Attached Snow Plow Project #6  
Cool! :cool: I can't wait to see how it turns out and I'm more than confident it will be second to none. If you have any questions you know where I am. Good luck :thumbsup:

Oh and thank you for your kind words on my work :eek:

I looked at your thread last year. Any chance you have more detailed photos of how things are welded up. I'm curious how you welded the vertical support for the mounting plate? Front and back.
The easiest thing to do would be make a mount that will accept the original truck mount.

Wedge
 
   / Another FEL Attached Snow Plow Project #7  
I looked at your thread last year. Any chance you have more detailed photos of how things are welded up. I'm curious how you welded the vertical support for the mounting plate? Front and back.
The easiest thing to do would be make a mount that will accept the original truck mount.

Wedge

I went looking through my hard drive and came up with these.
 

Attachments

  • fel1.jpg
    fel1.jpg
    425.7 KB · Views: 1,407
  • fel2.jpg
    fel2.jpg
    607.2 KB · Views: 1,282
  • fel3.jpg
    fel3.jpg
    643 KB · Views: 1,425
  • fel4.jpg
    fel4.jpg
    591.4 KB · Views: 1,181
  • fel5.jpg
    fel5.jpg
    947.7 KB · Views: 1,140
   / Another FEL Attached Snow Plow Project #8  
Ya good luck with your project,I did mine about two years ago with an 8ft.curtis on my L4240.You are right keeping as short as you can,mine works but is a little long for tight areas.Can't go wrong copying 4 Shorts design.I would advise to use new cylinders,don't want to crap up your system with old fluid.

The solution to that is take the hoses off the cylinders, if the rods are extended, push them in (over a pail) with the oil inlet facing down, ie flush them.

No point in tossing perfectly good cylinders when at worse, the hyd filter will catch anything that might have somehow gotten into the remaining oil.
 
   / Another FEL Attached Snow Plow Project
  • Thread Starter
#9  
Hey guys, thanks for all the encouragement on this project. After the dis-assembly work this morning, I really need it! Every nut and bolt fought me the whole way and wow is this thing heavy! I guess I'm just not used to working with this type of equipment other than just hooking it up to my tractor where the tractor is doing all the heavy lifting. Sure does make me appreciate even more all the good work that you guys post on TBN!

The good news with the dis-assembly is that I only had to cut off one bolt, the bad news is that it is the bolt holding the cylinder (see pics). That may just push me to pick up a new pair!

Here are the initial pictures along with a few questions that I have after wrenching on this

Q1: Does anyone know what this extra flange is for on the sector (circled)? Not sure if it was part of the original or if it was added on along the way?

Q2: It looks like I have going to have to rebuild the pivot pin sleeves. I don't think the original had grease fittings - anyone out there every add those to their pivot pins? Pictures would be very helpful!

Q3: The moldboard has a few spots where it is rusted through. I was thinking through the following options and would like to get some advice. 1-repair the existing holes (how?) 2-cut out the moldboard and replace it with another steel one or 3-cut out the moldboard and replace it with a poly moldboard if I can find one to fit this Meyer ST90 model.

Q4: After removing the cutting edge (steel) I discovered it is in fairly decent shape. However I will mostly be plowing my 450' concrete driveway as well as a side drive that is gravel. Should I look at replacing the steel edge with a rubber one? or Poly? What are the major pros and cons of each?

More pics to follow as I continue moving through the rebuild.
 
   / Another FEL Attached Snow Plow Project
  • Thread Starter
#10  
Not sure why the pics didn't show up. Let's try again!
 

Attachments

  • Dis-assembled.jpg
    Dis-assembled.jpg
    984.3 KB · Views: 1,098
  • Sector.jpg
    Sector.jpg
    901.6 KB · Views: 931
  • Cylinder with cutoff.jpg
    Cylinder with cutoff.jpg
    609 KB · Views: 911
   / Another FEL Attached Snow Plow Project #11  
I wouldn't give up on that cylinder yet. Have you ever used a vice and sockets to press out U-joints? have you got an air socket big enough? There are a couple techniques that I think can work.

Use some penetrant and some heat. take the fitting off the cylinder and drain it od oil first. Extend the rod out of it to get the seal away fro any heat, also.

You set the press up right it will go, even if you have to use a bit of persuasion........

Good luck.
 
   / Another FEL Attached Snow Plow Project
  • Thread Starter
#12  
I wouldn't give up on that cylinder yet. Have you ever used a vice and sockets to press out U-joints? have you got an air socket big enough? There are a couple techniques that I think can work.

Use some penetrant and some heat. take the fitting off the cylinder and drain it od oil first. Extend the rod out of it to get the seal away fro any heat, also.

You set the press up right it will go, even if you have to use a bit of persuasion........

Good luck.

Dead Horse,

Thanks for the tip. I will definitely try the vise and sockets trick. Never done that before, but I know exactly what you mean. This also give me a good excuse to mount that new vise that I got for Christmas last year. Still in the box! I just love these projects that lead to other projects!!

Will update you on how it goes!
 
   / Another FEL Attached Snow Plow Project #13  
While its Nice to go New, it can really up the price and a lot of times the rebuilt older unit can be better than the new one.
I'd drive that bolt out, test for function and re-use. The money saved can buy plow lights...or replace any hoses that look bad
 
   / Another FEL Attached Snow Plow Project #14  
Dead Horse,

Thanks for the tip. I will definitely try the vise and sockets trick. Never done that before, but I know exactly what you mean. This also give me a good excuse to mount that new vise that I got for Christmas last year. Still in the box! I just love these projects that lead to other projects!!

Will update you on how it goes!

I know another technique too........ for more "troublesome" press jobs. Don't give up. Even if you have to take the cylinder to a shop that has a hydraulic press, for the few pennies it wil cost to push that slug out you can save that cylinder and like he said above..... PLOW LIGHTS!!!!!!!!!!!!!

:D:thumbsup:
 
   / Another FEL Attached Snow Plow Project
  • Thread Starter
#15  
While its Nice to go New, it can really up the price and a lot of times the rebuilt older unit can be better than the new one.
I'd drive that bolt out, test for function and re-use. The money saved can buy plow lights...or replace any hoses that look bad


Yea, I've been looking up prices on new cylinders, moldboards, cutting edges, etc and this project could easily ramp up in $$$. Not my intention, but I definitely want to do a good job and not have to revisit it for at least a couple of years!

I'll definitely test out those old cylinders if I can ever get the hose off! The fitting is on there really good. I'll let it sit overnight with the penetrating oil working its magic!
 
   / Another FEL Attached Snow Plow Project #16  
Nice project. Like already said - keep working at that bolt. Penetrating oil (or the old ATF/acetone blend) for starters. Soak it in real good. Do you have an air hammer? They can be helpful to shake stuff loose. Even a short-barrel one will do some good and they are dirt cheap at Northern, HF, or even HD (like $20). Next up, heat. Also as previously stated, make sure all the oil is out, and put the piston way down at the other end. Maybe even wrap a wet rag around the far end near the piston to keep it cool as the heat could trash the seals. Then - You have 2 ways to attack this: the slow press option and the BFH. Impact can tend to start breaking things loose. The air hammer or a BFH can do that for you (use a bolt or rod or something as a drift with the BFH). You can build up a lot of strain in a press before something rusted pops. Make sure it won't fly out and kill you.

If all else fails, get out the drill. Use oil, go slow, start small and step up in a few steps and you should be able to clean that out. Once you get it at least partly drilled out, you may have more luck pressing it out. Be as precise as you can with that first center punch as that will set the stage for how good the drilling goes...

And don't forget the anti-seize when you put it all back together...
 
   / Another FEL Attached Snow Plow Project
  • Thread Starter
#17  
Ok,

Here is the update on the cylinder. After our Christmas party tonight I decided to return to the shop and see if I could make some progress. I was able to get the Hydraulic line off and drain the fluid. It didn't look bad at all. It was blue in color, but I assume that is the color of the fluid that was used in the truck pump.

Here's a question for all you hydraulic experts out there. How easily should that cylinder slide in and out? This guy is awful stiff! Does that indicate a problem?

In regards to the bolt rusted onto the cylinder . . . I got my vise mounted up and after a few tries quickly realized that it wasn't going to man up to the job. It's a pretty small vice and I actually started bending the jaws!

I have a friend who has a bulldozer repair shop in town. They replace tracks and use some heavy duty equipment there. I'm sure he can get me out of this jam! I'll pay him a visit on Monday!

Now, back to my earlier questions . . . any responses / advice?
 
   / Another FEL Attached Snow Plow Project #18  
Ok,

Here is the update on the cylinder. After our Christmas party tonight I decided to return to the shop and see if I could make some progress. I was able to get the Hydraulic line off and drain the fluid. It didn't look bad at all. It was blue in color, but I assume that is the color of the fluid that was used in the truck pump.

Here's a question for all you hydraulic experts out there. How easily should that cylinder slide in and out? This guy is awful stiff! Does that indicate a problem?

In regards to the bolt rusted onto the cylinder . . . I got my vise mounted up and after a few tries quickly realized that it wasn't going to man up to the job. It's a pretty small vice and I actually started bending the jaws!

I have a friend who has a bulldozer repair shop in town. They replace tracks and use some heavy duty equipment there. I'm sure he can get me out of this jam! I'll pay him a visit on Monday!

Now, back to my earlier questions . . . any responses / advice?

Thomas if you heat the the thinnest side of the base of the cylinder where that bolts is cut off and cool it right away with cold water it will come out easy enough. Just pull the cylinder up about half way before you apply the heat and you'll have no problem getting that bolt out. I reused my angle cylinders when I did mine. Like some other wise member suggested, just cycle the cylinders by hand to get the old fluid out.

Now when it comes to your question about the cylinders. They are very tight to move by hand. Yes you'll be able to do it but it's not that easy to do. I put a bar in the lower hole (when you get the bolt out) and put another bar in the cylinder hole and while putting my feet on the bottom bar I pull up on the top bar and it will move in and out.

With these angle cylinders just make sure there's no pitting on the chrome and that there not bent. If any of these two are present replace the cylinders.
 
   / Another FEL Attached Snow Plow Project
  • Thread Starter
#19  


With these angle cylinders just make sure there's no pitting on the chrome and that there not bent. If any of these two are present replace the cylinders.

Paul.

Not sure how bad the cylinders have to be before they would need replacing. Here are a few pics of the worst one. I was able to cycle the cylinders a couple of times and there doesn't appear to be any seals that are leaking. They were very stiff, but your technique worked like a charm!
 

Attachments

  • Cylinder.jpg
    Cylinder.jpg
    332.6 KB · Views: 399
  • Cylinder Closeup.jpg
    Cylinder Closeup.jpg
    370.3 KB · Views: 382
   / Another FEL Attached Snow Plow Project
  • Thread Starter
#20  
Took some time to gather up all the nuts and bolts I removed during the dis-assemble so that I can make sure I get the correct sizes on the new ones.

As you can see, I only have 1 pivot pin. The other one is seized up in the sleeve on the sector. From what I have been reading, this is a pretty common occurance on these Meyer ST series snow plows. I am going to have these sleeves cut out and new ones put in with grease fittings so that this doesn't happen again.

I found these pics on the web that shows the new sleeves being installed with grease fittings. I will also add grease fittings to the sleeves on the plow.
 

Attachments

  • sector pivot sleeve.jpg
    sector pivot sleeve.jpg
    46 KB · Views: 451
  • plow and sector grease fittings.jpg
    plow and sector grease fittings.jpg
    36.6 KB · Views: 417
  • Parts 1 (2).jpg
    Parts 1 (2).jpg
    440.6 KB · Views: 360

Marketplace Items

2015 CASE SV280 SKID STEER (A60429)
2015 CASE SV280...
WOODS 3120 BATWING MOWER (A60430)
WOODS 3120 BATWING...
30KW GENERATOR (A58214)
30KW GENERATOR...
2018 ALLMAND MAXI-POWER 45 GENERATOR (A58214)
2018 ALLMAND...
Kuhn FC400RG (A60462)
2011 KENWORTH T370 (INOPERABLE) (A58214)
2011 KENWORTH T370...
 
Top